Slidegenius, Inc.

3D Backgrounds: Adding Depth and Dimension to Your Prezi

What else can you do to enhance your audience’s visual experience? Aside from customizing your prezi, is there any other way to add something more to your presentations? For this week’s Prezi Feature, we take a closer look at 3D backgrounds. 

One of the many advantages of Prezi is the flexibility it offers. Unlike linear slide presentations, the prezi canvas offers vast space for storytelling. With Prezi, you’re free to transition from one point to another and follow any narrative structure you want. You can also add depth and dimension to your presentations. Give your visual metaphors a whole life of its own with 3D backgrounds.

3D backgrounds can give your visuals a more dynamic look. Prezi makes use of “parallax motion” to create a 3D-like effect as you move around the canvas. With this feature, your background automatically adjusts when you transition along the path. If you layer multiple images in the background, you get a cross fade effect as you zoom in and out of frames.

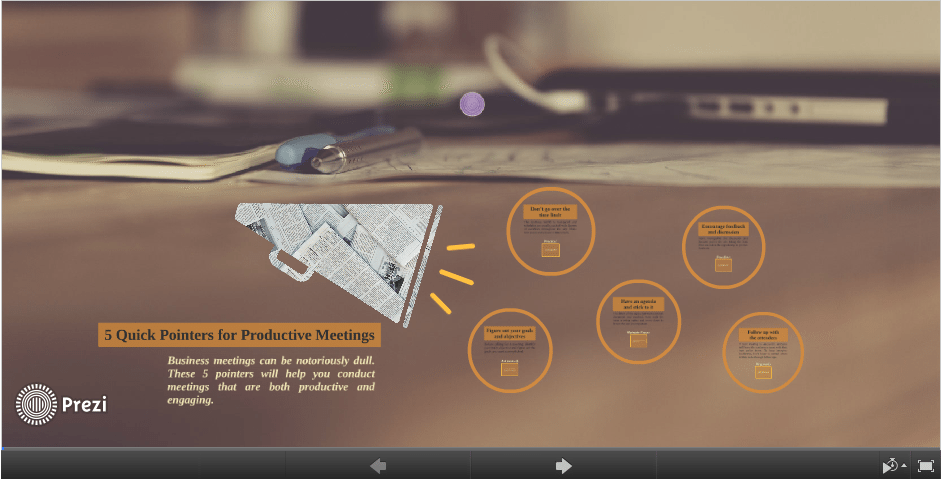
Check this presentation to see how it all works:

prezi 3d backgrounds sample

How do I add 3D backgrounds to my prezi?

3d backgrounds 03

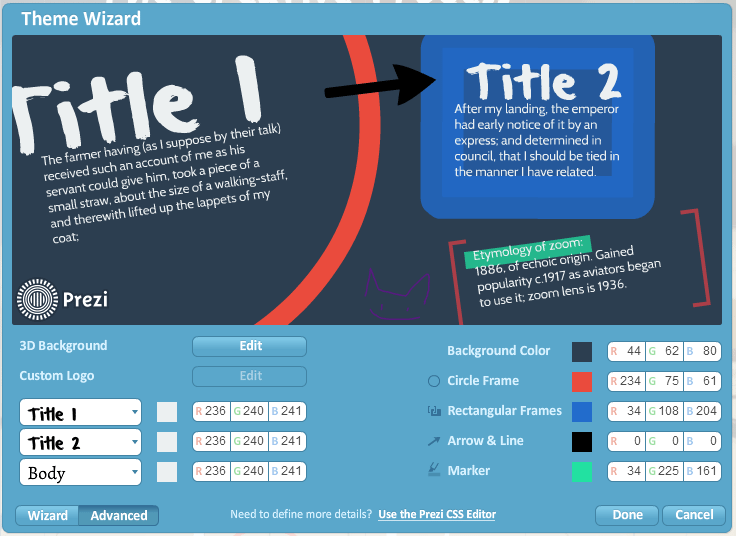
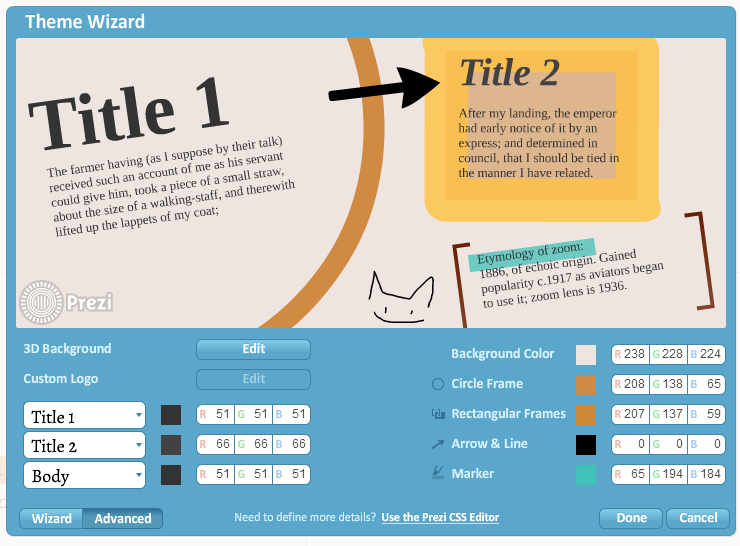
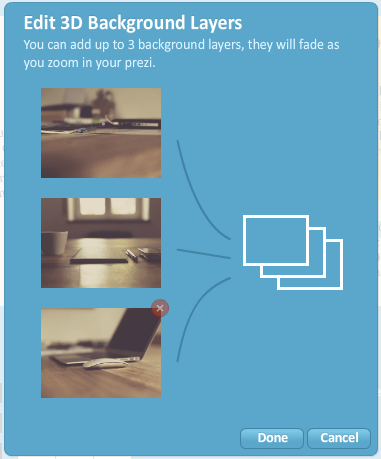
You can add 3D backgrounds through the Theme Wizard. Access the “Customize” sidebar and look for the “Advanced” option at the very bottom. From there, all you have to do is upload your own images via the 3D Background “Edit” button.

3d backgrounds 01

You can have up to 3 different background layers. Drag and drop the thumbnails to arrange them in the order you prefer.

What tips should I keep in mind?

While working with 3D backgrounds, take note of these four things:

  • Image Size: Make sure your image is at least 3000 pixels wide. Any smaller and your background images might look pixelated once you zoom in your prezi. Be wary of your file size, as well. Larger files might cause your prezi to lag or crash. If your image file is too big, Prezi will automatically ask to resize it.

3d backgrounds 04

  • Similar Images: Since the layers change with a cross fading effect, opt for similar-looking images. If you don’t want to distract the audience, any variation between the 3 images shouldn’t look too jarring.
3d backgrounds 05
markus spiske (Flickr)
  • Readable Content: Keep your content readable by working with simple images. In other words, choose images with plenty of white space and aren’t too “busy”. You can also make use of shapes or the highlighter tool to create contrast between your text and background.

3d backgrounds 06

  • Zooming In and Out: When arranging your content, zoom in and out to transition from one layer to another. Try not to place anything in between transitions. Just keep zooming in until the image becomes clear.

3d backgrounds 07

Learn more by viewing this tutorial by Meaghan Hendricks, a presentation designer at Prezi.

Enhance your visual metaphors by showing depth and dimension in your presentations. Experiment with 3D backgrounds and you can improve your audience’s prezi experience.
SlideGenius Blog Module One

We redesign PowerPoint presentations.

Get your free quote now.

get a free quote

Featured Image: Featured Image: Death to the Stock Photo / Prezi logo via Wikimedia Commons

Prezi Design Tips: How to Leverage Your Brand

A company’s brand is an integral part of its identity. For this week’s Prezi feature, we discuss a few ways you can incorporate branding to make sure your presentations stand out from the competition. 

Whether it’s a small business or a multinational corporation, branding is always a process that’s integral to any organization. That’s why it’s important to make sure your brand is in the presentations you deliver. No matter how well-designed, it’s not enough to use stock templates and illustrations. You need to present visuals that highlight your company’s story and experience. If you want to stand out from your competition, branding your presentation is a step you can’t afford to skip.

In Prezi, an easy way to start branding your presentation is by uploading your own custom logo. If you’re either a Pro, EDU Pro, Enjoy, or EDU Enjoy user, you can replace the Prezi logo that appears by default in the lower left  corner.

brand prezi 01
Replace the logo with your company’s own logo by upgrading your Prezi plan.

All you have to do is head to the Theme Wizard by clicking on ‘Customize’ and choosing ‘Advanced’ from the right sidebar. From there, you’ll easily find the “Upload custom logo” feature. You can watch this video tutorial for a step-by-step review of the process.


Of course, uploading your logo is only the first step to fully branding your presentation. After all, the logo is only a single component of your company’s entire brand. You still need to make sure that the rest of your design remains consistent with your company’s core message and identity. To do that, you need to create a prezi that tells the complete story.

Here are some things you can keep in mind when building a presentation to leverage your brand:

Look to your logo to make font and color choices

brand prezi 04
The logo is your first source of inspiration when branding a presentation. (View Prezi)

One of the easiest ways to brand your presentation is by looking to your logo for some quick inspiration. It’s important to keep your integral design elements consistent with the visual representation of your brand. Head back to the Theme Wizard and customize your prezi by choosing colors and fonts that work well with your logo. Your choices doesn’t have to be directly similar. In fact, a bit of variety can add some interest to the look of your presentation. However, keep in mind that the fonts and colors you pick should still be compatible with the overall look of your logo.

Use images that fit your brand’s personality

brand prezi 03
The visuals that enhance your design should be consistent with your brand’s personality. (View Prezi)

You should also make sure that the images in your presentation are a perfect representation of your brand’s personality. You can check this resource to uncover more details about this. Once you have everything figured out, sit down for a quick brainstorming session. List down the words that come to mind when you think of the qualities that make your brand unique. You can then use your list to come up with keywords that will facilitate your search for the perfect pictures and illustrations.

Think of a visual metaphor that describes what you do 

brand prezi 02
Keep your brand story engaging by finding the perfect visual metaphor. (View Prezi)

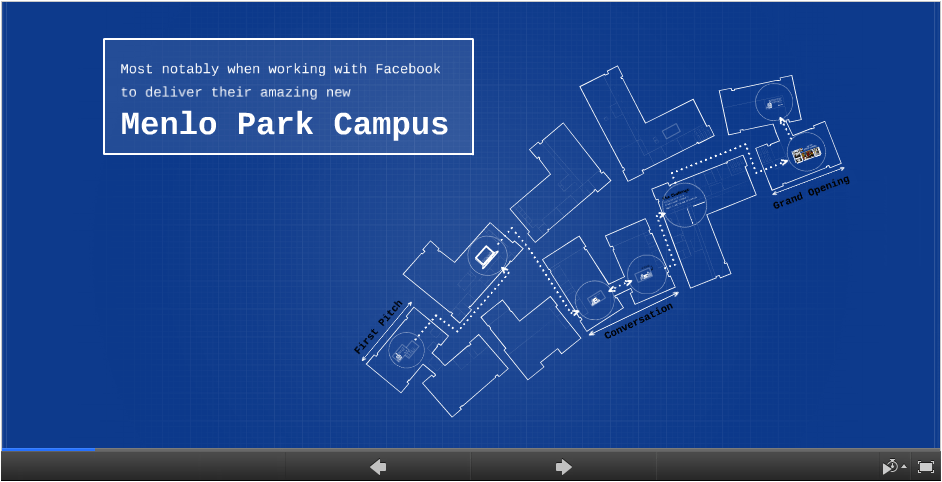
You can also turn your story into a visual metaphor that will give the audience more insight about what you do. Designer Meghan Hendricks created a presentation to illustrate how an architecture firm made use of Prezi to pitch to a big client. In order to tell a story that corresponds to their brand, she used a blueprint as the design’s central metaphor. For your own presentation, think of an object or symbol that perfectly describes the service or product you’re offering. If you want to make sure that your presentation is as unique as your brand, stay away from cliches by taking the time to brainstorm and  hash out your ideas.

Presentations are the perfect opportunity to leverage your brand. Make sure your design remains consistent with your core message and identity by following these tips.


Featured Image: Featured Image: Death to the Stock Photo / Prezi logo via Wikimedia Commons

Collaboration in Prezi: Creating a Cohesive Vision

Technology continues to make communication and collaboration much easier. Share your ideas and collaborate with everyone in your team with a step-by-step guide in this week’s Prezi Feature

A presentation isn’t always a lone endeavor. Maybe you’re working with collaborators on a new project. Maybe you need to ask some people in your team to corroborate the facts and data you have. Whatever the reason, there will be occasions when your work requires close collaboration with others. If you want to make sure that the core message is properly represented through visuals and content, you’ll need to take into account everybody’s input.

Unfortunately, this isn’t as easy as it sounds. The process of collaboration can get a bit tedious, especially when you’re building a presentation deck together. There will be plenty of back and forths between different individuals. Dozens of emails sent. Different versions of the presentation file shared. There are so many steps to go through before everyone can agree on a final “look”. In between those steps, there are a lot  of room for error as well. The process will be so much easier if you can all just sit and work together at one time. But what if there’s a conflict in schedules? Or what if your collaborators live across the country from you?

We often talk about how today’s technology has significantly increased our ability to communicate, specifically in the world of business. You can save a lot of time and effort if you know which tools to use. Speed up the process and see everyone’s input instantly using Prezi’s collaboration feature.

Here’s a step-by-step guide to keep everyone’s ideas clear and cohesive:

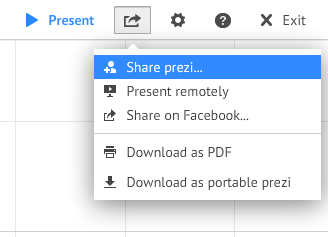
With Prezi’s collaboration feature, you can work with up to 10 different users. While editing your presentation, click on the Share button at the right side of the top menu.

prezi collaboration 02

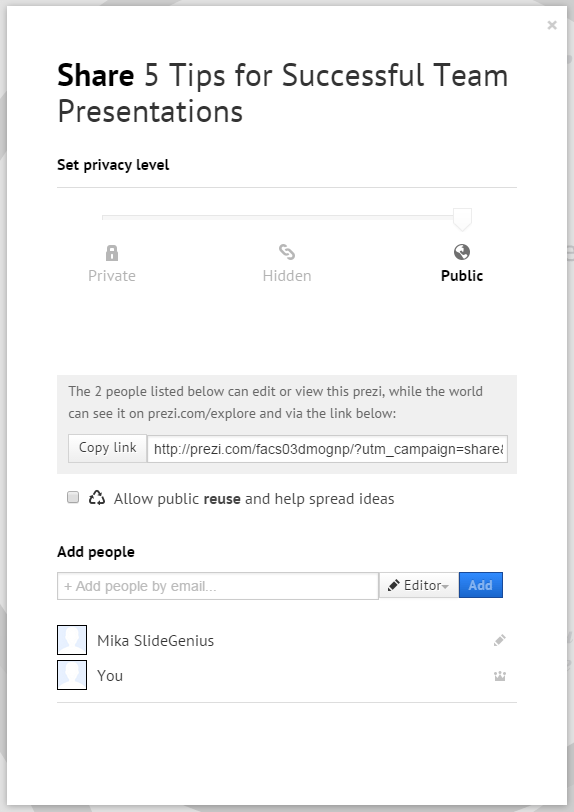
Choosing ‘Share prezi’ will prompt a pop up where you can type down the email address of your collaborators. Prezi will send emails informing them that they can edit the presentation with you.

prezi collaboration 01

From there, it’s as easy as working on your prezi as you usually would. Except now you’re working together with several other people, making your own edits on specific parts of the presentation.

prezi collaboration 03

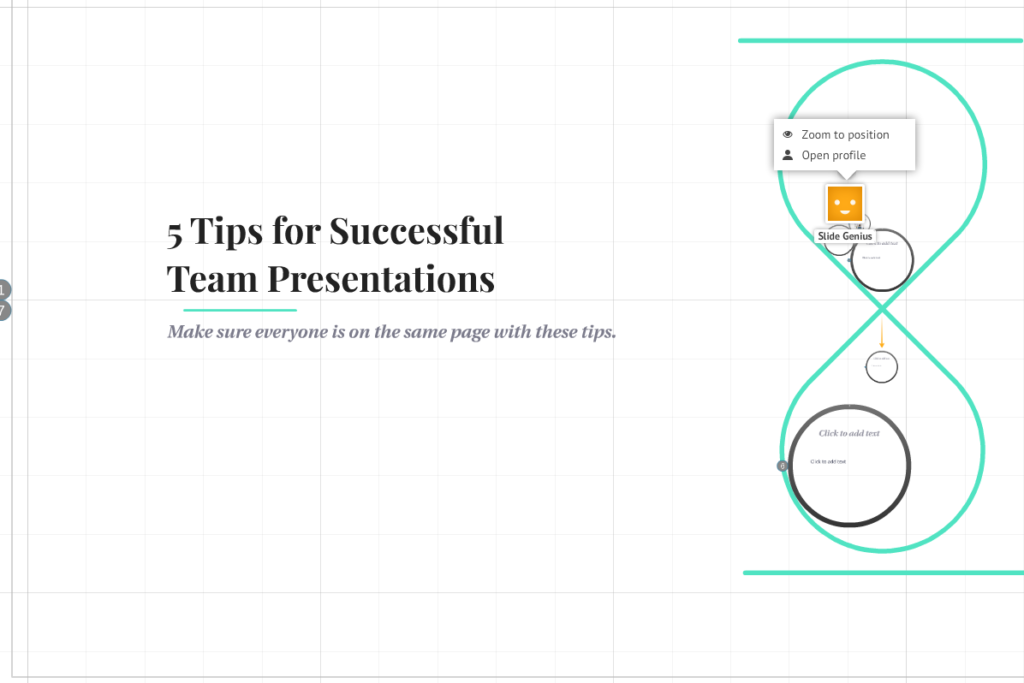
If you want to see which part of the prezi your collaborator is working on, click on their avatar and choose ‘Zoom to position’.

prezi collaboration 05

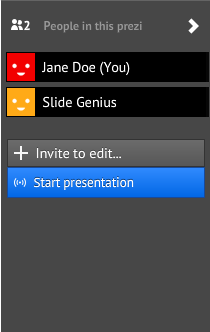
You can also invite other users to join by expanding the sidebar on the right. If you want to review your prezi once everyone is done making their contributions, just click on  ‘Start presentation’.

prezi collaboration 04

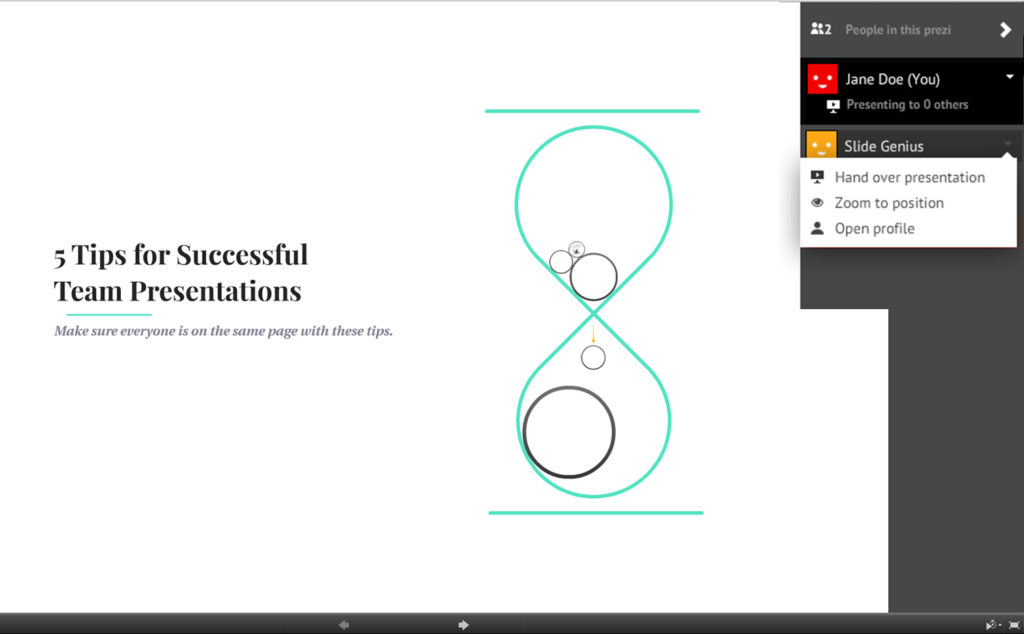
You’ll be the presenter by default, but you can allow your collaborators to take the lead by clicking on their names and choosing ‘Hand over presentation’.

prezi collaboration 09


Collaboration is a crucial part of any project. When it comes to preparing presentations, the old saying “two heads are better than one” is often true. Allow others to share their ideas and contribute to  create a strong and cohesive vision. Creating a presentation involves a lot of creativity and innovation. With Prezi’s collaboration feature, you can combine the best ideas into a single vision.


Featured Image: Death to the Stock Photo / Prezi logo via Wikimedia Commons
Prezi Tips: How to Create Your Own Designs in No Time

For this week’s Prezi feature, we’re going to help you work on a tight schedule. Presentations can take a lot of effort, but you can still come up with original designs by following these 3 time-saving Prezi tips. 

Living in a fast-moving environment, we often have a long list of tasks to finish by the end of the day. Those that require more attention become a lot harder to accomplish. As much as you’d want to focus most of your time preparing for a big presentation, there are plenty of other things you have to do. Sometimes, it’s just not realistic to aim for a perfect prezi.

Sure, great presentation design will take a lot of effort. But if you know how to play your cards right, you can create an amazing prezi in no time at all. The first thing you have to do is to decide on a concept for your design. It may sound like additional effort, but you will be able to work much faster once you know which direction to take your prezi. With a concept planned, the only thing left to worry about is arranging all the pieces together. You can do that easily with these time-saving Prezi tips:

Tip #1: Recycle old content

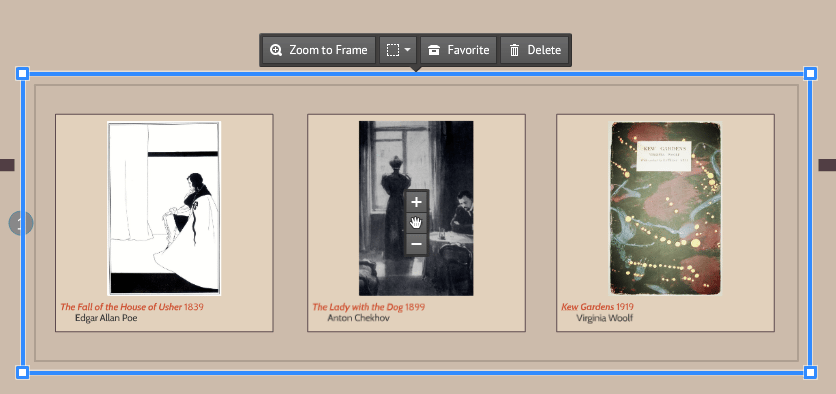
You don’t always have to start from scratch. One of the easiest ways to save time is to recycle your old content and design elements. Prezi allows you to build a library of frames and other items that you might want to use in future presentations. You can easily reuse your favorite content from prezis you’ve made in the past by taking advantage of the My Content feature.

Save your content for future use by selecting it and clicking on ‘Favorite’. You can also right-click on the content you want to save and choose ‘Add to Favorites’.

prezi tips time saving 04

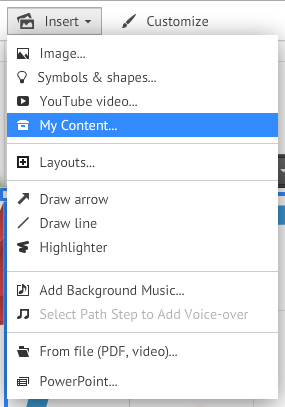
To access the stuff you’ve saved, just click on ‘Insert’ from the top menu and select ‘My Content’. From there, you can drag your content from the right sidebar and drop it right onto your canvas.

prezi tips time saving 05

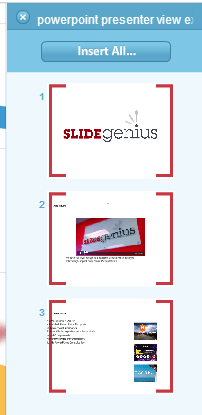
Another thing you can do is use slides from an old PowerPoint presentation. Import your PowerPoint into Prezi through the Insert menu. Select ‘PowerPoint’ and choose the slide deck you want to use. Drag and drop the slides individually or hold shift and double click to insert several slides at a time. On your canvas, these slides will work as frames.

prezi tips time saving 06

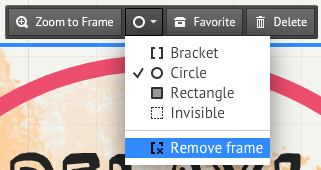
If you want to separate elements within a frame, just click the options button and select ‘Remove Frame’ from the transformation tool.

prezi tips time saving 03

Tip #2: Make use of templates and layouts

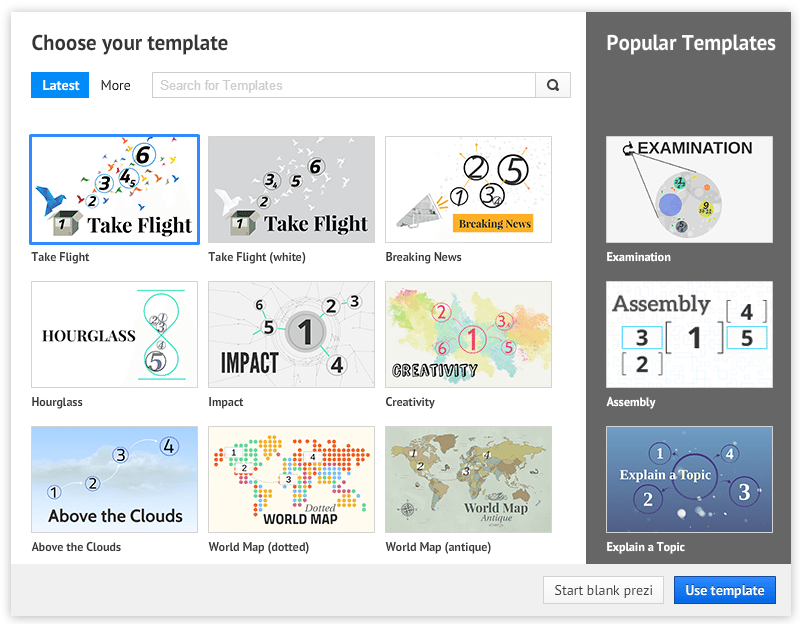
Another way you can save time is by taking advantage of templates and pre-set layouts. Prezi has a huge selection of templates that’s constantly updated, so you always have new visuals to choose from. You can always change up the theme and customize as you’d like. Add your own background or choose a different color palette to make it completely your own.

prezi tips time saving 01

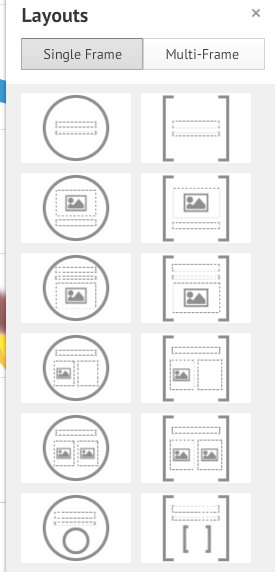
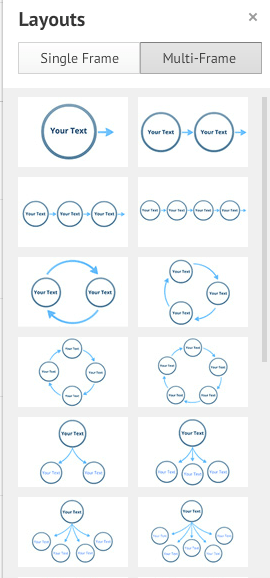
If you’d rather work on your own design, use layouts to skip worrying about arranging your frames and content. From the top menu, click ‘Insert’ and select ‘Layouts’. From the sidebar, you can choose from different single and multi-frame layouts.

prezi tips time saving 08

Tip#3: Enable keyboard shortcuts

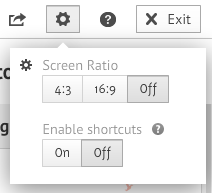
You can skip a few steps by using keyboard shortcuts as you work on your prezi. Click on the cog wheel icon in the top menu and enable shortcuts from there.

prezi tips time saving 02

Refer to this list for a full guide on different editing and presenting shortcuts. Here are just a few that you might find useful:

  • F – Draw frame, press again to change frame type (bracket, circle, rectangle or hidden)
  • L – Load a file on your canvas (image, pdf, video, swf)
  • S – Draw a shape, press again to change shape type (arrow, line, rectangle, circle, triangle)
  • P – Go to Path mode
  • 1 – Zoom in
  • 2 – Zoom out
  • CTRL + SHIFT + C – Opens the Prezi CSS editor
  • CTRL + SHIFT + D – Duplicates and flips your content, creating a mirrored version of your content (works for images and arrows but not text)
  • Esc (Escape key) – Finish current action or close open dialog
  • Space – Enters Present mode
  • Space then 0 – Enters Present Mode in fullscreen

Preparing for a presentation can really be stressful, but you can make it work if you take advantage of Prezi’s many helpful features. Come up with your own amazing designs  in no time with these Prezi tips.


Featured Image: Death to the Stock Photo / Prezi logo via Wikimedia Commons
Extending the Metaphor: 3 Tips for Choosing Images in Prezi

As the old saying goes, a picture is worth a thousand words. For this week’s feature, extend your visual metaphor by carefully curating the images in your design. Take note of these 3 tips for choosing images in Prezi. 

A lot has been written about the role of images in presentation design. Experts always reiterate that adding pictures to your presentations is one of the best ways to get your point across. Instead of filling the screen with a block of text, you can use a single image to highlight the idea you’re trying to convey.

Prezi is already a dynamic presentation tool, but you can still take your designs one step further by choosing the right images. Start by clicking “Insert” from the top menu and selecting “Image”. From there, you can decorate your prezi with pictures saved in your computer or easily search the web for something that perfectly represents your message.

prezi insert image 01

Extend your prezi’s visual metaphor by choosing images that go beyond an aesthetic purpose. Here are 3 tips to make sure that the pictures you use contribute to advancing the story you want to tell:

Use several keywords to find the perfect image

It’s convenient to just choose the first image that pops up, but it doesn’t guarantee that you’ll get the right one. Most of the time, the first thing you see is the first thing other people see as well. If you want to use images that are unique to your prezi, you will have to widen your search.

Find the perfect image by using several keywords as search terms. Broad and less specific keywords will get you images that aren’t too common or literal, but they might also yield results that are irrelevant to your theme. If you can’t find what you’re looking for, re-do your search with a different but related keyword. To make it easier, use a term that you commonly associate with the original keyword.

prezi images tip 1

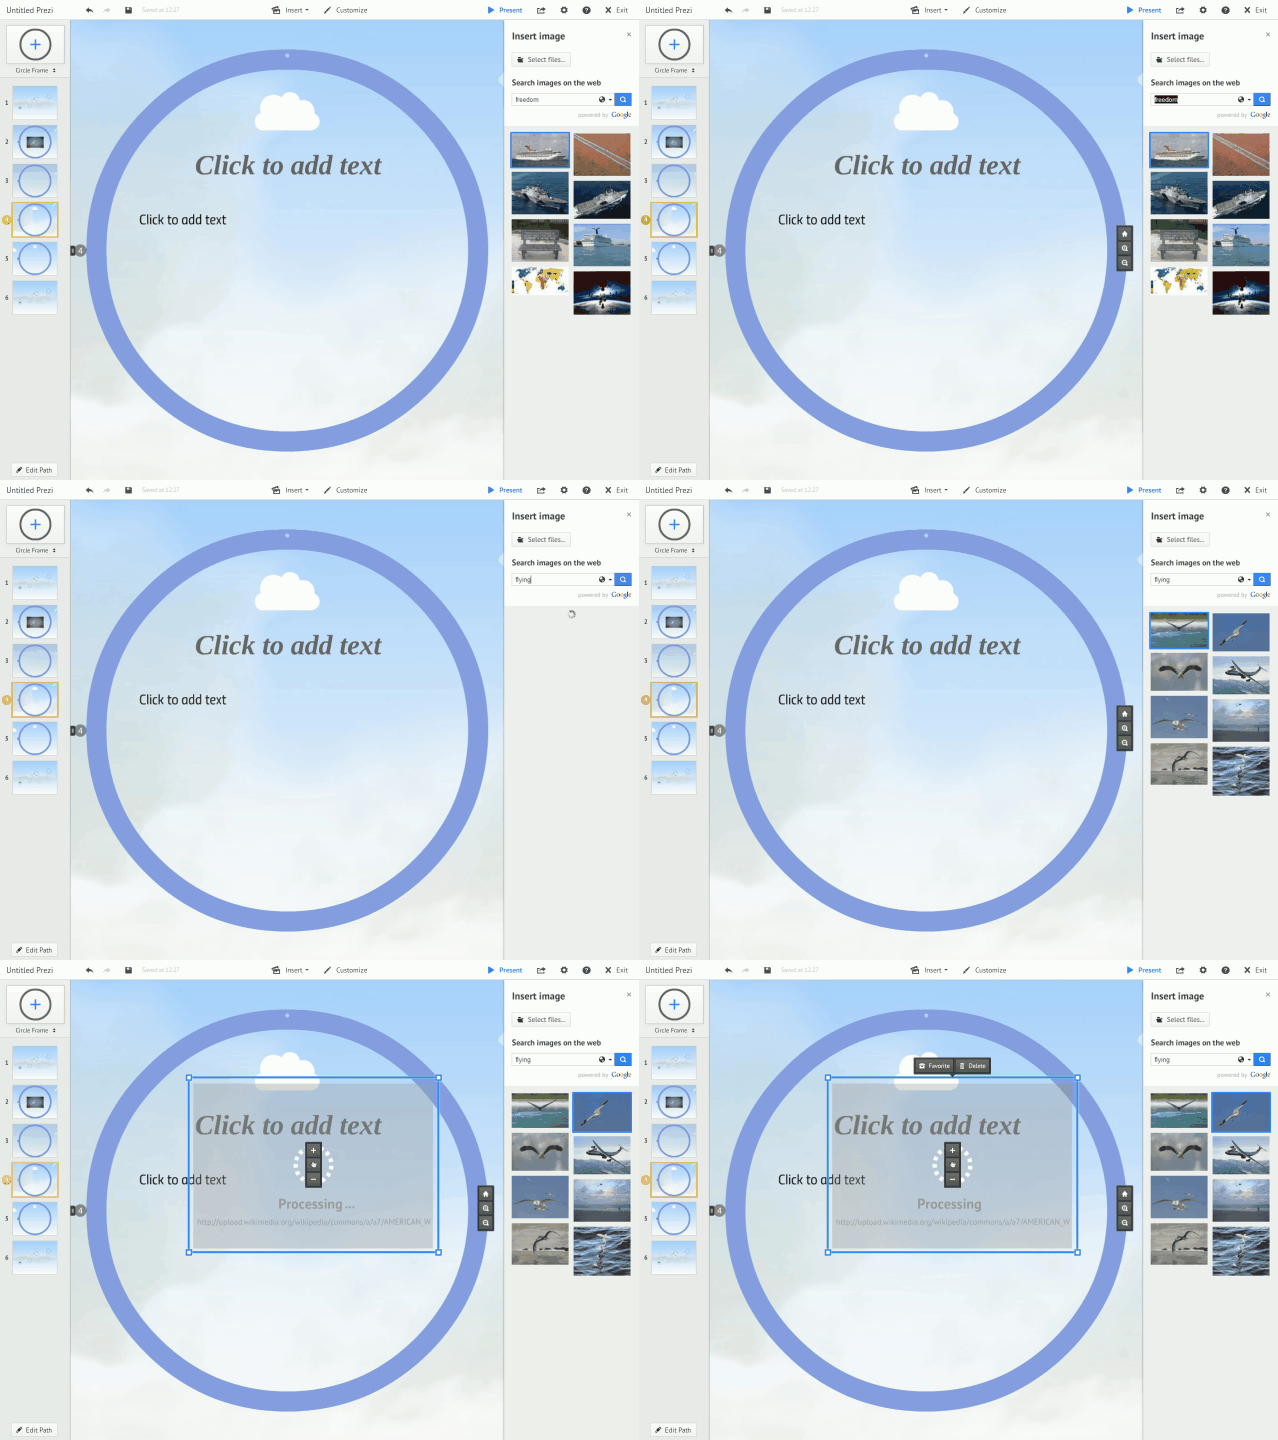
In this example, I tried to search for images around the word “freedom” but couldn’t find one that matched my theme. I searched again using the word “flying” and found an image that works better for the metaphor I’m going for.

Look for images that are simple but poignant

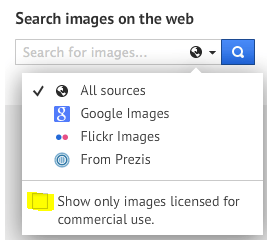
Obviously, the images in your prezi should leave an impact on your audience. Look for ones that depict a strong emotion. Audiences tend to connect with what they find relatable, so try to deviate from overly staged stock photos. If you’re a PRO user, you can extend your search to Flickr. Click on the down arrow beside the search button and adjust the options as you’d like. Just be sure to tick the box that filters out copyrighted materials.

prezi insert image 09

While you’re aiming for drama, it doesn’t mean that you have to go with the most intricate image you find. When it comes to presentation design, simplicity can also be poignant. A picture that’s bold and streamlined is a lot easier on the eyes. Without too many details to distract the audience, it can also quickly attract attention.

Choose an image with plenty of white space. An image that doesn’t have a lot going on will draw focus on only a few elements, making your prezi look less cluttered. White space is particularly important to create balance, which you’ll need if you have plenty of other items in a single frame.

Give all pictures a consistent look with some editing

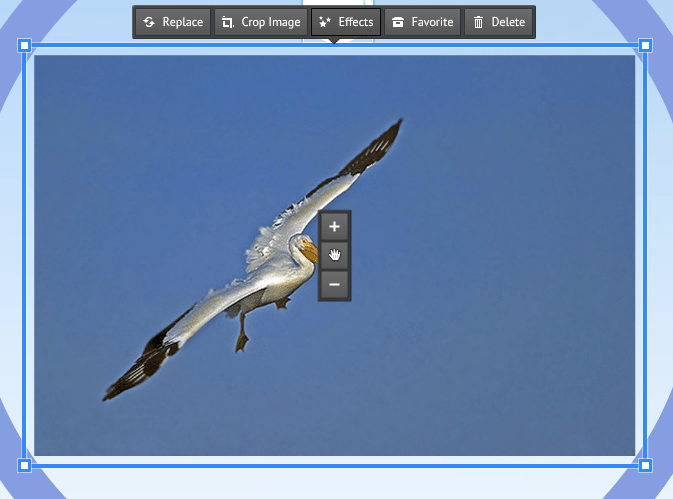
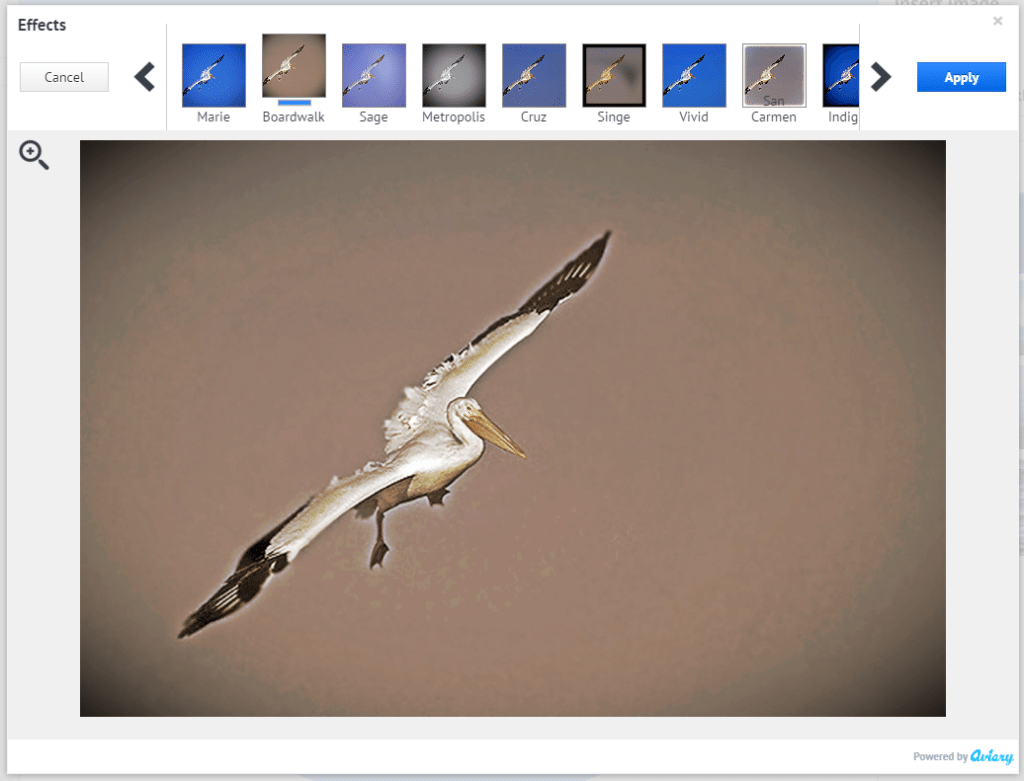
By using several different images, you might end up with visuals that look disjointed and incoherent. To make sure everything looks consistent, take the time to edit and enhance the look of your pictures. Select the image you want to edit and choose “Effects.”

prezi insert image 04

From there, you’ll have access to a photo editor without having to leave Prezi. Make the necessary adjustments and apply the same (or similar looking) filters to achieve a more consistent look.

prezi insert image 06
Your prezi is sure to stand out if you’re careful about the images you choose. It’s not enough that you decorate your presentation with visuals that are aesthetically pleasing. The images in your prezi should also serve a purpose. Extend your visual metaphor by carefully choosing images that are relevant to your core message.
Featured Image: Featured Image: Death to the Stock Photo / Prezi logo via Wikimedia Commons
Multimedia Tricks: 3 Ways to Add More Life to Your Prezi

We’re living in the age of multimedia. Every single day, an average of 60 million photos are uploaded to Instagram. On Facebook, the number is even greater—users are said to post at least 350 million photos daily. Meanwhile, on YouTube, 100 hours of videos are uploaded every minute. In our hyperactive and fast-paced environment, presenting information through text isn’t enough. We all want to see ideas play out through engaging visuals.

Usually, presentations are focused on text, punctuated with with still images that highlight points every now and then. Multimedia presentations differ from this format. Through the use video clips, animation, sound effects, and interactivity, multimedia presentations can give the audience a better visual experience.

Because of it’s dynamic zooming animation, Prezi is already an effective tool for multimedia presentations. However, there are still other multimedia tricks you can try. Here are 3 things you can do to add more life to your prezi:

Use fade-in animation 

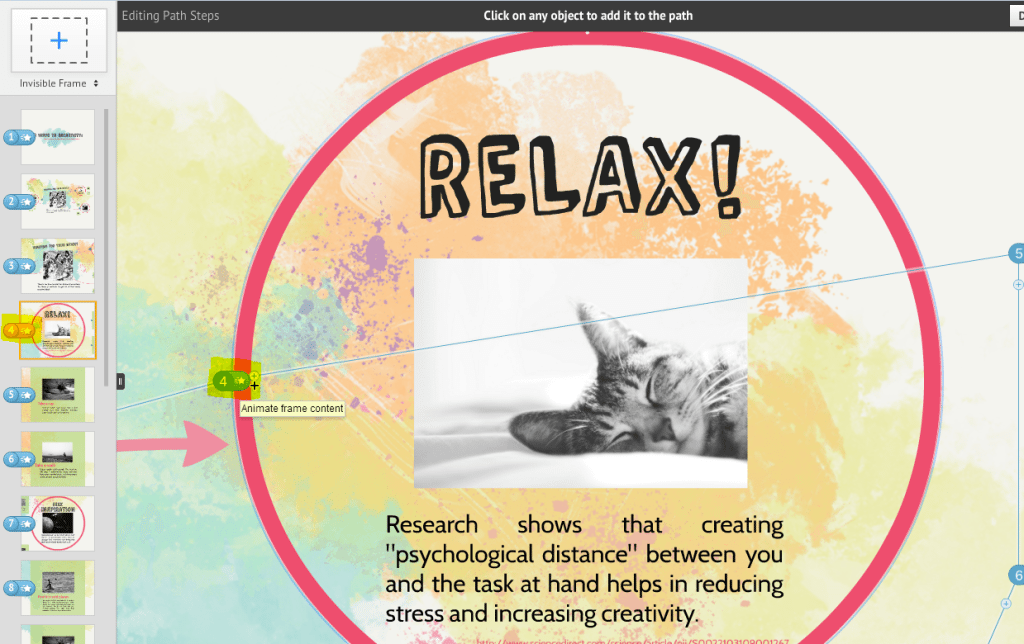
A fade-in effect will add to the dimensional look that the zooming animation already gives. With this technique, you can animate items within a frame to fade as you move along the path. Start by clicking on ‘Edit Path’ at the bottom of the left sidebar. Once in Path Mode, choose the frame you want to animate and click on the star.

prezi multimedia tricks

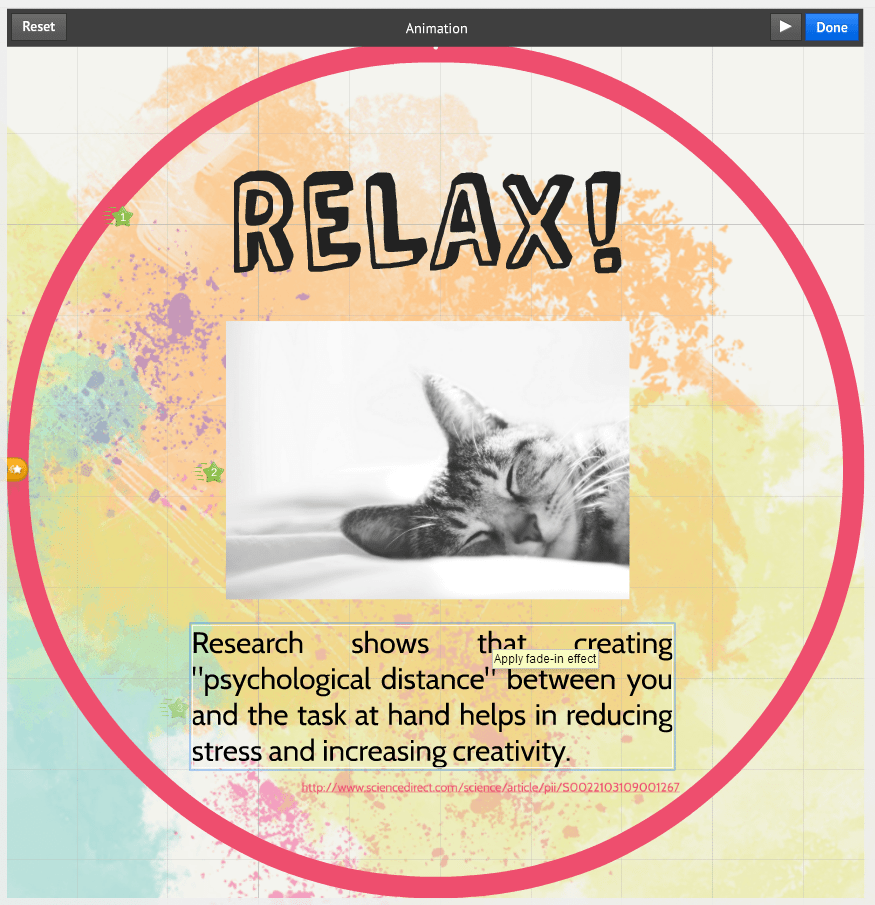
Once the Animation Wizard appears, just select the items in the progression you’d like to appear.

prezi multimedia tricks

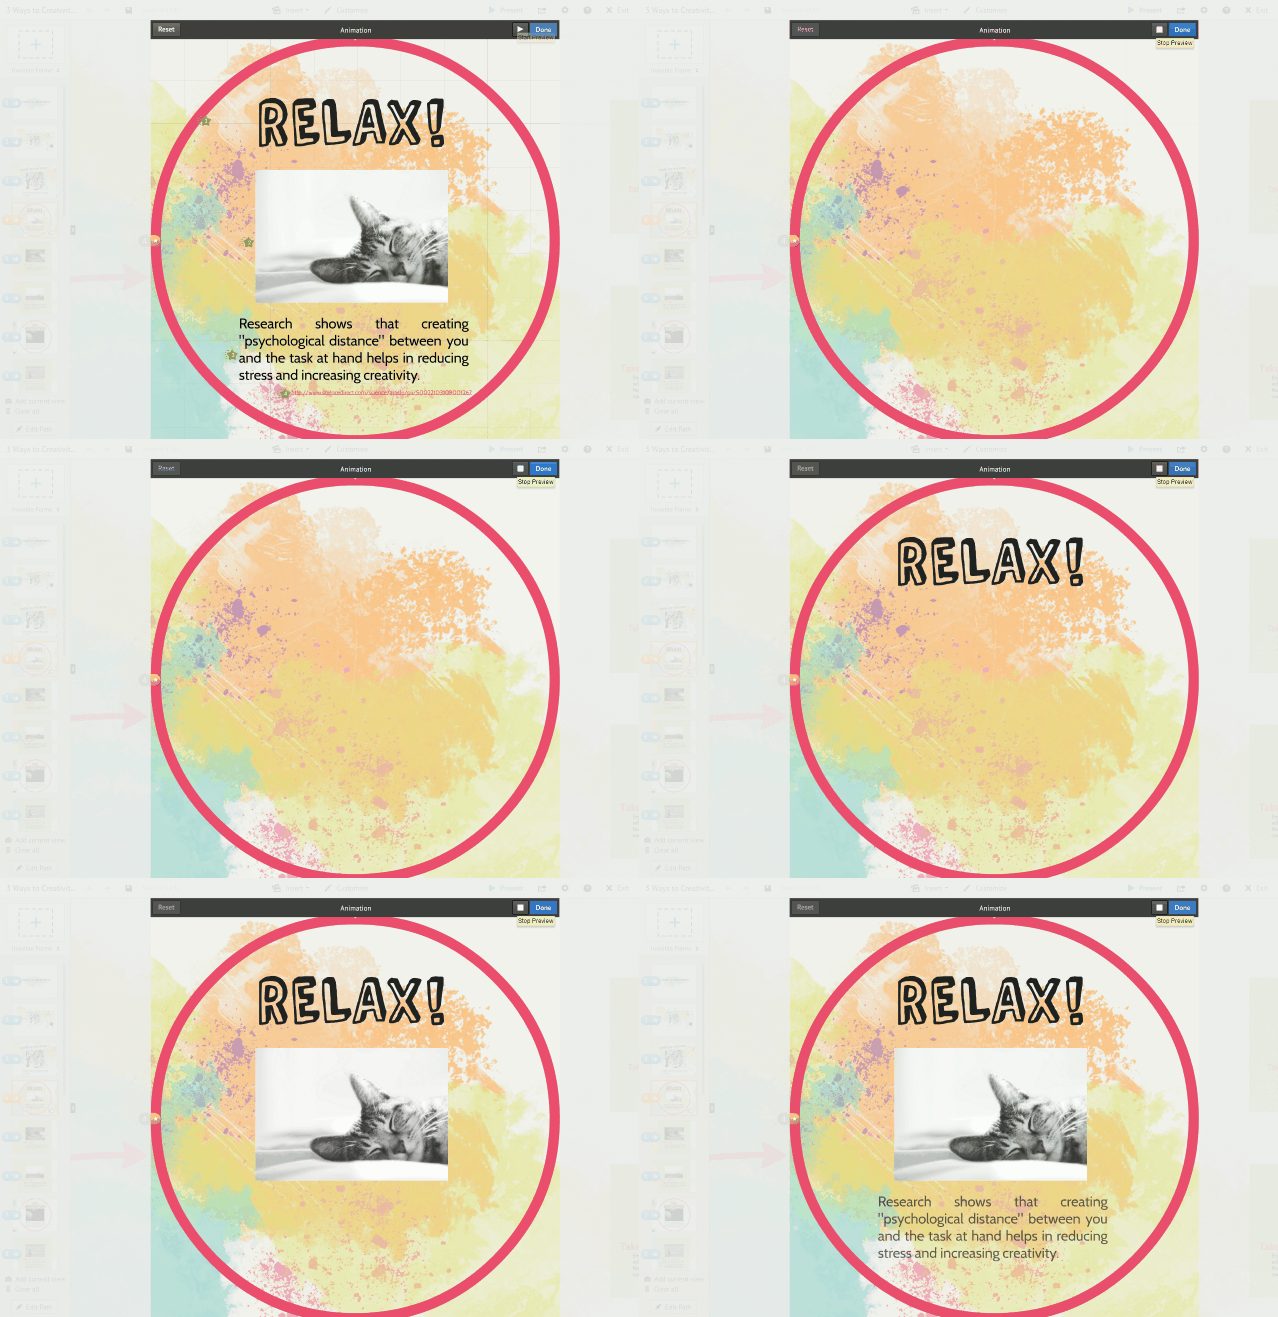
To preview the fade-in effect, click on the Play symbol above.

prezi multimedia tricks

Add background music and voice overs 

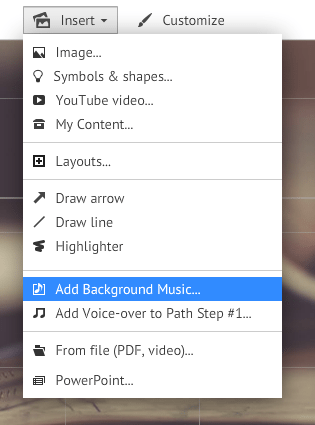
To give your audience a full multimedia experience, you can also add sound clips to your prezi. You can choose to add a background track which will play on loop as you deliver your presentation. Just click on Insert from the top menu and choose ‘Add Background Music’.

prezi multimedia tricks

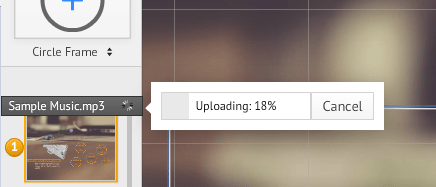
Once you’ve selected the file you want, Prezi will start to upload the audio.

prezi multimedia tricks

With the upload completed, you can click on the Play symbol to preview the track. To delete track, just choose the Trash icon.

prezi multimedia tricks

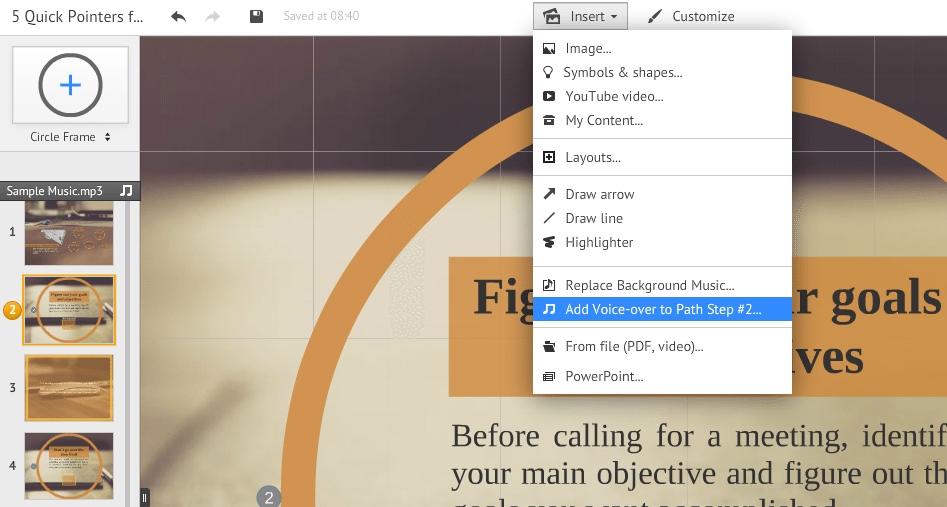
If you’re planning to share your prezi online, you can also add voice overs that will play as viewers move along the path you defined.

Select the path step or frame you want from the left sidebar, then click on Insert from the top menu.

prezi multimedia tricks

prezi multimedia tricks

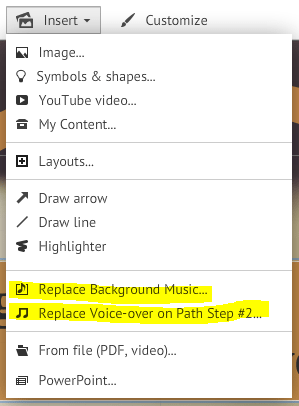
And if there’s anything you want to change, you can easily replace any of the sound files via the Insert option.

prezi multimedia tricks

Keep in mind that there’s only a handful of audio file formats you can upload. Currently, Prezi supports the following:

  • MP3
  • M4A
  • MP4
  • WMA
  • WAV
  • FLAC
  • OGG
  • AAC
  • 3GP

If the sound clip you want to use is in another format, there are tools you can use to convert your files.

Insert video clips

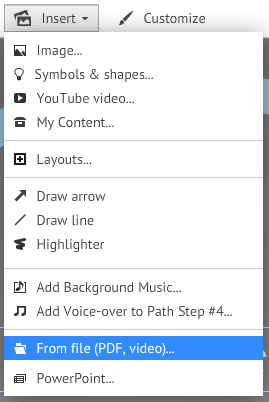
To complete your multimedia presentation, you can insert short video clips to your prezi. You can decide to upload a file from your computer or embed a video from YouTube. To add a clip that’s already saved on your computer, simply click on Insert and choose ‘From File’.

prezi multimedia tricks

You can upload videos in any of the following format:

  • FLV
  • MPG
  • MPEG
  • MP4
  • WMV
  • MOV
  • F4V
  • M4V
  • 3GP

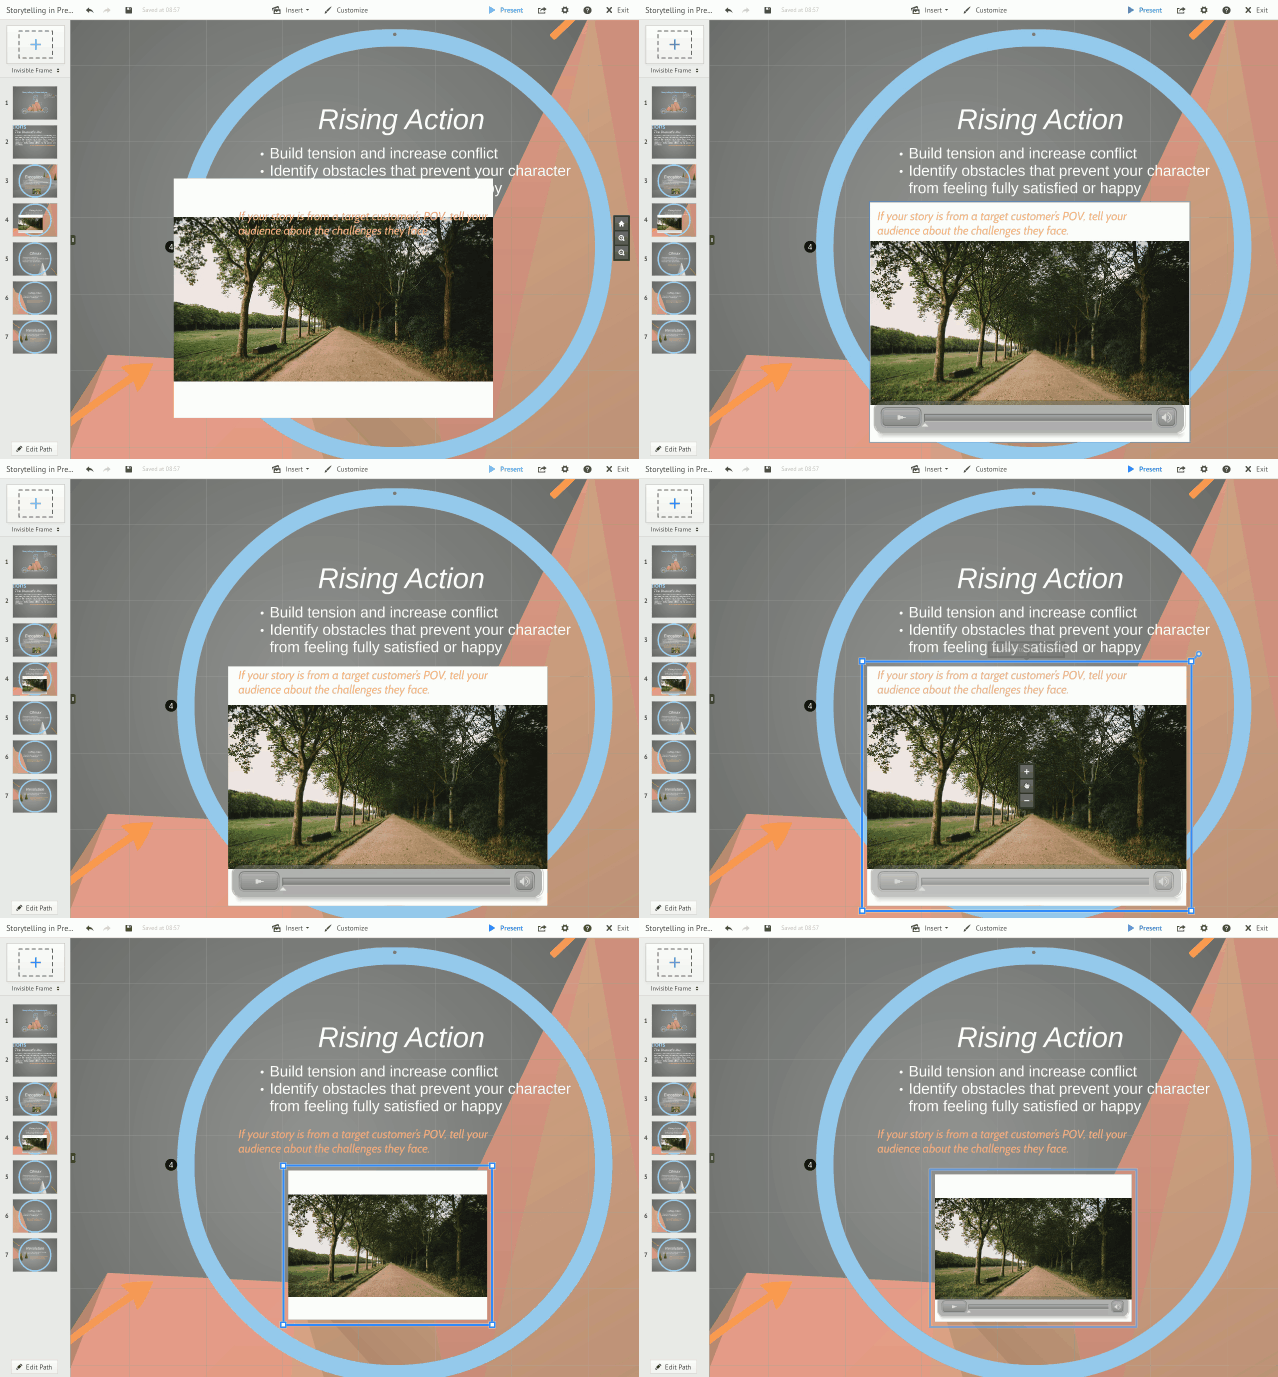
Once the upload is done, you can now move and resize the video using the transition tool.

prezi multimedia tricks

To embed from YouTube, make sure you have the video prepared in another tab. Head to the Insert option once again and choose ‘YouTube Video.’ A pop up box will appear where you’ll have to paste the YouTube link.

prezi multimedia tricks

You can then use the transition tool to make size adjustments and move your video around. Be sure to add attribution using the text tool, either in the same frame or at the end of your prezi.

There you have it! It’s not hard to come up with unique multimedia presentations, especially with a flexible tool like Prezi. Give your presentations more life than before using these 3 multimedia tricks.


Featured Image: Featured Image: Death to the Stock Photo / Prezi logo via Wikimedia Commons

Themes: Customizing a Prezi That’s Unique to Your Presentation

We often emphasize the importance of design in delivering presentations. For this week’s Prezi Feature, learn how to create a Prezi that’s unique to your presentation. By customizing your Prezi themes, you can create visuals that perfectly match your message. 

By now, audiences are used to seeing the same presentation decks over and over again. If you really want to leave a lasting impression, you need to think outside the box and get creative. Prezi is a flexible tool that allows you to do just that. With Prezi, you can take control of your narrative and focus on every detail of your presentation. Best of all, you can easily create unique designs that will surely enhance the audience’s visual experience.

Customizing Your Deck

Customize Prezi themes quickly and without much hassle. Beginners will find it easy to come up with their own designs. With just a few clicks, you can add your own background image and change font types. Advanced users also have the option to take their designs even further.

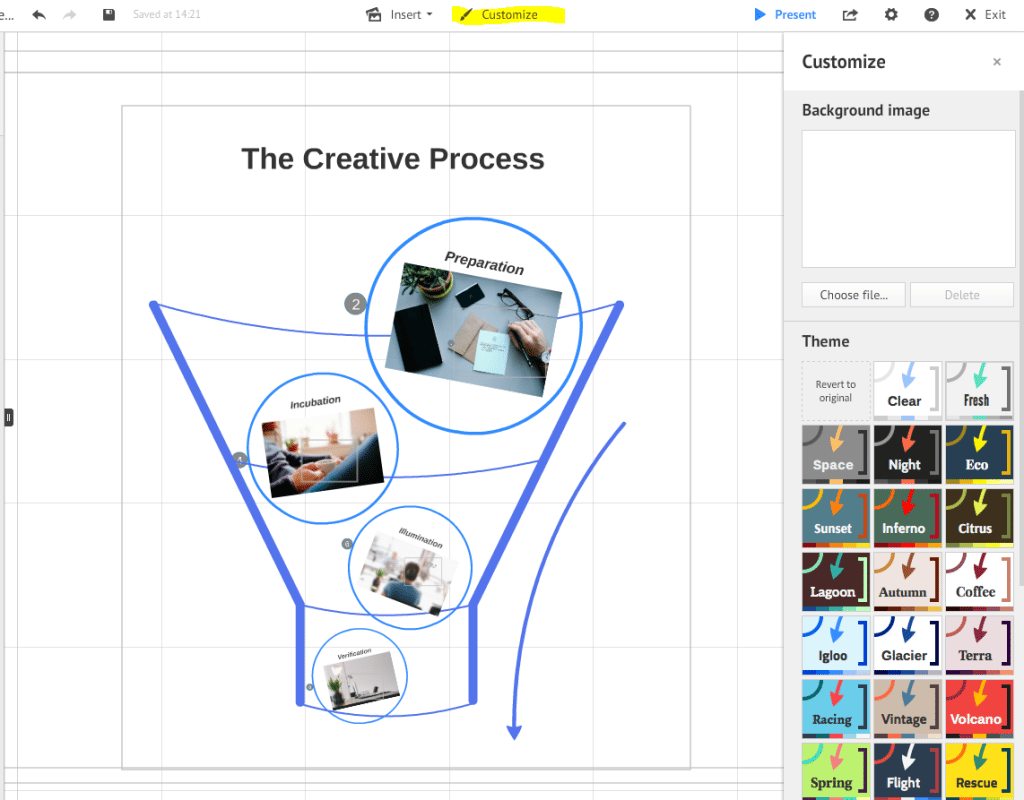
Place your content on the Prezi canvas. Once you’re happy with how everything looks, you can start customizing your theme. Click on Customize from the top menu to access the customization sidebar.

prezi themes 08

Choose a predefined theme that suits your design concept.  To make sure that your prezi theme is one of a kind, scroll down and click the “Advanced” option to open the Theme Wizard. Here are a few tips to create Prezi themes that are unique to your presentation:

prezi themes 05

Change colors using RGB codes

prezi themes 09

You can customize colors by using RGB codes. You can use this site to learn the code that corresponds to a certain color. Copy the code from the site and then paste it to the RGB fields in the Prezi Theme Wizard.

Use the CSS editor to define more details

prezi themes 03

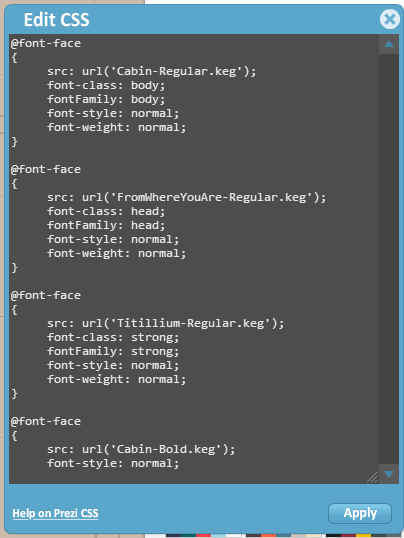
If you’re familiar with HTML, you can open the Prezi CSS Editor to add more details. Use CSS to adjust different things on your prezi theme. You can edit each element in your prezi canvas, like customizing the frames and changing the look of particular shapes. You can also use the CSS editor to define more font types and further enhance your color palette. You can take a look at this CSS crash course to learn more.

Add a background image

prezi themes 04

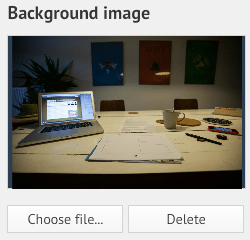
A background image can also add another dimension to your Prezi themes. Simply choose an image from your computer and upload it to Prezi. If the file size is too big, Prezi will automatically resize the image for you.

Save your theme for future use

prezi themes 07

After achieving your desired theme, don’t forget to save it for future use. This will be helpful for occasions when you don’t have much time to prepare for your next presentation.

Give your audience a unique visual experience. Take the extra step to customize your Prezi themes and create a design that perfectly matches your content.


Featured Image: Featured Image: Death to the Stock Photo / Prezi logo via Wikimedia Commons
The Path to a Perfect Prezi Story

Stories unfold in different ways. Whether in movies or presentations, some stories need to move in different directions to deliver its core message. For this week’s “Prezi Feature,” learn more about Prezi’s path tool to ensure that your presentation unfolds exactly how you want it to. 

How do you tell your presentation story? Most prefer a straightforward delivery of the facts. They introduce one element, and then move on to the next. The story is told in a neat and orderly sequence, which is simple and easy to follow. But what if your story begs to be told in a different way? How do you tell your story then?

Luckily, Prezi is a flexible presentation tool that allows you to stray off the beaten path of linear narration. Do you need to show the bigger picture? Or do you want to zoom in to show the details? Do you want to visualize how your project is similar to an uphill journey? Whatever the case, you can use the path tool to create your own transitions and reveal the elements of your presentation in a way that suits the story.

Here’s a closer look at the path tool, with some tips and tricks to help you out:

Connecting the dots

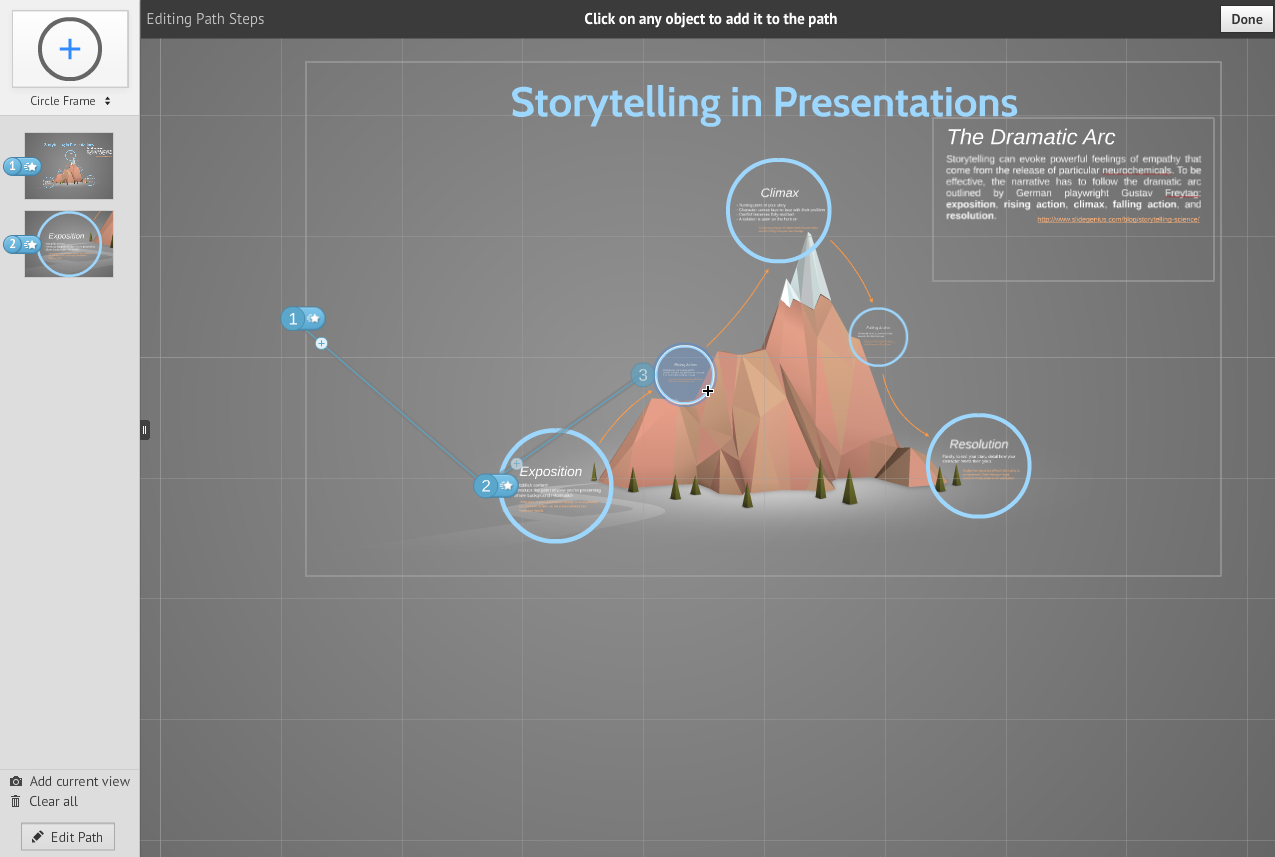
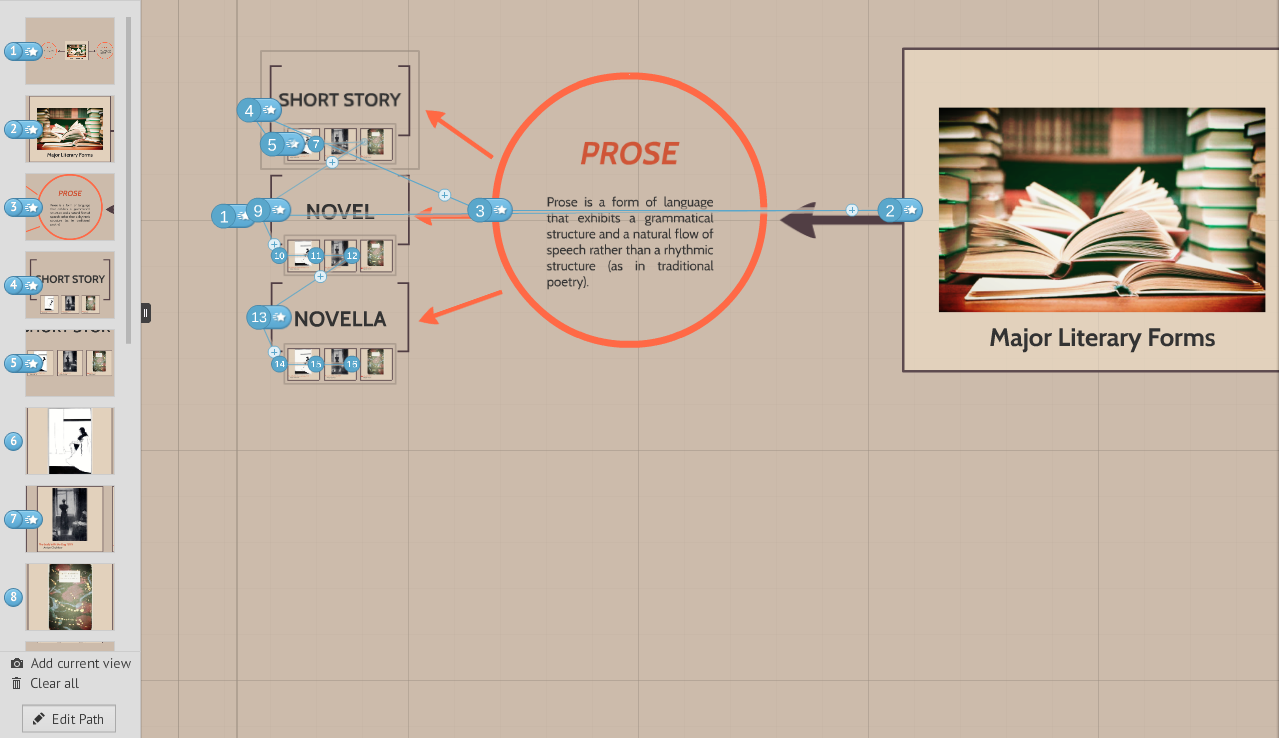
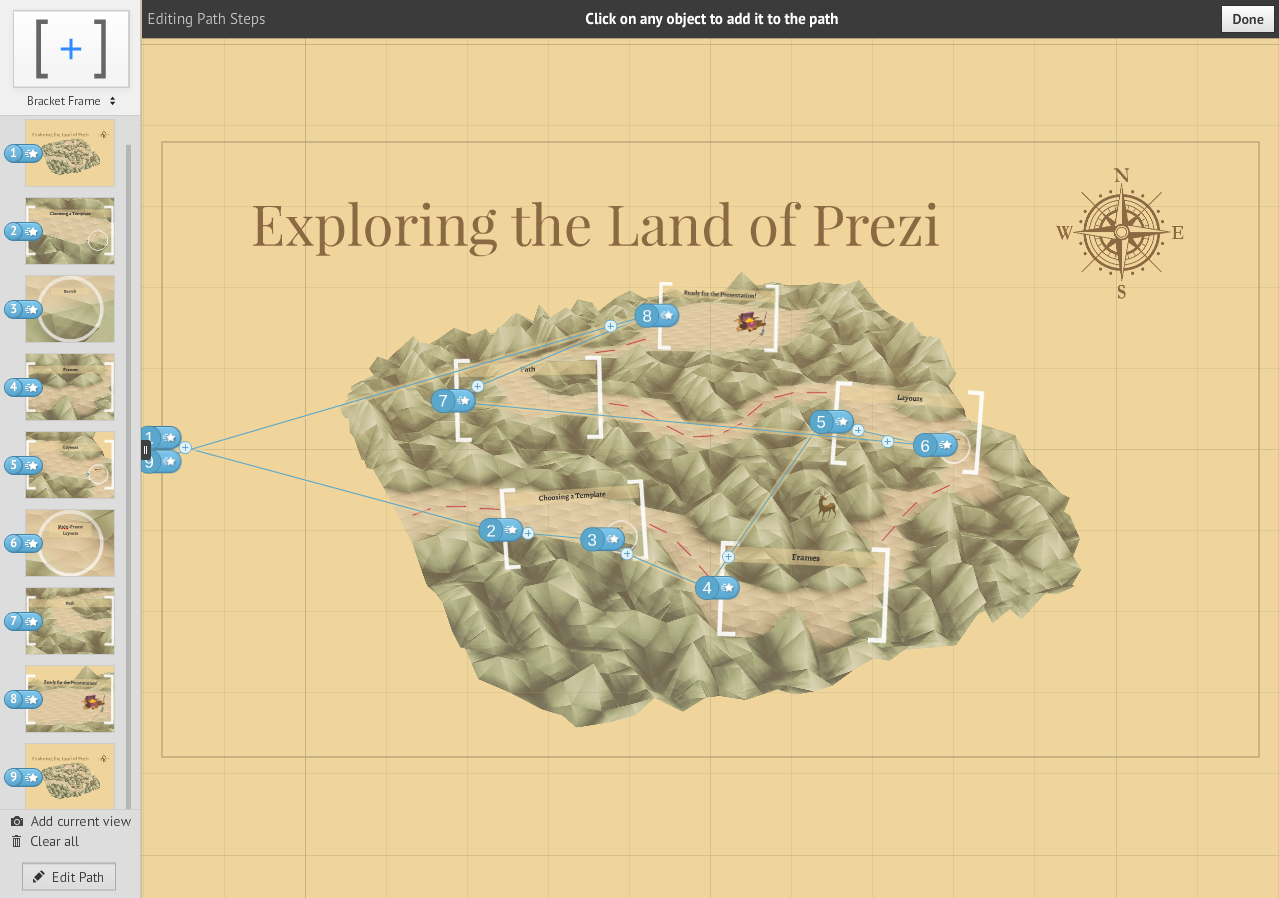
After arranging your content, it’s time to define the path of your prezi. Click on the Edit Path button at the bottom of the left sidebar, then start selecting frames in the order you want them to appear. It’s like playing “connect the dots.” You connect different elements together to create a complete and seamless picture.

Prezi Path Tool 01

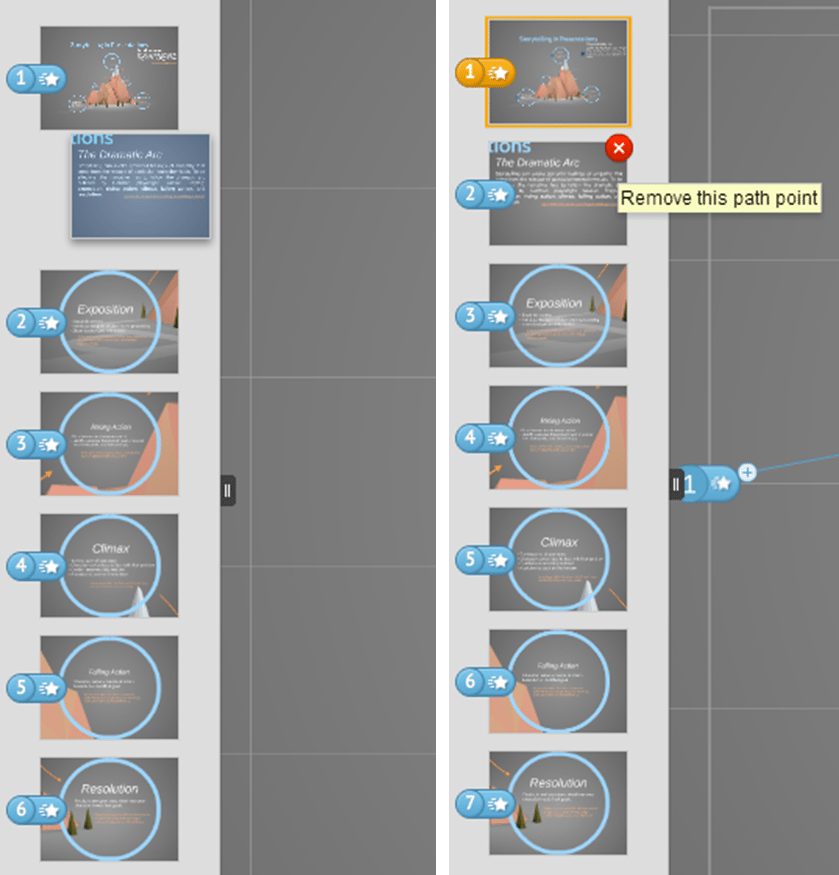
If you make a mistake, you can simply re-arrange the frames on the sidebar. Just click on the thumbnail you want to move and drag it up or down the path. Likewise, if you want to remove a frame, just hover over the thumbnail and click the red X.

Prezi Path Tool 04


Presenting the full view

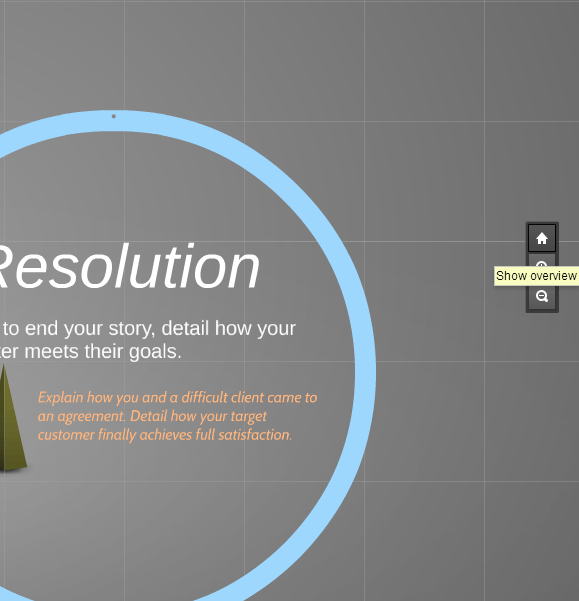
Aside from transitioning from frame to frame, you can also present the full view of your prezi. In other words, you get to show the “big picture.” This is helpful if you’re presenting a mind map, or if you’re using a particular visual metaphor to emphasize your message. As you edit the path, hover over the right side of the screen and click on the “home” button that appears.

Prezi Path Tool 03

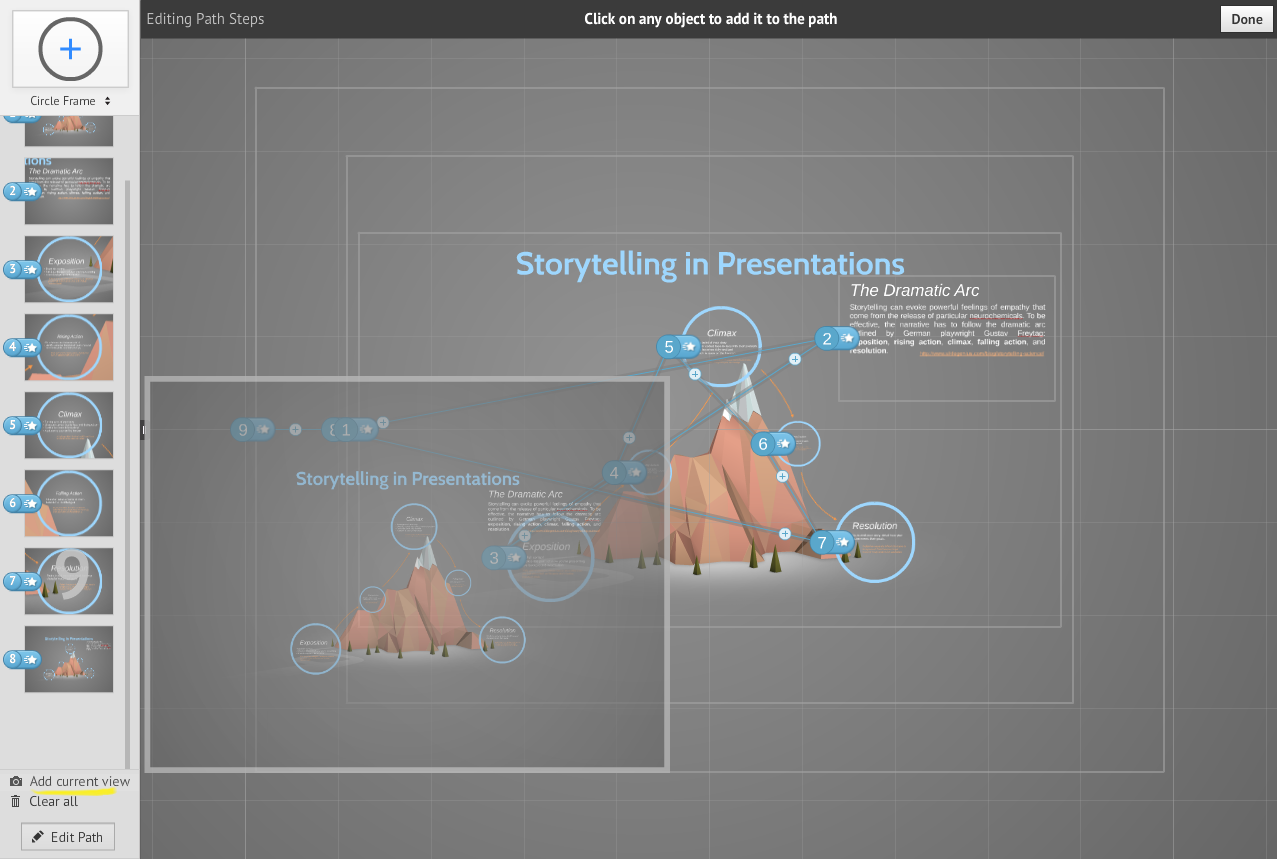
When the entire prezi fills your screen, click on Add to current view and include it to your path.

Prezi Path Tool 06


Focusing on the details

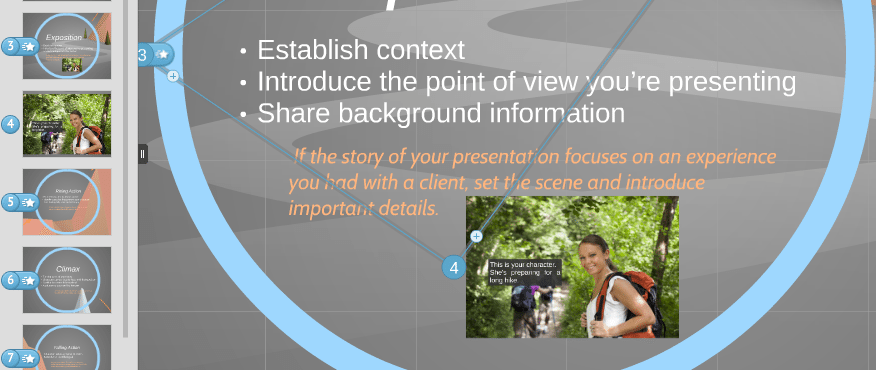
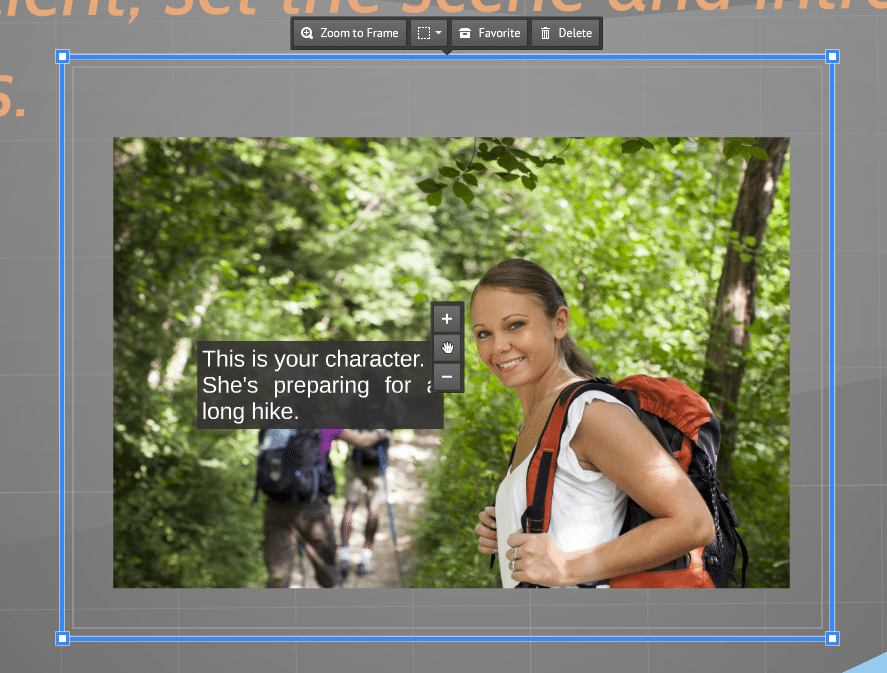
To give your audience the entire story, you also need to zoom in and show the intricate details. Any object in your canvas can be added directly to the path. Add any text, image or video, even if they’re already inside a frame.

Prezi Path Tool 07

You can also add multiple elements at a time. All you need to do is group them together using an Invisible Frame before you edit the path. From the left sidebar, change frame type to Invisible and drag it over the objects you want to group. Simply drag the corners to resize the invisible frame and make everything fit.

Prezi Path Tool 08


The best way to illustrate how the path tool works is to see it in action. View this prezi, then observe how non-linear transitions can add a unique and interesting dimension to your presentation. The path tool gives you absolute freedom to create a full-bodied and intricate story.

So how do you tell your presentation story? Set the path and tell it in any way you like.


Reference

Jaffe, Eric. “The Remarkable Power Of Visual Metaphors To Make Us More Creative.” Co.Design. April 11, 2014. Accessed October 9, 2014.


Featured Image: Featured Image: Death to the Stock Photo / Prezi logo via Wikimedia Commons
Prezi Feature of the Week: Present the Big Picture with a Mind Map

When presenting, it’s important to show the big picture, as well as its minute details. For this week’s “Prezi Feature”, learn how you can create a mind map to do just that.

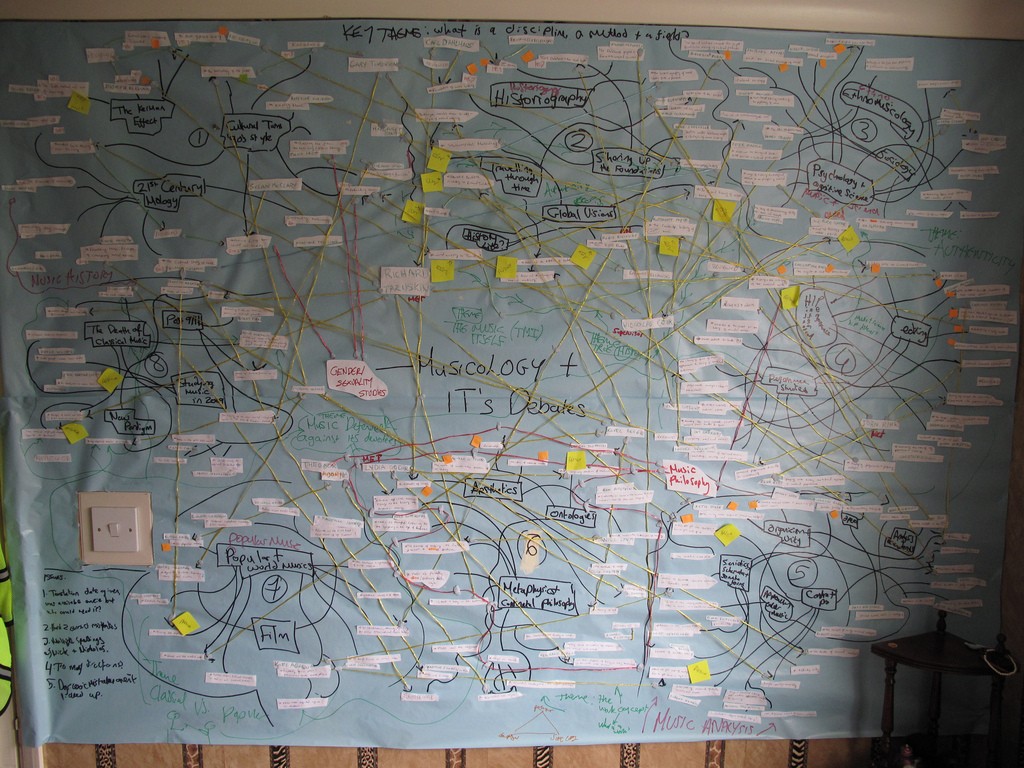
Ideas usually come to us in clusters, and it’s hard to separate one from the other. When we’re brainstorming, we can come up with a whole web of ideas from just a single concept. One idea will branch out to a new one, and two more will branch out from that. Before you know it, you have a complicated map of interlocking chains of thought. It’s usually chaotic, but it also perfectly shows how ideas are related to each other.

chaotic mind map sample
A chaotic end to brainstorming. (Image: Flickr/Tim Regan)

When it’s time to turn your ideas into a presentation deck, it can be hard to trim the big picture. Do you focus on a single line of thought? Which one? What happens when an idea overlaps with something else? How do you turn creative chaos into a neat, linear narrative? Sometimes, you don’t have to. Visualize how a single topic can branch out into a web of ideas by creating a mind map with Prezi.

Finding order in the chaos

The challenge to mind mapping is that complex topics can easily turn into a huge, dizzying mess. To create some order, you’ll need to practice a bit of discipline. Your main goal is to make sure your mind map remains concise, while keeping all the important details. In other words, you’ll need to do some revisions.

As you would when building a slide deck, start with an analogue approach. Grab a notepad and draft your mind map first. Start by writing down your main topic, and then let your ideas branch out across the page. Once you’ve written everything down, condense each idea into key concepts. This step is similar to how you’d create a presentation storyboard. Let the ideas flow freely first, and then edit out excessive and repetitive details.

Creating a mind map in the Prezi canvas

Once you’ve condensed your draft, it’s time to turn your ideas into a free-flowing presentation deck. Mind mapping involves combining colors, shapes, and images, plus the strategic arrangement of all these elements. Prezi is the perfect canvas for that. You’re free to move around each element and create a layout that suits the flow of your ideas. To accurately visualize your topic, take note of these tips when arranging your mind map:

1.) Use different frame types to organize your mind map
prezi mind map tutorial 01

You can make use of different frame types to show how your ideas progress into different “levels”. In this example, the main topic is contained inside a rectangle frame. The two diverging ideas that branch out from there are inside a circle frame.

2.) Create hierarchy by manipulating frame size and changing arrow width
prezi mind map tutorial 02

You can also represent  hierarchy in your mind map by manipulating the size of your frames. The farther you are from the center, the smaller your frames should be. Do the same thing with your arrows. Decrease thickness as you branch out across the canvas.

3.) Group specific parts or branches with an invisible frame
prezi mind map tutorial 03

prezi mind map tutorial 04

Add an invisible frame to group certain parts of your mind map together. This is useful if you want to focus on a specific branch before discussing each idea.

4.) Set the path carefully
prezi mind map tutorial 06

The final look will depend on how you set the path. Once you’ve completed building the mind map, set a path that will allow the audience to see how everything works together. Give the full view at the start of your presentation, then make use of the zoom tool to focus on specific details. To illustrate, click here to view a mind map of a previous blog post called “3 Ways to Creativity“.

Conclusion

The flexibility of Prezi’s canvas allows you to create presentations that defy the usual one-track narratives. You can present the big picture and pan through the entire landscape.

Show your audience how the core message relates to your main points by creating a mind map.


Featured Image: Featured Image: Death to the Stock Photo / Prezi logo via Wikimedia Commons
Prezi Feature of the Week: Getting Started

PowerPoint remains the default choice for most business settings. But if you want something new for your next big presentation, Prezi is a great place to start.

Prezi gives you the freedom to structure your presentation as you see fit. Instead of asking you to work on a progression of slides, Prezi gives you a canvas where you can lay out your content. This spaces allows you to organize your ideas in any way you want. You don’t have to think of your presentation in terms of moving from point  A to Z. Your presentation can go from A to B, return to A, and then skip to F.

With Prezi, you get to visualize the big picture and then zoom into the specifics as you deliver your presentation. Because of this flexibility, Prezi can be intimidating for beginners. If you feel like the blank canvas is going to swallow you whole, try starting from the basics:

1.) Templates

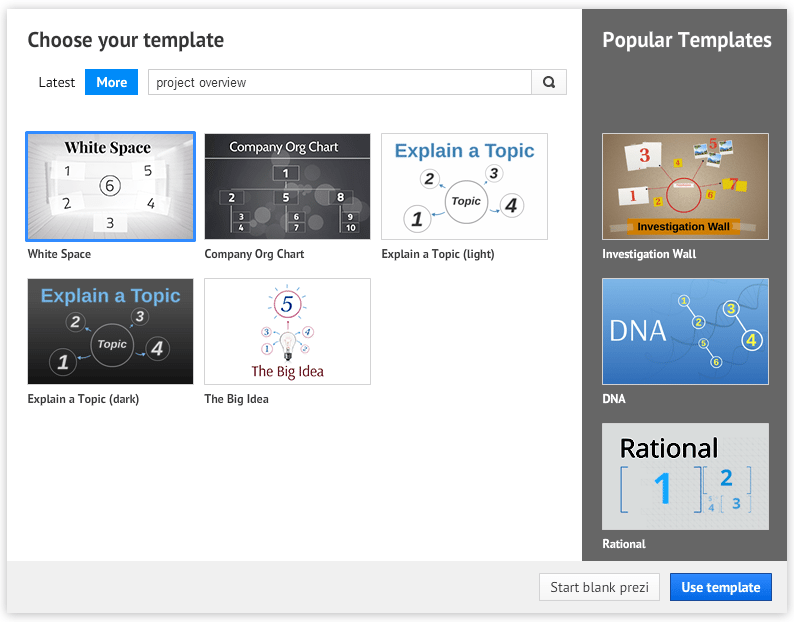
When you first make a new Prezi, you can choose to start from a blank canvas or work with a template. By using a template, Prezi automatically constructs how the different objects will look on the canvas. All you have to do is add your own content.

prezi template 02

Prezi has plenty of unique designs that can work as a visual metaphor for your presentation. If you’re having trouble imagining how yours should look, use the search box to find suggestions that are perfect for the topic you’re covering.

prezi template 03

2.) Frames and Layouts

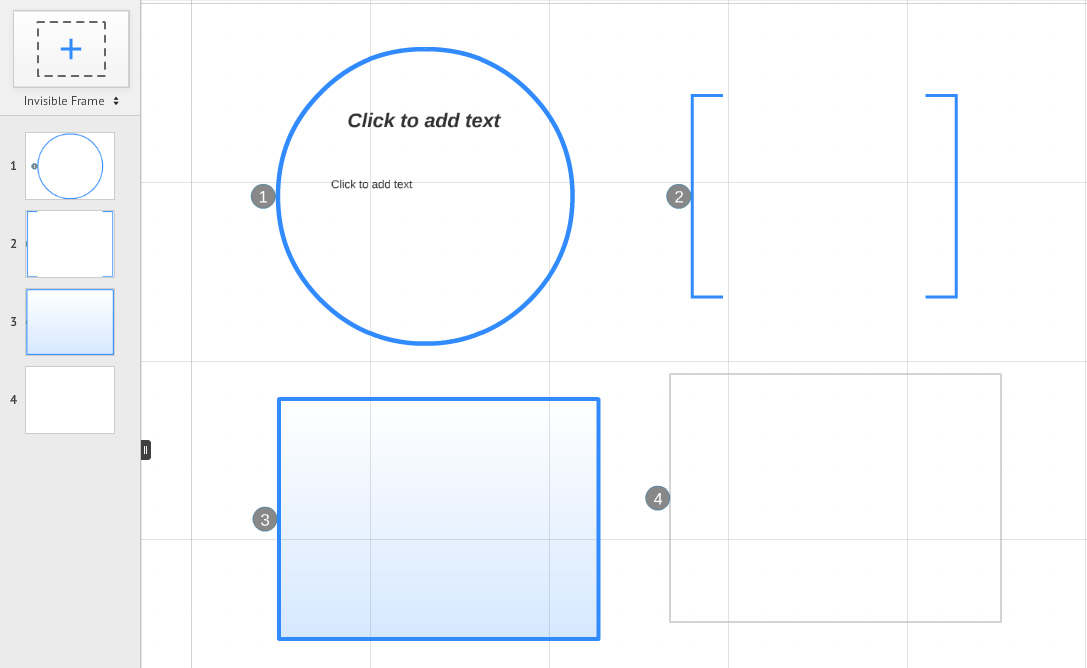
If you’d rather build your Prezi from scratch, you’ll need to learn how to use frames. Basically, frames work in the same way as slides. They’re placeholders for your content, allowing you to organize your ideas. You can think of them as Lego pieces you have to arrange and put together to build a whole structure.

There are four different frame types—circle, bracket, rectangle or invisible. Just click on the + icon above the left sidebar and drag the frame into your canvas.

prezi frames

Rotate, scale, and move the frames to build the structure you have in mind. You can also make use of layouts to add frames with placeholders you can edit. If you don’t want to bother with arranging frames in a specific way, you can choose from the Multi-Frame Layouts available.

prezi layouts

3.) Path

Whether you’re using a template or starting from scratch, the path tool is a crucial part of the Prezi-making process. A path will define how your presentation will transition from one frame to the next. You have the freedom to move across the canvas however you like.

Once all your frames are set, click on the Edit Path button at the bottom of the left sidebar. On your canvas, select objects in the order you want them to appear. Add Current View can also help you transition to the view that’s currently filling your screen.

prezi path
It’s never easy to try something new for the first time. With some patience and creativity, you will easily find your footing. Prezi can be a little confusing for beginners, so familiarize yourself with these three basic features. Next week, we’ll take a closer look at other Prezi features to help you become a pro.


Featured Image: Death to the Stock Photo / Prezi logo via Wikimedia Commons
-->