Slidegenius, Inc.

Why ‘Planning Analog’ is Better than ‘Going Digital?’

There are two basic steps to planning: conceptualizing, and organizing your ideas. These steps determine your presentation’s core message. After all, you won’t be able to discover what points would work and what wouldn’t without careful planning. This involves in-depth research and freewriting before you can come up with the best ideas that you can focus on.

But where do most presenters begin when planning for their pitch and deck? In some cases, most of them go digital to start the process. They use presentation software programs like PowerPoint to identify and structure their discussion points.

Alternatively, some still prefer writing down and outlining rough ideas using the analog approach. They use this method to allow their thoughts to flow naturally without the distraction of any digital devices.

You might be asking, between these two methods, where do you begin planning your business presentation? Should you think digital, or plan analog?

In this post, we’ll cover how planning analog is more effective than the digital method. But before we proceed, let’s look at how each approach varies to find out which fits your purposes.

The Downside of ‘Planning Digital’

The Downside of Planning Digital

Nothing’s wrong with going digital when you start throwing in all your presentation ideas. It actually helps you do straight edits and modifications on your slides, making your work easier.

While others may view this approach as helpful, some may not agree with putting their ideas straight to the deck. Just by doing it often might negatively affect the deck’s overall quality.

PowerPoint offers support to your performance, but it can also distract the crowd when your edits result in a cluttered slide deck. Outlining your thoughts this way limits your ideas from flowing naturally since you’re editing on the fly.

Giving in to what PowerPoint can provide makes you stay within your comfort zone. With a digital device on hand, planning won’t be smooth sailing compared to an idea generated with a pen and paper.

The Benefits of ‘Planning Analog’

The analog technique uses brainstorming as a mind-mapping strategy to dig up brilliant ideas.

It enables speakers to generate ideas on a paper, sticky note, or whiteboard, helping you to flesh out more important points for your topic.

Here are more good reasons why you should opt for this approach during the planning stage:

a. Provides Clearer Objectives

Provides clearer objectivesListing down your ideas helps you determine what you want your audience to understand, even if this list was made on a simple sticky note. This involves bringing together your key points and highlighting your presentation’s main message. Also, it gives you an idea in identifying what objectives will successfully execute your plans.

In this way, you can think of effective strategies that will not only generate audience interest, but will also guide you in creating an outline that compresses your thoughts.

Focus on your goals to develop cohesive content that emphasizes your core objective.

b. Reinforces Creativity

Reinforces creativityStructuring your pitch using a pen and a paper allows you to come up with better ideas to improve your visuals. Choosing these traditional drawing tools helps you produce different concepts relevant to your subject.

Dumping your thoughts straight to PowerPoint can make your deck’s structure look haphazard since content weren’t arranged systematically beforehand.

When planning, consider going to other places where you can discover new ideas that can build up your pitch. Squeeze out your creative juices by creating a storyboard using traditional tools. This lets you sort out and prioritize your points first.

c. Saves Time

Saves timeIt doesn’t only unleash your creative side, but it also saves you time when creating a perfectly-designed deck. Planning analog gives you more time to categorize and specify each idea that you’ve gathered and thought of.

According to sales trainer Jerson James, arranging your ideas using a computer will only distract you with other things. These distractions include email alerts and even other office tasks, which only draw attention away from your main priority.

Time yourself when organizing your thoughts. Even something as simple as taking a five to ten-minute breather to sort out your ideas can help you arrange everything afterwards.

Let’s Go Analog!

Let's Go AnalogWhether you prefer to do it on your laptop, or on a piece of paper, planning is important to deliver your message effectively. Choosing between planning digital and analog isn’t a problem. Skipping the stage can only make things worse. However, using the analog approach is more advisable since it opens a doorway of great and clearer ideas, as James wrote in his article.

Remove any barriers when planning for a visually-appealing presentation. Concentrate on drafting your pitch to produce clearer objectives that’ll help you achieve your main goal.

Use traditional tools to reinforce creativity that offers fresh, new perspectives that’ll entice the audience. Plan analog to save time and keep you from any distractions that’ll put the entire presentation at stake. Once you’re done, then you can open your PowerPoint and execute your plans to craft a winning deck.

Need a well-designed PowerPoint presentation? Contact the SlideGenius team now to get a free quote!

Check out and share our infographic!

Reference

James, Jerson. “Preparing for a Presentation? Think Analog.” LinkedIn. July 13, 2014. Accessed October 19, 2015. www.linkedin.com/pulse/20140713181747-35264839-preparing-for-a-presentation-think-analog

Back to Basics: Making the Most of PowerPoint Gradients

If you’re still starting out with PowerPoint, it’s important to explore the program’s different features. Before you can go to the presentation tool’s more advanced options, however, you’ll need to figure out its basic components first.

One of these primary elements is the gradient tool. You don’t need to stick to solid colors all the time. This PowerPoint tool can give a plain slide background or shape some depth and shading, making it more realistic. However, be careful not to overdo it to avoid making your deck look clunky and cluttered. Opt for a cleaner PowerPoint with just the right design.

Learn to use gradients strategically in creating effective shading techniques on a professional deck:

Choosing the Right Color Combination

A gradient is the combination of two or more colors. These colors bleed into each other and overlap, but both are always visible.

Earlier versions of PowerPoint provide built-in gradient fills with their own color combination, but PowerPoint 2010 onward has its preset gradient fills for one color with light and dark variations. You can customize these later on to your preference. This includes adding more colors to your gradient.

Choosing an appropriate color combination is necessary in making hues complement each other. For shading purposes, it’s better to use analogous color schemes or similar color temperatures. As an example, using only warm or cool colors on your gradient will give the illusion of seamless color transition.

Using Preset Gradients

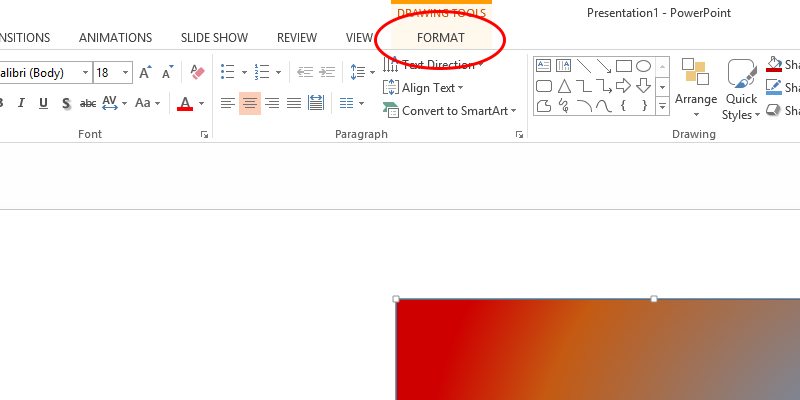
Built-in gradients are the simplest to use and may be preferable for first-time users of PowerPoint. To apply this gradient to shapes, do the following steps: Select the shape you’ll be applying the gradient to. A Format tab will appear in your toolbar.

format tab

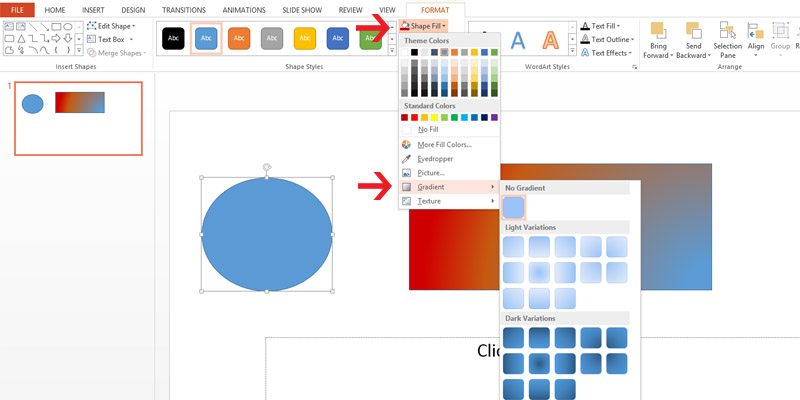
Under the Shape Styles group, select Shape Fill > Gradient.

Supporting Image 02 - Shape Fill

Choose from any of the variations available. There are two selections for any solid color in the gradient: Light and dark.

Light variations are your original color mixed with white. On the other hand, its dark counterpart is also your original color with black.

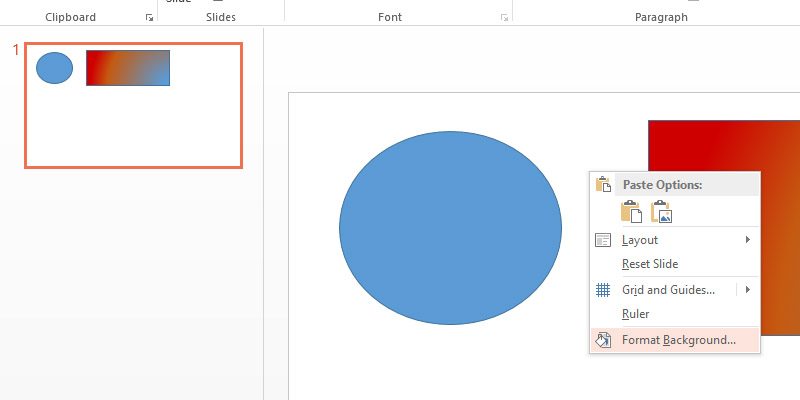
To go to the Gradient option for your slide background, just right click the slide you want to apply the gradient to, and select Format Background.

Supporting Image 03 - Format Background

From there, follow the same set of instructions as applying gradients to shapes.

Customizing Gradients

If you aren’t satisfied with the available gradient choices, you’re free to customize your gradients.

Click on the More Gradients option below the gradient variations.Supporting Image 04 - More Gradients

Here you can choose the Type of gradient you want. It can be radial, rectangular, linear, or path.

You can also pick the Direction you want your colors to take.

Making use of Gradient Stops will let you control how much of each shade blends with the rest.

Supporting Image 05 - Gradient Stops

To change the color of a specific shade, select a gradient stop and change it on the color picker.

Other aspects of your selected gradient stop that you can change include its Position, Transparency, and Brightness.

Experiment with these options until you achieve your desired gradient.

Conclusion

Gradients may be a basic PowerPoint feature, but using it in the right way can still transform your deck into something understandable and easy on the eyes.

Make sure you select the right color combination. This can evoke the right moods for your pitch and achieve an effect that leverages rather than detracts your design.

If you want to familiarize yourself with the basics of PowerPoint gradients, start with preset gradients. Depending on what you want to do with your shape or slide background, choose between light or dark variations of your solid color fill. Customize your gradient and play around with the amount, type, and direction of your colors to add depth and shading. Using the correct color combinations can highlight your brand to make it more distinct and memorable.

Need help with your deck design? Contact our SlideGenius experts today for a free quote!

References

“Add a Gradient Fill to a Shape.” Office Support. www.support.office.com/en-us/article/Add-a-gradient-fill-to-a-shape-11cf6392-723c-4be8-840a-b2dab4b2ba3e
“Color Harmonies.” Tiger Color. www.tigercolor.com/color-lab/color-theory/color-harmonies.htm

Featured Image: “Convergence (Explored!)” by Mohammed Moosa on flickr.com


Converting Presentations into Videos in PowerPoint 2013

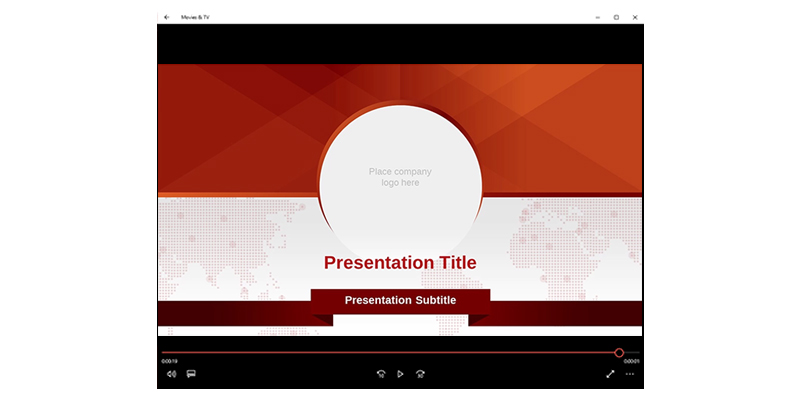
Converting PowerPoint presentations into videos is a great way to give your speech extra engaging power. Since most people are wired to watching videos, turning your deck into another multimedia format can make your audience completely consume your content.

One of the greatest perks of exporting a presentation as a movie is that you can play videos on both mobile phones and PCs. Presentation files, on the other hand, require Microsoft PowerPoint when viewing or editing a file.

Here’s a quick tutorial on exporting your presentation into a video with PowerPoint 2013:

1. Open the PowerPoint presentation that you want to turn into a video.

PowerPoint 2013 Video: 2. In the upper-left corner of the screen, click on File.

PowerPoint 2013 Video Tutorial: Open File3. In the File menu, click on Export.

PowerPoint 2013 Video Tutorial: click Export4. Choose Create a Video.

PowerPoint 2013 Video Tutorial: Click Create Video5. The Create a Video dialog box will appear, showing two drop-down lists and a time length box.

PowerPoint 2013 Video Tutorial: Create video6. The first drop-down menu, labeled Presentation Quality, gives you three different quality options for your exported video.

PowerPoint 2013 Video Tutorial: Presentation qualityThe three Presentation Quality options are:

a. Presentation Quality

PowerPoint 2013 Video Tutorial: presentation qualityThis has the largest file size, resulting in the highest quality. If you want an HD-quality video with high-end animation, we recommend choosing this one. Your video will be exported at a resolution of 1920px x 1080px.

b. Internet Quality

PowerPoint 2013 Video Tutorial: internet qualityThis will result in a medium-sized video, with a moderate quality. Your video will be exported at a resolution of 1280px x 720px.

c. Low Quality

PowerPoint 2013 Video Tutorial: low qualityThis will give you the smallest file size, but also the lowest quality. Your video will be exported at a resolution of 852px by 480px.

The second drop-down box allows you to record timings and narrations for each slide. You can even record your own voice for your presentation’s narration.

PowerPoint 2013 Video Tutorial: ExportIt contains the following options:

a. Don’t Use Recorded Timings and Narrations

PowerPoint 2013 Video Tutorial: Con't use recorded timings and narrationChoose this if you want each slide to stay onscreen for the same amount of time. The default time is 5 seconds.

If you want to change how long each slide will appear, you can adjust the number of seconds in the option labeled Seconds spent on each slide.

PowerPoint 2013 Video Tutorial: Click on the up arrow to increase it per second or click on the down arrow to decrease it. Otherwise, just click inside the text box and type how many seconds you want each slide to stay onscreen.

Take note that this option will remove any and all narrations you’ve recorded for this deck.

b. Use Recorded Timings and Narrations

PowerPoint 2013 Video Tutorial: use recorded timings and narrationsChoose Record Timings and Narrations if you’d like to record narrations or set each slide to stay onscreen for different amounts of time.

7. Once you’re done with these settings, click the Create Video.

PowerPoint will start converting your presentation into a video file.

PowerPoint 2013 Video Tutorial: convert8. When it’s done, the Save As window will appear.

PowerPoint 2013 Video Tutorial: save as9. In the File name text box, type the name of your converted video.

PowerPoint 2013 Video Tutorial: file name10. When you’re done, click Save.

PowerPoint 2013 Video Tutorial: save

That’s it! Enjoy your PowerPoint video file!

Uploading your PowerPoint file as a video ensures an audience by allowing you and other people to share and watch the video in an instant. Try this video conversion trick to make your work – and your life – easier!

Reference

“How to Save or Convert a PowerPoint Presentation to a Video.” How-To-Geek. n.d. www.howtogeek.com/214947/how-to-save-or-convert-a-powerpoint-presentation-to-a-video

Psychological Biases: Overconfidence in Sales Presentations

We used to believe that too much of anything can be a bad thing; these include excessive sleeping, drinking, and eating. Beside these daily activities, there’s one human trait that can best explain the above mentioned adage: overconfidence.

Overconfidence is a self-delusion that may lead to disastrous situations and wrong decisions. For example, overconfident drivers and motorists who take great risks on the road are more prone to car accidents. Being overconfident, however, can also be a good thing.

According to a study, people who are proud of themselves are more likely to get rewards than those who are self-conscious. The research implies that delusional confidence isn’t absolutely a negative trait. In fact, it can help you reap better results at work and other aspects of life.

Here’s how psychological contexts discuss overconfidence and how it can make sales presentations more effective.

Defining the “Overconfidence Effect”

The overconfidence effect refers to a biased way of seeing oneself and placing too much faith in personal knowledge and opinions. It’s a cognitive bias in which people think they are better than their own characteristics, abilities, and judgement. This is a common phenomenon for entrepreneurs who are not afraid of making risky decisions when improving their chances to succeed.

Why Use Overconfidence in Presentations

Being overconfident during sales presentations may add value to your pitch and boost your professional image. It allows you to persuade the audience through confident postures, body language, and vocal tone. This appears to be a significant factor in making people see the huge potential of your proposal. It also allows you to realize your full capabilities.

As Anisa Shyti writes, the probability of succeeding in something depends on three things: how well you know the topic, how familiar you are with it, and how difficult you think it is. When you think that you’re stronger or smarter than you really are, you’re close to motivating yourself to perform better.

How to Make Overconfidence Your Ally

This psychological bias will only become your friend when your actual presentation performance equates to your promises. By this, we mean presenting with reasonable confidence and guaranteed accuracy. Self-belief and performance should meet halfway to come up with good results.

This is why you need to know your sales presentation by heart, from start to finish, to make your buoyancy a genuine one. Emphasizing your successful sales records and sharing client testimonials are some of the effective ways when justifying self-confidence. To boost your credibility and prevent damaging your self-worth, every information that you present must be 100% true.

Think You’re the Greatest

Even if overconfidence has gained a bad reputation in society, its psychological bias still presents many advantages. Our confidence influences a determined personality and attracts greater possibilities. A strong character allows you to show positive and convincing presentation cues, which can make your pitch more effective.

Take advantage of your self-worth to give your speech more charisma and power.

Featured Image:Consumer Confidence by Chris & Karen Highlandon flickr.com

3 Presentation Tips Speakers Can Learn from Comedians

Comedians are known for telling humorous stories, jokes, and monologues that bring excitement and interest to audiences. Corporate presenters, on the other hand, focus more on delivering detailed information to inform and persuade the crowd.

Do you need to be a comedian to be an effective presenter?

No, but there are few crucial tips that stand-up comedians can teach professional speakers about delivering sales presentations.

What, then, do comedians and public speakers have in common? Where do they differ, and what lessons can we learn from them?

What’s the Secret?

Comedians are experts at cracking jokes and convincing audiences to have fun during their performance. Like them, you can do humorous presentations that convince the crowd to listen while understanding your message. They also use silence to emphasize a certain point and give the audience time to absorb a particular idea.

Aside from your presentation’s content, your delivery can also contribute to a successful communication.

To help you become a more confident, passionate, and entertaining speaker, here are three things to consider:

1. Be Prepared

Presentation Tips: Be well preparedLack of practice will only harm your pitch. If you don’t make time for it, chances are, you’ll get sidetracked by unexpected situations.

Preparation is still the best way to manage your fear and overcome anxiety. If you know your content by heart, you’ll be able to deliver a clear presentation. This involves warming up your voice, mastering proper facial expressions, and rehearsing your business pitches to engage your audience effectively.

2. Stay Away from the Lectern

Presentation Tips: Stay away from the lectrensLecterns aren’t bad at all. While they can be used to hide your notes and materials from your audience, comedians often avoid lecterns and focus on throwing puns at their audiences. They also maintain eye contact so as not to lose their attention and keep them in tune.

When presenting, avoid relying too much on the lectern. This can help you concentrate on dealing with the crowd and remove any barriers that create distance between you and your listeners.

3. Learn from Failures

Presentation Tips: Learn from failuresEverybody makes mistakes, including presenters.

Making people laugh is one of the hardest things to do. However, comedians do their best to meet this expectation.

When you fail, remember: it can teach you to be a better presenter. Giving up will only stop you from improving. Understand this: all professionals experience hardships. Use this knowledge to improve and excel.

The Punchline: Learn the Basics

Presentation Tips: PunchlineBeing well-prepared, staying away from the lectern, and learning from failures are only a few lessons presenters can borrow from comedians. Once you master these techniques, you’ll be able to develop good relationships and achieve a more effective presentation.

To help you deliver a more dynamic and entertaining presentation, SlideGenius experts can assist you and offer you a free quote.

Share our infographic!

3 Tips for Making Company Profile Presentations More Effective

The value of any business lies in the quality of the product or service it sells. Whether it’s a breakthrough device, an amazing piece of art, or a new concept, communicating your ideas effectively is important to earn a client’s trust. This all boils down to the importance of a corporate profile presentation.

A quick look at a company gives prospects a general idea on how a business meets and satisfies its customer’s needs. It puts your business in the spotlight, creating greater possibilities of gathering more sales leads and building new professional relationships.

Here’s a quick guide on how to make a good company profile:

Collate All Facts

Start by defining your company goals and objectives. Spell out your collective efforts, track record, and unique strengths. Demonstrate what your company does for its customers and employees. Explain what makes your business different and how it gives the organization its distinct character.

Besides your mission vision and corporate values, putting in a short history also shows your company in the best possible light. State when it was established, where it’s located, and its progress over the years. However, make sure that these items aren’t cluttered throughout your slides.

Don’t Forget the Structure

Once all topics are listed, arrange them in a logical manner to make more sense. Prioritize the important ones to start off your spiel with more impact. Your business profile must always begin with the About Us section.

The succeeding slides must be comprised of your products and services, specialization or company vision and mission, client testimonials, and call to action.

Group common topics together to limit your slides. This brings your creativity in using visual images to strengthen and support your message.

Keep the Branding Visible

Visual components—logo, colors, fonts, illustrations, and graphic themes—encapsulate your company’s identity.

In designing your business profile slides, it’s important to use visuals that highlight your brand. Use shapes and graphic designs that confirm your branding, not contradict it. This all applies in your organizational chart, global or multi-location operations, and portfolio.

Keeping your brand visible also gives your business a handful of benefits. It separates you from your competition, allowing people to reel in their personal opinions and preferences.

Conclusion

A company profile gives potential prospects a sneak peek on what a business has to offer. Just like actual presentations, a corporate background is also essential in generating leads and building professional relationships.

Learning how to create an effective company profile puts your business in the best light. Collate all the information needed for your presentation. Arrange facts in a logical manner, beginning with details of utmost importance. Use visuals that shape and confirm your brand.

Follow these tips and ensure a winsome pitch for your company’s growth and success!

References

Singh, Vivek. “7 Steps in Making your Corporate Profile Presentation.” JazzFactory.In. October 24, 2012. blog.jazzfactory.in/2012/10/7-steps-in-making-your-corporate.html

Featured Image: “Wordle clouds” by Achim Hepp on flickr.com

Recover Your Unsaved File in PowerPoint 2013

Unsaved work can happen for a number of reasons. It can happen when there’s a power failure or a system crash, or for whatever reason, maybe you just forgot to hit “Save.”

Don’t worry. Recovering an unsaved file is possible in PowerPoint. In fact, there’s more than one way to recover it. These features are enabled by default, so you’re guaranteed to get your file back.

Be warned that it’s generally not recommended to change these settings because you’ll never know when you need to save unsaved work again.

This guide will point you to where an unsaved file usually goes and what to do to recover it.

Unsaved Files

For owners of Microsoft Office 2010 and higher, recovering an unsaved file is made even easier. However, for users that have the older version of Microsoft Office, refer to this link.

This tutorial will be using PowerPoint 2013, meaning we can access the option also known as AutoRecover.

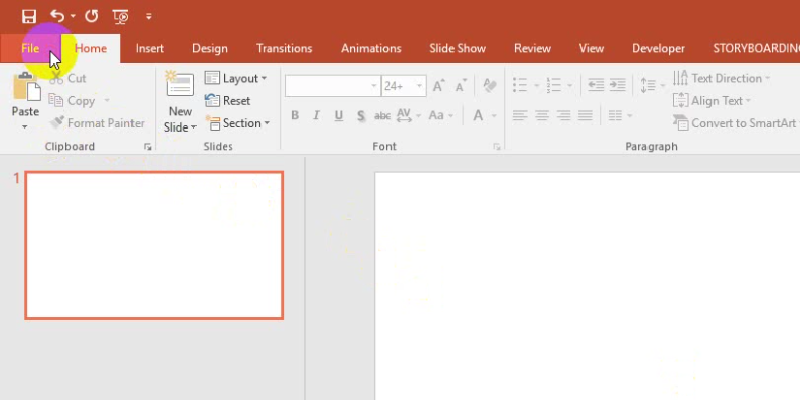
1. Go to the ribbon and click on File.

recover your unsaved file in PowerPoint 2013: Autorecover

2. In the second column that displays Recent Presentations, scroll down to the bottom and you’ll see a button that reads Recover Unsaved Presentations.

recover your unsaved file in PowerPoint 2013: recover unsave powerpoint

The files in this folder are only stored temporarily, so save your recovered file properly once you find it. Temporary files are deleted automatically from the system. Do not rely on recovery methods to save your work.

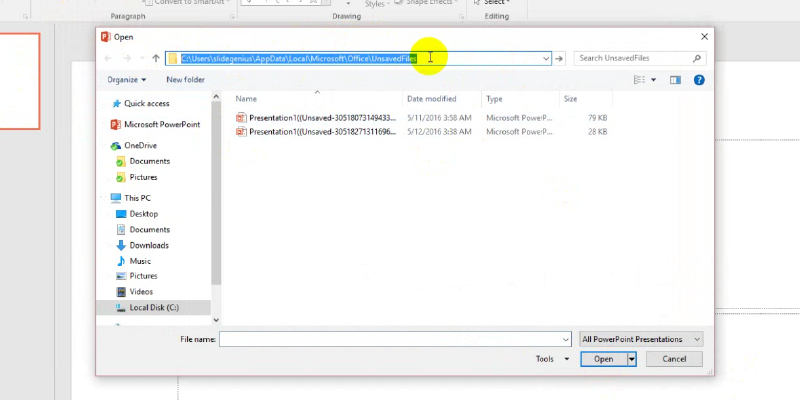
3. A dialog box labelled “Open” will appear which will contain your unsaved file.
recover your unsaved file in PowerPoint 2013: label

Click on the address bar as highlighted in the image. This will show the filepath, displaying the exact location of your file.

Copy and paste the filepath to Windows Explorer: C:\Users\<username>\AppData\Local\Microsoft\Office\UnsavedFiles

Don’t forget to replace <username> with yours when copying the filepath from this article:

You can retrieve an unsaved presentation using this method with ease.

Interrupted Changes

This next method is suitable when your changes were interrupted and you wish to restore the changes you made in your work.

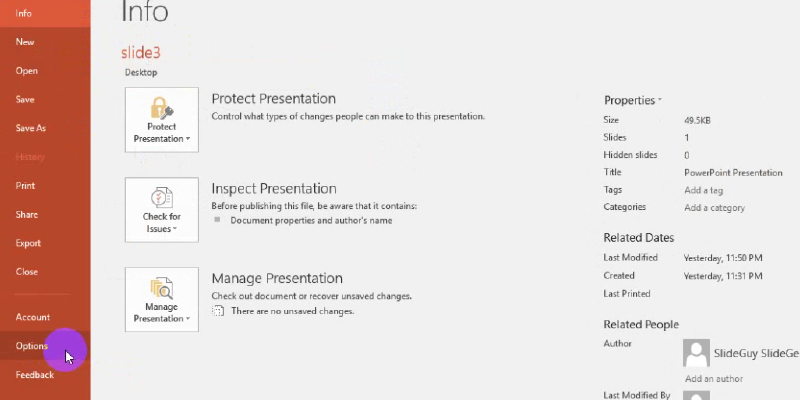
1. Go to the ribbon and click on File> Options.

recover your unsaved file in PowerPoint 2013: interruptive changes

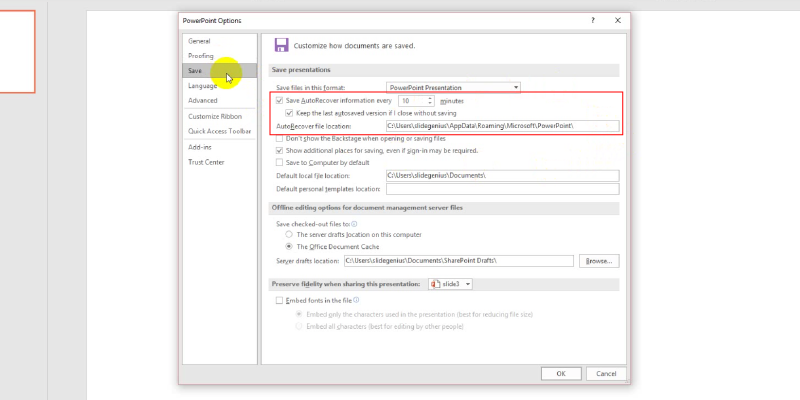
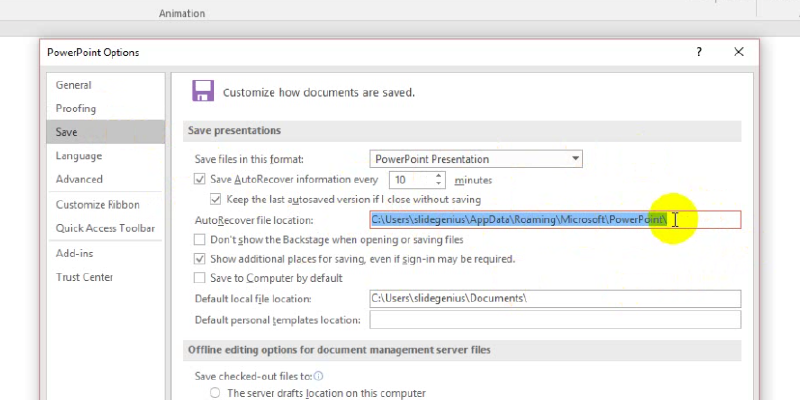
2. A dialog box called “PowerPoint Options” will appear. Go to Save and see if the boxes are checked ☑ in the highlighted image. If yes, then you may proceed to the next step.

recover your unsaved file in PowerPoint 2013

These options need to be present to restore your file’s unsaved changes. You won’t be able to recover your file’s previous state when these aren’t checked.

3. Copy the filepath located in the box beside AutoRecover file location. The file can be directly accessed by pasting the filepath in Windows Explorer.
recover your unsaved file in PowerPoint 2013: autorecover file location

Since this tutorial uses PowerPoint 2013 and runs on Windows 8, the filepath looks like this:

C:\Users\<username>\AppData\Local\Microsoft\Office\UnsavedFiles

This filepath will lead you directly to your file. Save this as a separate PowerPoint file and pick up the changes from where you left off.

A Few More Pointers

Avoid relying too much on the recovery functions to save your work because they’re only hosted temporarily in their respective folders. If you leave them there, you’ll never be able to retrieve them after a certain period of time has passed. Always remember to save your files outside of these temporary file folders.

You also don’t want to risk damaging or corrupting your presentation save-states by changing the save settings in PowerPoint. It can be tempting to tweak the settings, but only advanced users should make these changes. In fact, changing these settings is highly discouraged because file recovery is placed there by default for good measure.

Save yourself from any potential headaches in the future and save your files properly.


Reference

“Recovery of MS PowerPoint Content from Temp Files.” officerecovery.com. www.office-recovery.com/powerpoint.asp

How Does Fidgeting Affect Your Professional Presentation?

Good posture is essential in public speaking because it allows you to project confidence. Slouching, swaying, and moving restlessly will only make you look nervous and unprepared.

Projecting yourself professionally involves cutting off bad habits like fidgeting. If you aren’t aware of how it can affect your performance, you’ll end up distracting and disappointing your audience.

Fidgeting is a display of constant movements that disturb others. In her book, How to Talk to Anyone: 92 Little Tricks for Big Success in Relationships, internationally acclaimed communications expert and motivational speaker Leil Lowndes advises presenters to avoid committing the behavior: “Whenever your conversation really counts, let your nose itch, your ear tingle, or your foot prickle. Do not fidget, twitch, wiggle, squirm, or scratch.”

Fiddling with your notes, playing with your hands, loosening your collar, and gripping the lectern’s corners are only a few examples of this behavior.

Presenters subconsciously fidget when they’re experiencing performance anxiety or stage fright, which trigger stress hormones. Here are a few tips to cut off the bad habit and ace your professional presentation:

Observe Yourself

Professional presentation tips: Observe your action

According to public speaking coach Jacki Rose, body language makes up the biggest part of successful communication. As you rehearse, consider recording yourself to observe how you behave during your pitch. It doesn’t only help you identify what you need to improve on; it also lets you pinpoint what needs to be removed, including unnecessary movements.

Ask your peers to watch you and let them give feedback afterward. Do this several times and review what causes you to commit the same habit. Is it because of technical problems? Did someone from your listeners distract you?

Once you recognize what prompted this act, use your positive habits to counter the negative ones and emphasize your ideas. If tapping your foot on the ground is one of those good habits, start stepping forward when explaining a certain point.

Take Time to Relax

Professional presentation tips: take time to relax

You might think this is common for presenters, but it’s not.

Reminding yourself to relax releases tension and lets you focus on what you need to accomplish. If speaking in front of a large crowd makes you fidget, develop positive self-talk and feed yourself with encouraging thoughts.

Worrying won’t help. Believing in yourself improves your confidence, allowing you to maintain a positive outlook while speaking in public. Never allow fear to overpower your self-esteem. Calm your nerves by breathing deeply to soothe anxiety. With deliberate practice, you can improve your strengths and slowly overcome your weaknesses.

Be Well-Prepared

Professional presentation tips: be prepared

Whether you’re a skilled veteran or a novice, preparation is still vital for your success. Delivery is more important than well-prepared visuals in achieving an effective presentation.

Preparation involves training yourself. In this case, you’re training to catch yourself fidgeting or projecting unnecessary gestures. Stand in front of a mirror to give you an idea of how you look while presenting.

Once you’re ready, you’ll be more confident to speak and convince your audience to listen.

Stop Fidgeting

Professional presentation tips: stop fidgetting

You won’t be able to overcome negative behavior without figuring out what causes bad mannerisms. Having a positive mindset will help you move toward achieving self-confidence.

Remember, your audience doesn’t only rely on your presentation’s content. Nonverbal cues also contribute in interpreting your message clearly. Break bad habits by observing yourself, calming your nerves, and being well-equipped to prevent any distractions that can ruin your performance and delay your success.

Resist the temptation to start fidgeting and notice how it makes you a better presenter.

Back up your skills with a well-designed PowerPoint presentation by letting our team to assist and offer you a free quote!

Check out and share our infographic!

References

Lowndes, Leil. How to Talk to Anyone: 92 Little Tricks for Big Success in Relationships. Chicago, IL: Contemporary Books, 2003.
Rose, Jacki. “Body Language – stop your nervous fidgeting!” Public Speaking Can Be Fun, January 8, 2007. www.publicspeakingcanbefun.blogspot.com/2007/01/body-language-stop-your-nervous.html

-->