Slidegenius, Inc.

3 Benefits on Building Your Audience Before Your Product

Businesses often sell their ready-made products to a yet-to-be-defined customer base.

In a sales pitch, presenters try to convince investors that the income their product generates will make them more valuable in the future. However, this mindset involves plenty of risk.

In his post on The Green Book, Rajan Sambandam of research and analytics firm TRC, he identifies the methods and processes of the new product development framework, which is commonly used by most companies who adhere to traditional marketing. However, there’s a more effective method of getting yourself noticed in the market. This involves using one of your little-known resources: the audience.

1. Real Connections

Some companies believe that reaching out to the audience or customer is the end goal. But flip this model and you’ll have equally productive results, if not more.

Build up your audience by basing the creation of your product on their interests and needs. Best-selling author, Joe Pulizzi, relates the advantages of working with the audience to leverage your product in his LinkedIn article. Compared to the product development method, which banks on a perceived need, audience buildup focuses on an existing issue.

People want authenticity, and if you want to project sincerity, interaction is key. To achieve this, establish rapport with the customer even before your presentation. Addressing this real-life problem instead of a theoretical one is more appreciated because it gives clients something they can readily apply in their daily lives.

2. Cost Reduction

Having a preexisting target market saves you a lot of money.

According to marketing strategist and brand advocate Katherine Dollar, selling a product no one has ever heard of as a company that people don’t identify with requires double the effort on your part. You’ll be paying traditional and digital advertisements without the assurance of people’s interests. As Dollar proposes in her article, however, if you’ve got a market ready for you to cater your product to, you won’t need to market as much.

Knowing your key customers from the onset of your production process already gives you a specific pool to fit your marketing campaign to. This is because you already have an organic network that will continue to grow and spread on its own.

In her article on Forbes, CMO consultant and marketing professor Kimberly Whitler presents word-of-mouth marketing as one of the most effective and easiest marketing techniques. Tapping into this marketing method reduces the cost on availing the help of influencers in the industry to spread the word around.

3. Decreased Risk

Investors want to know how stable your product will be once it’s out in the market. When it comes to business, ensured mutual gain is necessary in getting investments.

Being uncertain about your product’s status because it’s yet to draw attention to potential buyers may make it harder to convince investors to finance you. Starting out with a significant following decreases the risk of losing investors by assuring them that you’re going to hit the ground running.

Having willing buyers out in the market eliminates the probability of failure and increases your product’s chances of success. You have people who are willing to buy your product and help your business grow, which also means a return of venture for your prospective investors.

Conclusion

Keeping a very specific target market in mind while making your product can act as a guide to building an effortless connection between your business and the customer. This saves you the trouble and the cost of promoting and advertising to get yourself noticed by the public eye. A natural network of followers will convince investors of your product’s success compared to haggling for their trust because of the high-risk an unknown product has.

Flip traditional concepts of product creation and establish your audience before your product for better sales.

References

Dollar, Katherine R. “6 Reasons to Build an Audience before Product Development.” Katherine R Dollar. September 10, 2014. www.katherinerdollar.com/reasons-to-build-an-audience-before-product-development
Pulizzi, Joe. “Build an Audience, Not a Product.” LinkedIn. November 2, 2015. www.linkedin.com/pulse/boss-build-audience-product-joe-pulizzi?trk=hp-feed-article-title-comment
Sambandam, Rajan. “New Product Development: Stages and Methods.” GreenBook, The Guide for Buyers of Marketing Research. www.greenbook.org/marketing-research/product-development-stages
Whitler, Kimberly. “Why Word Of Mouth Marketing Is The Most Important Social Media.” Forbes. July 17, 2014. www.forbes.com/sites/kimberlywhitler/2014/07/17/why-word-of-mouth-marketing-is-the-most-important-social-media

Featured Image: “Product Placement” by David Goehring on flickr.com

2 Easy Ways to Avoid Missing Fonts in PowerPoint 2013

Launching a presentation that fails to display your font choices can be disappointing. Not only can this scenario be completely avoided with a few simple checks, but it’s also a waste of time invested in picking a set of fonts that match your pitch.

The problem happens when the fonts you used are unavailable on the computer you’re using for your presentation. Here are two easy ways to help you display custom fonts in your deck:

I. Embed Fonts

Embed fonts in PowerPoint first to guarantee font compatibility when transferring your deck to another computer. Follow these steps so that your fonts won’t go missing during a presentation:

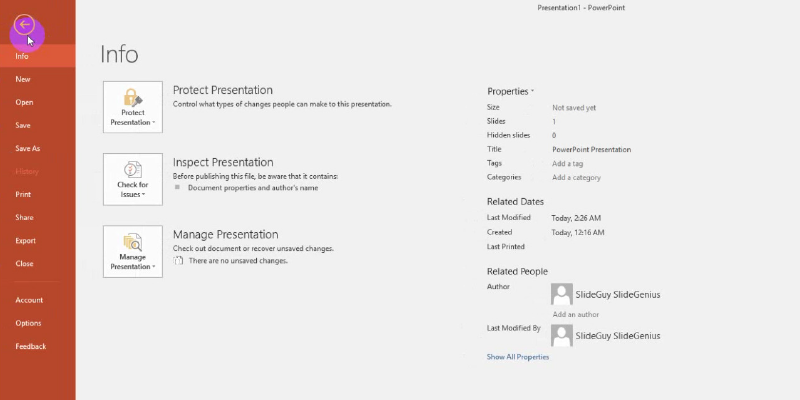
1. Click the File tab on the ribbon. You’ll be taken to the Backstage view.

how to embed fonts in powerpoint 2013

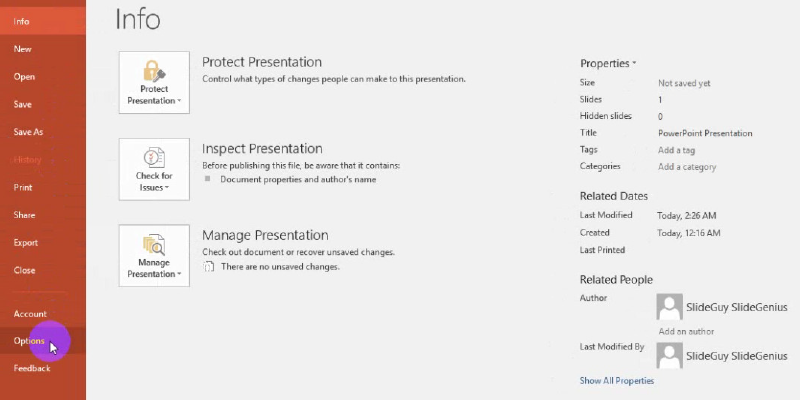
2. Click on Options at the bottom of the vertical ribbon.

how to embed fonts in powerpoint 2013 steps

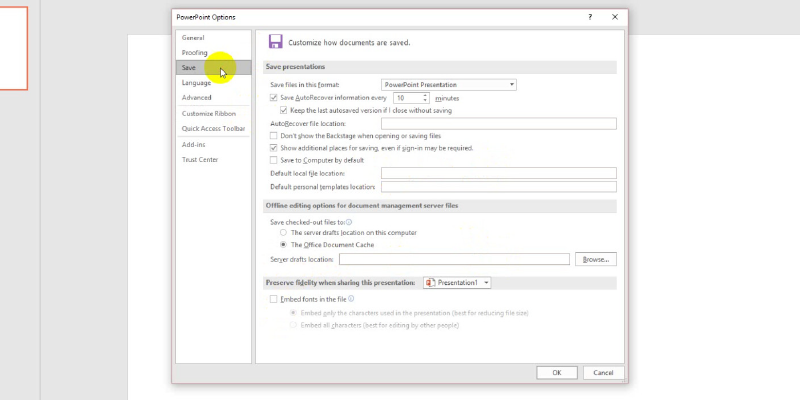
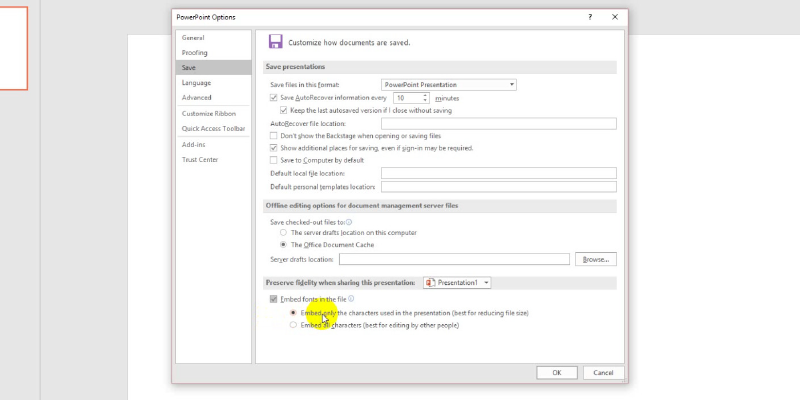
3. A window called PowerPoint Options will appear. Click on Save in the left column.

how to embed fonts in powerpoint 2013

4. Scroll down further and check the box for Embed fonts in the file under the heading that says Preserve fidelity when sharing this presentation.

5. Select Embed only the characters used in the presentation (best for reducing file size).

how to embed fonts in powerpoint 2013: embed only

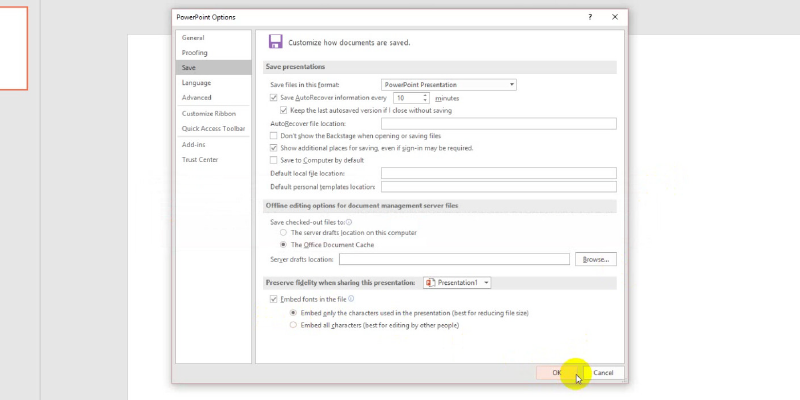
6. Click OK.

how to embed fonts in powerpoint 2013: click ok

Your custom fonts should now be embedded within the presentation. This method eliminates the need of having to install your custom fonts to every computer that will view the presentation.

II. Save as PDF

When you’re pressed for time, saving your presentation as PDF is also a great alternative. It’s ideal for maintaining the appearance of fixed slide layout and fonts. However, this format will be unable to play animations, so do take note if your pitch needs to be viewed with dynamic animation.

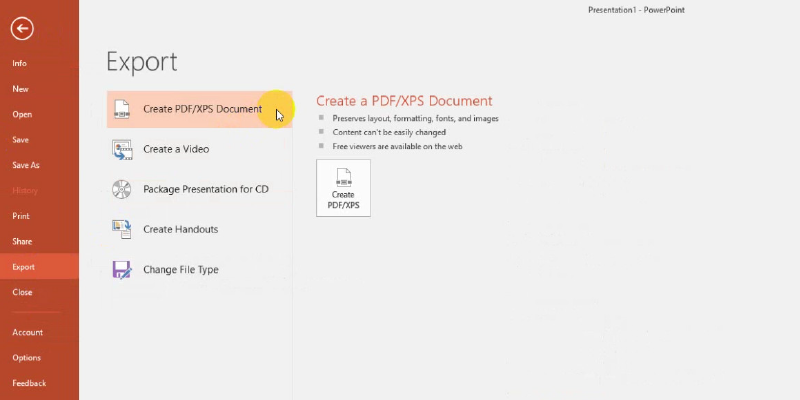
1. Click on the File tab, select Export, then choose Create PDF/XPS Document.

how to embed fonts in powerpoint 2013: create as pdf

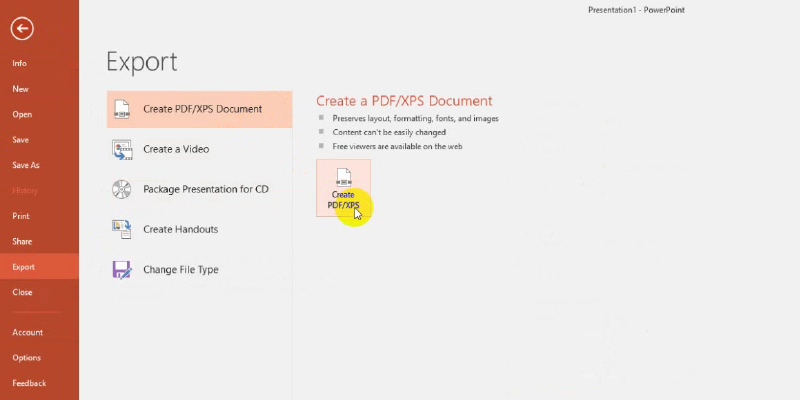
2. Click on Create PDF/XPS.

how to embed fonts in powerpoint 2013: create as pdf / xps

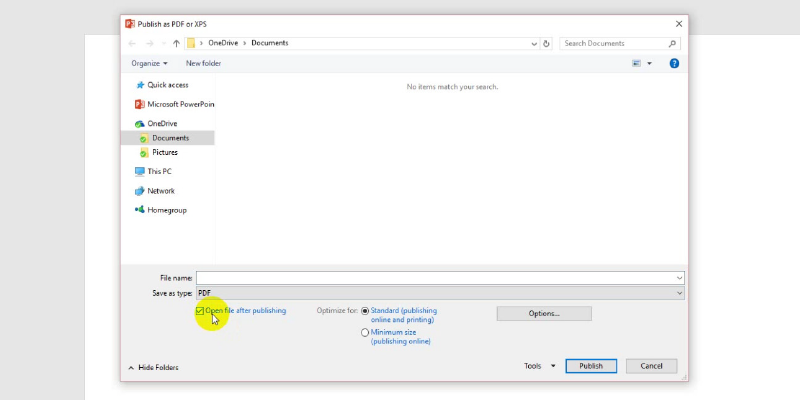
3. A confirmation window will appear. Put a check next to Open file after publishing, below Save as type.

how to embed fonts in powerpoint 2013: open file after publishing

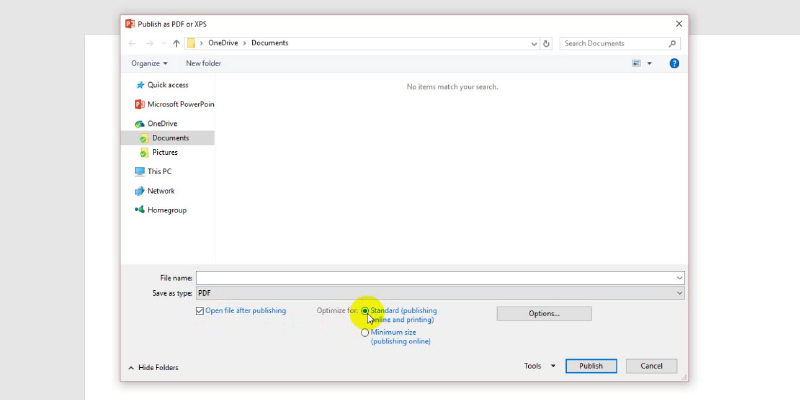
4. Enable Standard (publishing online and printing).

how to embed fonts in powerpoint 2013: standard publishing

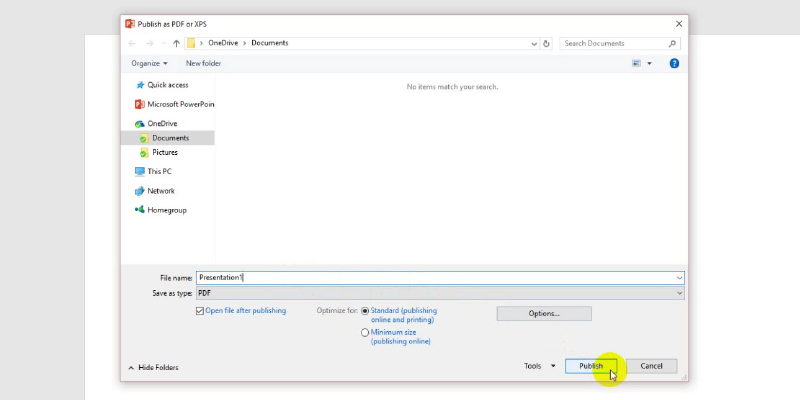
5. Give a file name for your presentation, then click Publish in the lower right corner.

how to embed fonts in powerpoint 2013: click publish

Have a Backup Plan

Using great font combinations for your PowerPoint slides can give your presentation maximum readability. There’s also the added bonus of making your deck stand out from a sea of boring, default font types with a custom font unique to your presentation.

That’s why instances like missing fonts and changes in font formats may put a dent on your well-designed deck. This doesn’t have to happen. Embed your fonts within PowerPoint 2013 to ensure that your custom fonts appear exactly as you want them to during your pitch. You also have the option to save your file as a PDF when you’re in a pinch. Although you’ll preserve the appearance of your slides, a PDF file can’t play any animations that you’ve set in each slide.

Choose among these two easy options so that your fonts won’t disappear when you have a big presentation coming up.


References

“How to embed fonts in PowerPoint.” Microsoft. n.d. www.support.microsoft.com/en-us/kb/826832
“Troubleshoot font problems.” PPTools. n.d. www.pptfaq.com/FAQ00402_Troubleshoot_font_problems.htm

Using Laser Pointers for Effective PowerPoint Presentations

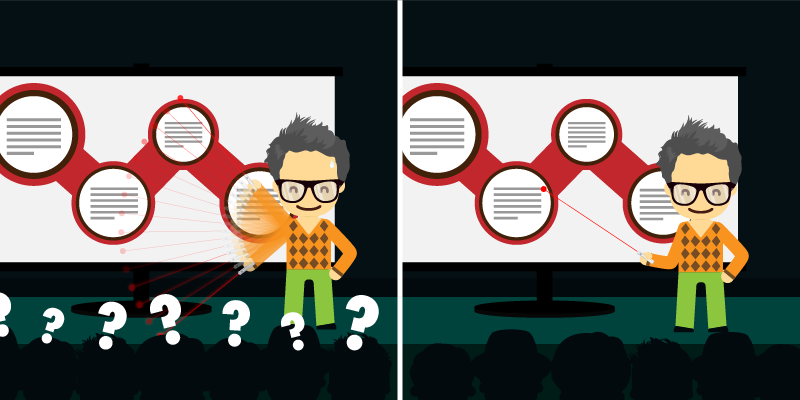
How often do you use a laser pointer to highlight a key point on your slide? Though they’re useful tools for your presentation, laser pens or pointers can unintentionally distract audiences from focusing on your topic. This may happen when you’re overly focused on highlighting a certain point on your deck instead of explaining each idea clearly from your pitch.

While they can help you emphasize a particular idea projected onscreen, they can also keep you from actively engaging your listeners. How? Pointing out something on your slides forces you to look at it rather than establishing an eye contact with your audience. If done frequently, it might prevent you from moving closer to the crowd and interacting with them.

To Use or Not to Use?

Laser Pointers for Effective PowerPoint Presentations Ideas

Pointing at data or objects on the slide with a laser pointer easily attracts attention. This is because the human eye is more sensitive to things in motion rather than still ones. That said, a gleaming and clear dot can be easily detected by our eyes, causing others to pay attention to the detail being pointed out.

However, there are speakers who subconsciously wave it around the room. The reason might be forgetting to turn it off while trying to expound on facts and arguments. Other presenters can also mistakenly point it at their audience. This is why in-depth practice is needed to avoid such incidents. When preparing for the big day, make sure to rehearse your pitch together with your slides to give you an idea when to use the laser pointer when delivering your message.

Whether caused by nervousness or unsteady hands, these actions negatively impact your presentation. Instead of drawing your audience to your performance and directing them to pay attention to your slides, they might get disturbed and distracted. This, in turn, will keep them from getting the intended message and understanding your point.

This is why you need to be careful in handling this tool to avoid losing their interest.

What Should You Do?

Disturbing Laser Pointers in PowerPoint Presentations

You may be asking if a mere pointing device can really improve and strengthen your pitch. However, the answer may depend more on how you convey your message.

With or without a laser pointer, an engaging and dynamic approach keeps your audience in tune with your discussion. However, in this post, we’ll focus on how its usage makes an effective pitch.

Indeed, there are speakers who use laser pointers to read text or encircle an object on the slide. This can work well if you’re speaking in front of a few people. Take note that these shouldn’t be abused and overdone to avoid turning off your listeners.

Aside from crafting a well-designed deck that summarizes your main points, here are a few tips on how you can amplify your performance with laser pointers:

1. Choose your words wisely

performance with laser pointers in powerpoint presentations

If you’re trying to put emphasis on a particular point, make sure not to state the obvious. Instead of uttering phrases like “This one,” start saying “The image shows” to describe the object displayed on your slide. Aside from displaying professionalism by not stating something that can be seen by the audience, it’s also beneficial to some members who find hard to see the laser pointer.

Doing so also gives you the impression that you’re well-prepared and experienced in terms of speaking appropriate words that show respect to your listeners. If they notice that you’ve given much effort in it, they’re more likely to listen and focus on what you’re saying.

2. Maximize your body movement

Maximize your content: lazer pointer in powerpoint presentations

If your topic requires a dynamic approach, then feel free to move and maximize your body language. Whether you’re emphasizing a certain key point or describing something that requires exaggerated movements, do so to support and complement the object of discussion. However, it doesn’t mean that you can use whatever movements or gestures you desire to show without considering if it’ll help strengthen what you’re trying to convey.

Also, make sure to turn off the laser pen when doing so to avoid pointing it towards the audience.

3. Learn to pause

Laser Pointers for Effective PowerPoint Presentations: learn to pause

If you know your topic by heart, you’ll be aware of when to stop and proceed. If you want your audience to recall an important idea, you’ll give them enough time to absorb your message by learning the art of pausing. This can be mastered through deliberate practice and preparation before your actual performance. Before you speak in front, go back to your script, pinpoint those statements that need emphasis, and mark them to guide you when to pause.

You can also record yourself when rehearsing. This will help you pace your speech and match the right words with appropriate body movements.

To Sum It Up: Don’t Overuse Your Point

powerpoint presentations: Don’t Overuse Your Point

Whether you’ll be using a laser pointer or not, you still need a well-designed and animated PowerPoint deck to complement your message. Select the right words, maximize your body language, and learn to pause when using a laser pointer to help you deliver more interesting and impactful PowerPoint presentations.

Consider using pointers as a way to highlight elements in your slide deck for a focused presentation. Never allow your laser pointers to control you. Instead, control them to aim for your purpose.

Our PowerPoint professionals can assist and offer you a free quote to produce well-crafted PowerPoint decks.

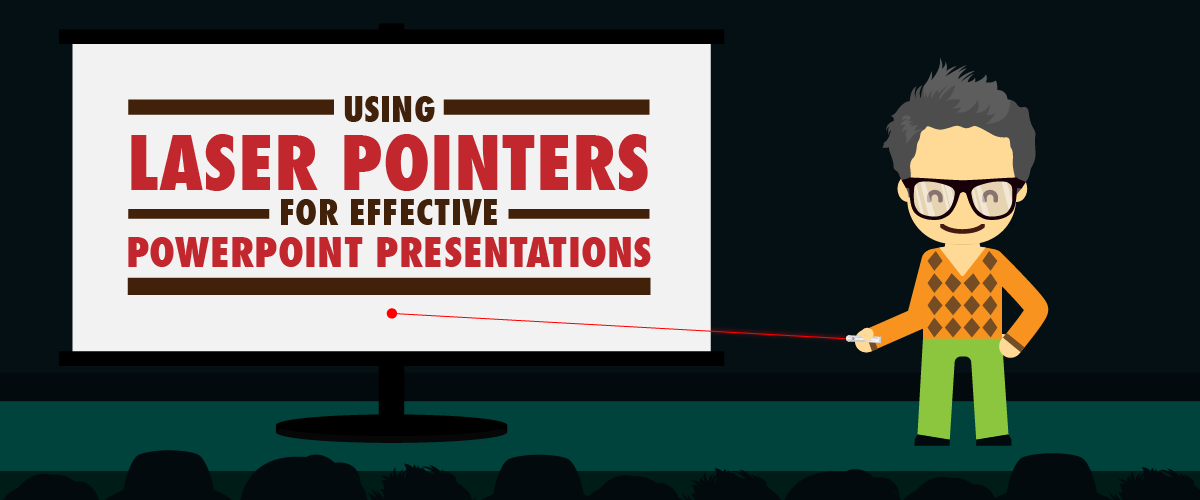
Check out and share our infographic!

References

“Effective Presentations with Laser Pointers.” Colblindor. May 22, 2006. www.color-blindness.com/2006/05/22/effective-presentations-with-laser-pointers
“Presentation Myths: I Need a Laser Pointer.” The Singular Scientist. July 21, 2013. www.womeninwetlands.blogspot.com/2013/07/presentation-myths-i-need-laser-pointer.html

Historical Alternatives: Remembering Life Before PowerPoint

PowerPoint has been around since the 90s. It may sound like recent history to us, but not many people can imagine life without PowerPoint anymore.

The program has dominated everything presentation-related in its short life—from sales pitches to classroom speeches. However, there has been a time when PowerPoint wasn’t around. What did people use before the iconic presentation program, and what can we learn from these historical PowerPoint alternatives?

Find out here:

Oratory Prowess

Before any form of visual aid, great speeches were delivered with good old-fashioned oration. It was either you memorized your speech or you went with an outline you could share impromptu. The downside to this was that people didn’t have the visual cue of a presentation like what PowerPoint does. They either missed some points, hoping it was nothing major, or stumbled through their own thoughts.

Some of the most powerful speeches of all time were simply oratory prowess. These speakers commanded attention by appealing to people’s emotions and letting them see things from their perspective.

Adapt one of these methods in your own pitch to develop your public speaking and persuasive skills. You may be backed up with a winning deck, but that doesn’t mean you should slack on your actual spiel.

Storytelling

In relation to emotional appeal, life before PowerPoint meant keeping your audience’s interest without an occasional powerful image to fix their gaze. How did presenters attract their listeners before visual presentation became a big thing?

Captivating performances were related through the power of a good narrative. These were common experiences that everybody could relate to—stories of their ancestors and their own lives that others may have also gone through before. It was through these stories that people connected to each other and expanded their connections.

Similarly, tap into storytelling by crafting your pitch around a narrative. Don’t just give your data straight to your audience. Be creative and add a human side to your presentation.

Develop a concrete beginning, middle, and end everyone can relate to.

Personal Network

Speakers who weren’t particularly persuasive counted on their personal networks to draw attention to themselves, even outside the stage. They made use of influential people during their time to endorse them.

This still happens today when businesses pitch to influencers who can give them a positive review through word of mouth among their followers. Take your pitch beyond the stage and make use of other avenues to deliver your core message to a larger audience.

Technological advancement makes it possible to reach out to people all over the world without necessarily having to move from where you are. Utilize digital media and different online social platforms to expand your circle. Bring your pitch online since it’s become easier to upload your deck to the Web for everyone to see.

Presenting live is the ideal, but if you want to penetrate your target market at once, consider options outside your actual presentation.

People were already pitching long before PowerPoint. Learn some things from these historical alternatives.

Use emotional appeal the way people used the raw power of their oration to charm large groups of people. Tell a story everybody wants to hear and captivate them with your pitch. Take your presentation outside the slide and into personal networks that will grow and expand.

When you’ve got your public speaking skills down to a T, contact a presentation expert for the perfect deck to match.

Featured Image: “IMG_3235.jpg” by Michael on flickr.com
https://www.flickr.com/photos/helloturkeytoe/4762288052/

How to Add Narration to PowerPoint 2013

Every opportunity needs to be maximized to make a sale. This includes sending a presentation file to clients outside the conference room.

Sound effects and music aren’t the only audio files you can add to your deck. By adding a narration to your PowerPoint 2013 and synchronizing your voice with your slides, you can make it feel like you’re right there discussing your idea. This connects with your audience further since you explicitly tell the story instead of them reading the deck by themselves.

To provide a comprehensive deck that’s easy to understand, add a narration as the final touch to your self-running presentation.

We’ll cover the steps on how you can lay out the narration for your deck. First, make sure that you have a microphone available so that you’ll be able to record yourself.

Set Up for Recording

With a microphone ready, open up PowerPoint 2013 and load up your prepared presentation.

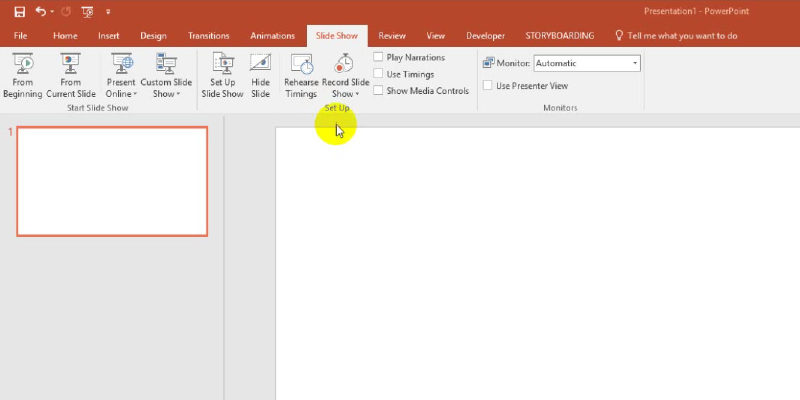
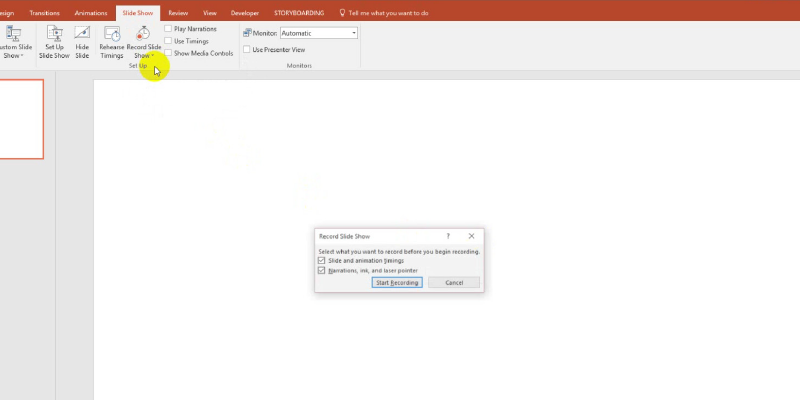
1. Go to the Slide Show tab at the ribbon. In the Set Up group, click on the Record Slide Show dropdown menu.

Screenshots 1-01

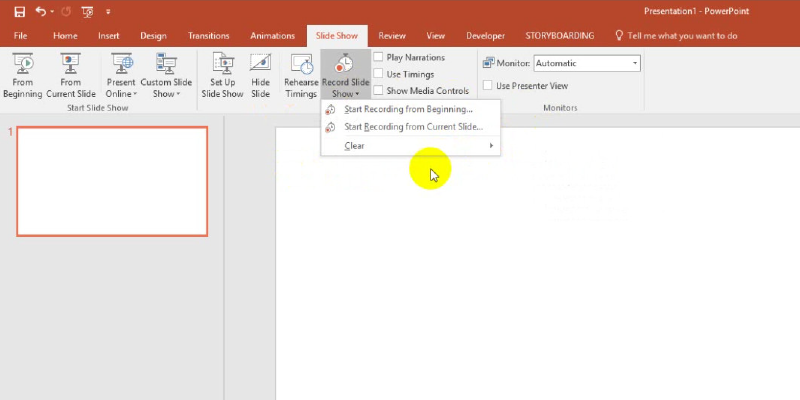
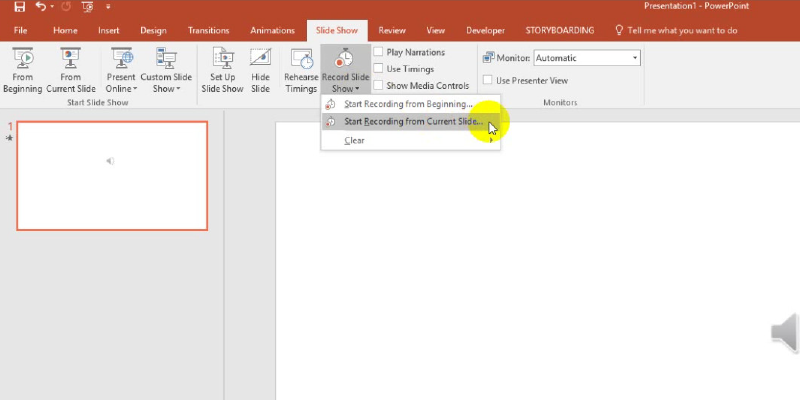
2. Two options will appear: Start Recording from Beginning and Start Recording from Current Slide.

Screenshots 2-01

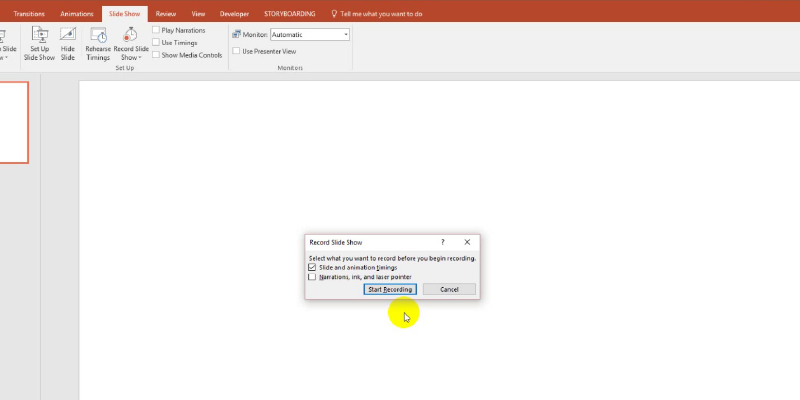
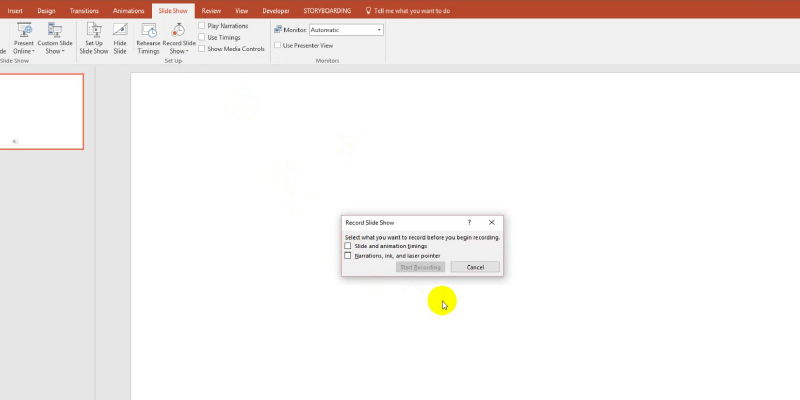
3. By clicking either of these selections, a dialog box named Record Slide Show will appear with recording options.

Screenshots 3-01

4. Tick the box that says Slide and Animations Timing if you want to control slide timings with your recording further. We’ll need to check the Narrations, Ink and Laser Pointer box so we can directly record on each slide.

Checking this box also means that you can use the ink and laser pointer tools as well for your recording if your version of PowerPoint supports it and if these tools are connected.

Screenshots 4-01

5. You can start recording at once by pressing the Record Slide Show icon. Alternatively, you can choose to record on a different slide by clicking the Record Slide Show dropdown menu and selecting Start Recording from Beginning or Start Recording from Current Slide.

Screenshots 5-01

The Recording Menu

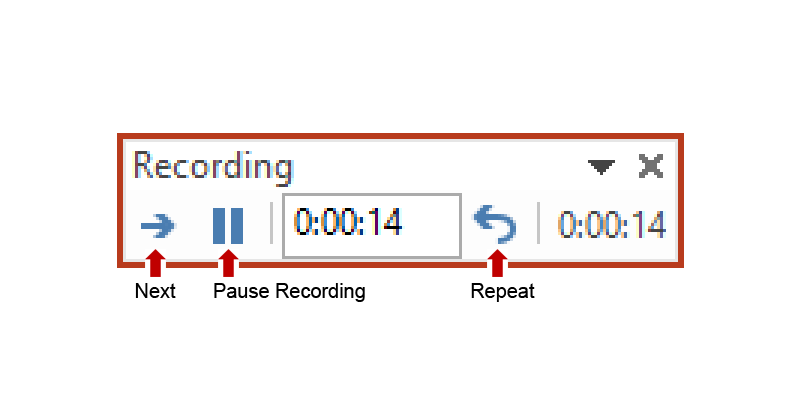
Your slide show will play in full screen as recording begins. On the upper left corner of the screen, you’ll see the small Recording menu.

Screenshots 6-02

Drag it around the screen if you prefer it be elsewhere. You can make the menu smaller, but you won’t be able to make it stretch bigger.

There are three buttons: the straight arrow is the Next button, the pause icon is Pause Recording, and the curved arrow is Repeat. There are also two sets of timers.

Screenshots 7-02

The timer in the middle displays the recording length of the current slide while the timer in the right displays the total recording time of your narration. Let’s take a look at three buttons you need to use here:

1. Next

Clicking this automatically records the audio for the next slide in your presentation. Alternately, simply clicking on the slide will stop and save your current recording. This lets you begin a new one in the next slide.

2. Pause

You can pause and come back where you left off in your current recording using this button. Instead of redoing your entire narration, you just need to refer back to your notes and continue recording.

Just exit your current recording session, manually select the slide and re-record it later with the Start Recording from Current Slide option. This can be found in the Record Slide Show dropdown menu in the Slide Show tab.

Screenshots 8-01

3. Repeat

Retake your entire recording for a slide by clicking on this. The Repeat button does not play back your audio but deletes your previous recording so that you can input a new one. After recording, the slide show will close and return to the Normal View of your presentation.

A sound icon will appear on the lower right corner of every slide where you’ve recorded your audio. Preview your recorded narration by clicking these to show the playback settings. The icon won’t be visible during slide show mode.

Screenshots 9-02

Bring Your Slides to Life

For the moments where you can’t be physically there to give your presentation, you won’t have the chance to answer inquires and clarify information. A narration is crucial to create a comprehensive and interactive presentation.

A narrated deck is even more important especially when you’re uploading it online, where you won’t be around to explain things. Once your deck has been uploaded, you may not always be able to go back and make changes, so don’t miss out on your last chance to make sure that your presentation gets its message across.


References

“Record Your Slide Show in PowerPoint.” Office Support. n.d. www.support.office.com/en-us/article/Record-your-slide-show-in-PowerPoint-9d136e4a-9717-49ad-876e-77aeca9c17eb
“Using the PowerPoint Workspace.” Office Support. n.d. www.support.office.com/en-US/article/Using-the-PowerPoint-workspace-8C6700CF-67C6-4275-A86B-AA87D31C9724

10 PowerPoint Design Tips to Revive Your Slides

Have your presentations been lackluster lately? Do you also find an impressive deck taking too much time and effort to make?

We’ve compiled a list to make it easier for you to achieve your desired deck. All you have to do is apply these simple changes to bring it back to life:

1. Keep Text to a Minimum

There’s absolutely no need to swamp your audience with text. They’ll only get ahead of you if you make all your talking points available for them to read. It also makes them tune out once they’ve read and understood everything.

Write down key points and save the details for your speech. Less text means you don’t have to keep going back to your slides to make corrections. It also means you have more room.

2. Connect with a Narrative

The most natural way of engaging in a conversation is with a story. If you’re struggling to turn your presentation into a narrative, follow a simple structure with a beginning, middle, and end.

Failing to meet one of these three conditions weakens the structure of your presentation. If you fail to reach a conclusion, the listener won’t know what to do with the information provided. The middle contains the meat of your presentation and not giving it enough attention is like skimming through your main points. Finally, because it provides context, skipping an introduction will make you hard to follow. Create a seamless pitch with a narrative structure for a powerful story format.

3. Hit Up PowerPoint Last

Prioritize content. Plan your speech outline and rehearse all your talking points. You’re the center of the presentation, and the program is only there to support you. Don’t make the mistake of becoming an accessory to your slides.

Take a break from crafting your deck to focus on rehearsing your speech. An engaging enough story and message might not need the support of an elaborate PowerPoint.

4. Storyboard Your Presentation

Before you even think of touching PowerPoint, build the structure of your story visually. Don’t jump ahead to slide creation without a plan of action. You’ll waste a lot of effort editing out slides that don’t fit your message. Lay out your ideas on paper so you can move them around freely.

5. Support Your Message Visually

Your image shouldn’t just be relatable to your topic. Since our first point emphasized text reduction, this point will emphasize balancing text with imagery. Hit two birds with one stone by choosing a high-quality stock image that looks good and visually supports your message.

For example, the stock image in the previous section, obtained freely from Kaboompics, is meant to depict the act of storyboarding ideas. This reflects the message of that section, which talks about storyboarding.

Although some sources provide images are free, always give credit where it’s due.

6. Cut Back on Animation Transitions

It’s better to stick to a simple but memorable presentation than be remembered for a convoluted one. Use simple slide transitions like cut, fade, and wipe since these are the least distracting of the bunch. These have been used for years in film editing. Your deck can benefit from these techniques as well. The cut transition is the most subtle, often over in a blink of an eye. Alternately, direct your viewer’s gaze specifically with the fade and wipe transitions.

These simple transitions are effective enough to deliver your points without becoming a distraction.

7. Limit Bullet Points

Use bullet points judiciously. They’re a simple and effective way to list down your key points.

In the example above, the list on the left is much easier to remember and understand than the one on the right since the points are kept to the essentials.

Format your list for consistency of style and content to avoid confusing your audience. Create a logical flow of ideas when using bullet points and keep each key point short.

Your audience can only remember a few key points during your presentation, so don’t add too much to the mix.

8. Choose Your Fonts Wisely

Your font choice plays a big role in PowerPoint design. Instead of plunging deep into the meaning and history behind every font type, we’ve narrowed it all down so you can choose the perfect font in five minutes or less. The fonts we recommend are already in your Microsoft or Apple computer so there’s no need to download anything.

For example, Bodoni is an elegant font that’s suitable for both headers and subheaders. Speed up the process further by plugging in your text and headline in Font Pair to view your text combination immediately.

9. Customize Templates with Slide Master

The Slide Master is your friend. It looks like a complicated feature, but if you have a clear brand identity and message, it’s simpler to use since it applies your formatting changes to your entire presentation.

Fonts and even color schemes can be standardized to give your deck a more consistent look. This makes it more comfortable for clients to view. This tool further customizes your deck. For example, you can append your company logo to all of your slides using Slide Master, and your logo will appear automatically on every slide.

10. Pick the Appropriate Chart

Complex data is difficult to translate visually. How do you know which chart to use for your presentation?

Dr. Andrew Abela, a professor of marketing and renowned presentation design consultant, developed the Chart Chooser for your convenience. Chart Chooser is a flowchart that guides you on how to present with the appropriate chart. Use your judgement to present your data appropriately and attractively.

Conclusion

These PowerPoint Design tips cover vital aspects of your presentation design with a heavy focus on keeping things clear and simple.

Draft your speech outline first before embarking on the design process of your slides. Manage the appearance of your slides later so that you won’t compromise your content by giving it the short end of the stick. Choose which elements go well in your slides. Every part of your slide must contribute to your entire message. Don’t use distracting animation, inappropriate bullet points, or the wrong chart to present your data.


References

Abela, Andrew. “Choosing a Good Chart.” The Extreme Presentation(tm) Method. September 6, 2006. www.extremepresentation.typepad.com/blog/2006/09/choosing_a_good.html
Reynolds, Garr. “10 Slide Design Tips for Producing Powerful and Effective Presentations.” TechRepublic. September 19, 2006. www.techrepublic.com/article/10-slide-design-tips-for-producing-powerful-and-effective-presentations/6117178
Teti, Gianluca. “Bodoni: A Typeface for (almost) Any Occasion.” Gianluca Teti – Web Graphic Designer. July 30, 2014. www.gianlucateti.com/bodoni-a-typeface-for-almost-any-occasion


Featured Image: by Jeremy Goldberg on unsplash.com
Protect Your Slides in PowerPoint 2013

Today, anybody can easily access and share millions of presentations online, whether for personal or commercial use. This is great if you want your file to be shared everywhere, but this isn’t so great when you’re aiming to keep your deck confidential. If you want to keep your PowerPoint presentation solely your intellectual property, you need to set your file’s privacy and viewing permissions properly.

Did you know that anyone can just copy or edit your content whenever they have access to your file? Luckily, this can be avoided with PowerPoint 2013’s file security options, allowing you to protect your slides for good. Here are several ways to protect your presentation from unauthorized access and unwanted changes:
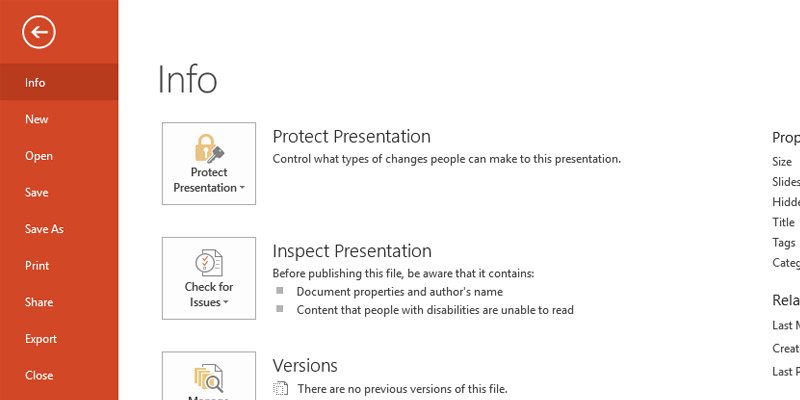
1. Click on the File tab on the ribbon. This leads you to the Backstage View window.

powerpoint privacy

2. While in the Backstage View, click on Info in the menu.

sgblog-protect-your-slides-powerpoint-2013-1

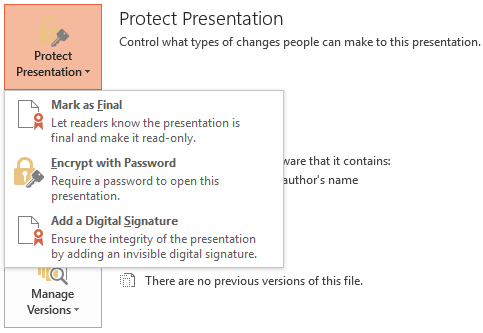
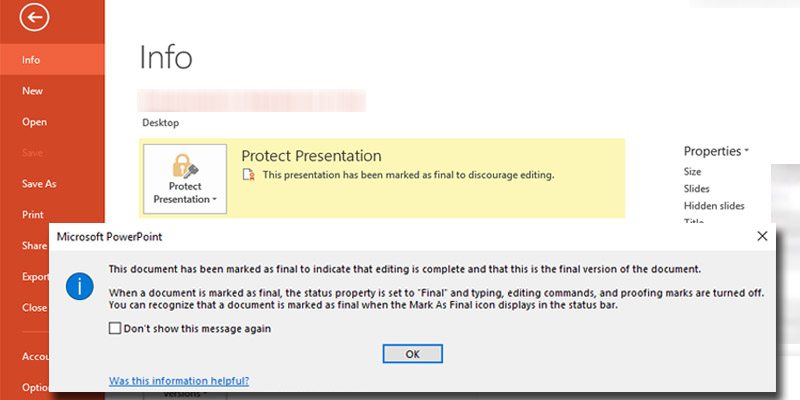
3. Choose Protect Presentation. This will reveal three options you can choose from:

protect presentation

a. Mark as Final: Marking a presentation as final gives you a read-only copy of your PowerPoint. A dialog box will prompt you to accept the changes.

sgblog-protect-your-slides-powerpoint-2013-2

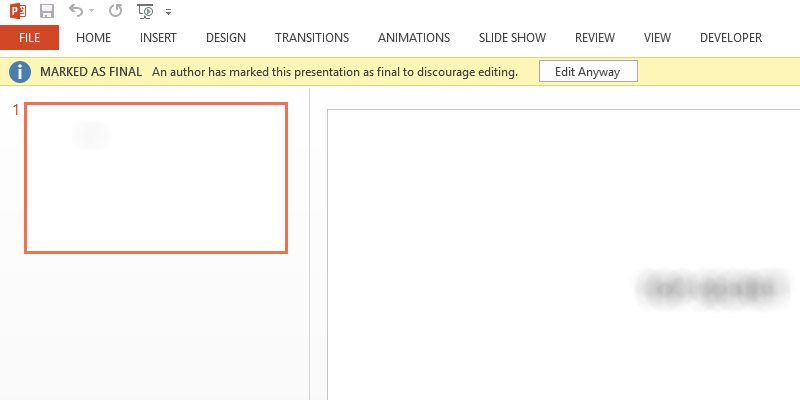
When you try to open a PowerPoint file marked as final, a thin yellow ribbon will appear with a warning. Next to this is a button that says Edit Anyway. Clicking on this button will make the file editable again.

sgblog-protect-your-slides-powerpoint-2013-3

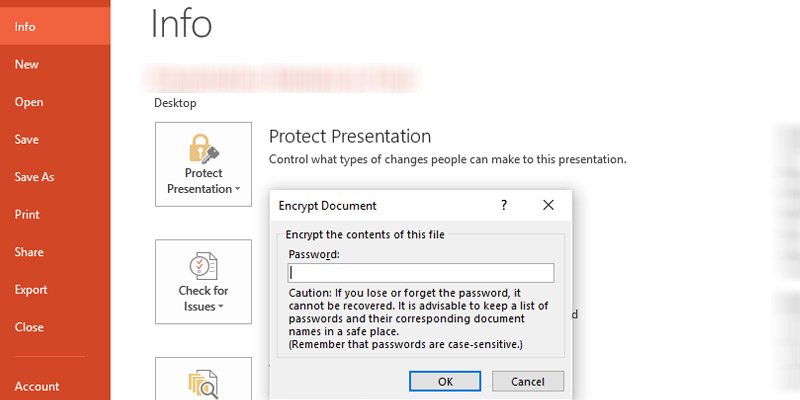
b. Encrypt with Password: Click this if you want to set a secure password for your presentation. A dialog box will prompt you to set a password for your file. Take note that the program cannot recover lost passwords.
sgblog-protect-your-slides-powerpoint-2013-4

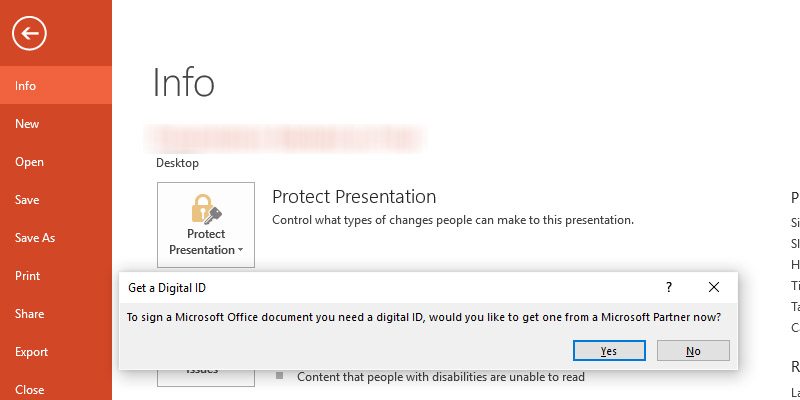
c. Digital Signature: Adding a digital signature establishes your identity and assures people viewing the file that the presentation is your own. To create a digital signature, you need to send the following to Microsoft:

a. Signing certificate and a public key
b. Certificate Authority

sgblog-protect-your-slides-powerpoint-2013-5

In Short: It’s Easy to Protect Your PowerPoint

supporting image-01

Protecting your PowerPoint file keeps your presentation from being edited or viewed by random individuals. If your deck contains confidential or sensitive information, don’t take any risks. Use any of the three options to give yourself some peace of mind and maintain your creative ownership.

Just one thing: Remember your passwords when you choose to encrypt your PowerPoint files. The program cannot retrieve the password when you lose or forget the password you set for it.

A digital signature makes your work appear more authentic and is an excellent way for you to leave your stamp of ownership on your file. The requirements for a digital signature will take more time and effort on your part, but it will be worth it for the extra security it gives.


References

Bajaj, Geetesh. “PowerPoint 2013 Tutorials – File Menu and Backstage View.” Indezine. January 9, 2013. www.indezine.com/products/powerpoint/learn/interface/file-menu-backstage-view-ppt2013.html
“Add or Remove Protection in Your Document, Workbook, or Presentation.” n.d. Office Support. www.support.office.com/en-us/article/Add-or-remove-protection-in-your-document-workbook-or-presentation-05084cc3-300d-4c1a-8416-38d3e37d6826#__toc311701333
“Digital Signatures and Certificates.” Office Support. n.d. www.support.office.com/en-us/article/Digital-signatures-and-certificates-8186cd15-e7ac-4a16-8597-22bd163e8e96
“Protecting Your Presentation.” GCF LearnFree. n.d. www.gcflearnfree.org/powerpoint2013/28.2

We’re in Strong Defense of PowerPoint and So Should You

Let’s put a lid on Death by PowerPoint once and for all.

One program can’t be responsible for the millions of boring presentations being delivered out there, yet the blame always goes to PowerPoint. Learning a craft takes a lot of time and dedication. The lack of time invested in learning the program and designing visual content are the roadblocks that most users can’t overcome in order to create a deck.

It’s too often that people blame PowerPoint for poor presentations, but the program can only make do with what the user puts into it. After all, it’s still only a visual aid. The rest of the presentation’s development rests on your shoulders.

Plan Out and Plot Your Points

The power to do anything with PowerPoint might be what puts off people from the program. Everyone starts with an empty slide, which can understandably be intimidating to stare at and fill with text. Avoid the pressure it places on you by preparing your outline now and creating a PowerPoint later.

Research your topic first. You’ll be ending up with a lot of information. Narrow it all down and create an outline next to trim down data that’s not supporting your message. Facilitate the flow of information for your audience by providing a structure and outlining your ideas before creating a deck.

Familiarize Yourself with PowerPoint

Lack of technical PowerPoint know-how will make it difficult for you to embody your vision on the slide. Familiarize yourself with the basic functions of the program and empower yourself with creation.

Invest time in learning PowerPoint. Look up a tutorial in a search engine, and the results are right there for your convenience. However, here’s another problem: design isn’t something we can come up with on the fly.

Your brand identity depends on your chosen design. The color scheme you pick determines the character of your brand, so pick one that best suits your needs. For example, blue is often seen as a professional color. Try to give it a bit of contrast by pairing it with orange and balance these colors by deciding which color you want to give more prominence.

Learning both the program and design is a multidisciplinary task that you can’t rush yourself into.

Practice, Practice, Practice

PowerPoint can be your ally or your enemy, but you can always count on yourself first.

Invest in your own abilities and hone your speaking skills. Record yourself and point out areas in your speech that gave you trouble and make sure to get it right on the next take. Keep doing so until you can get your entire pitch right in one take. Practice your delivery so that you know your pitch like the back of your hand.

You’re the center of the presentation, and PowerPoint is just there to aid you. Don’t pour all your effort and resources on your deck. Make sure to spend the same amount on yourself.

PowerPoint, Your Partner for the Perfect Pitch

As with most things in life, you can only get out what you put in when it comes to PowerPoint. Resist the temptation to cram your entire research in a few slides. Structure your slides in a way that will make it easier for your audience to follow what you’re saying.

Miscommunication down the line can be avoided if we make the effort to learn the language that machines speak: they wait for us to input a command, then they execute it.

In defense of PowerPoint, it has clear limitations. For one, it can’t customize your pitch according to your vision. You have to provide the input that the program can work with.

Maximize its potential before dismissing the capabilities of this presentation tool. Ask a team of experts to help you get the most out of your pitch.


Reference

Kaptereve, Alexei. “Death by PowerPoint.” SlideShare, July 31, 2007. www.slideshare.net/thecroaker/death-by-powerpoint

-->