Slidegenius, Inc.

Top 5 Presentation Fears and How to Overcome Them

For a majority of Americans, a true horror story doesn’t involve the dead coming back to life. What really scares 76% of the population is far simpler. It’s a situation that regularly occurs in the world of business. In this scenario, there are no zombies or vampires. There’s only an empty stage with an audience looking on.

In lists ranking people’s phobias, the fear of public speaking constantly appears on top. It even outranks the fear of death, which usually appears at number two. Isn’t it odd that we find the idea of facing an audience even more daunting than death? Jerry Seinfeld made a comic observation about it:

I read a thing that actually says that speaking in front of a crowd is considered the number one fear of the average person. I found that amazing – number two was death! That means to the average person if you have to be at a funeral, you would rather be in the casket than doing the eulogy.

So what leads to this heightened response over something that is so integral to our professional lives? Why are people so anxious about sharing their ideas to an audience? What are the presentation fears we need to overcome?

Presentation Fears: What are we afraid of?

As a psychiatrist, Dr. Judith E. Pearson works to help people move past their phobias. In her sessions she discovered three major presentation fears:

  • Being the center of attention
  • Making a mistake in front of others 
  • Repeating mistakes from previous presentations 

Another public speaking coach, Gary Genard, adds a few more factors to the list. According to his experience, presentation fears stem from the following:

  • Feeling dissatisfied with one’s presentation skills
  • Comparing one’s self to other speakers 

‘Re-frame and Regain’: Overcoming presentation fears

According to Dr. Pearson, the best way to overcome your presentation fears is to approach them in a different light. We often get too involved in our fears that it soon becomes the only thing we can worry about. By re-framing the way you handle the situation, you can use your presentation fears as motivation.

Here’s how you can re-frame the 5 presentation fears listed above. Regain your confidence with the following techniques:

It’s not about you

A lot of the most common presentation fears stem from self-consciousness. If your anxiety stems from being the center of attention or how you compare to other speakers, it’s because you’re worried about how the audience perceives you. Are they scrutinizing the way you move and speak? Will they judge you if you make a mistake? Would they rather hear someone else talk about this topic? You get nervous because you worry about what they might be thinking of you.

To solve this problem, you need to stop thinking of what you might be doing wrong. Instead, you need to focus on your goals. What is your presentation about? Why are you delivering it in the first place? What do you want to accomplish by the end of it?

And just like you, the audience is there to accomplish their own goals. They want to hear the information you’re about to share. If you really want to please them, focus on delivering your core message efficiently. As Dr. Pearson puts it, “stop thinking like a victim in front of a firing squad and start thinking like someone who has something worthwhile to say to people who want to hear it.”

Mistakes are unavoidable

Presentation fears can also stem from past experiences. If a crucial misstep derailed a previous presentation, it’s normal to worry that the same thing will happen again. As Genard puts it, “public speaking anxiety is often learned behavior.” But even so, it doesn’t have to be permanent.

Accept that some situations are out of your control and mistakes are inevitable. Instead of obsessing over the mistakes you committed in the past, think of how that experience can help improve your skills.

Practice makes perfect

It might sound cliche, but the best antidote to your presentation fears is sufficient preparation. Take the time to practice your skills and prepare your presentation. Familiarize yourself with all your points and arguments. Give yourself enough time to prepare great visuals. Most importantly, practice your skills even without a presentation coming up. The more you practice, the more confident you’ll feel about facing a crowd to share your point of view.

READ MORE: 

Featured Image: Pablo via Flickr

Multimedia Tricks: 3 Ways to Add More Life to Your Prezi

We’re living in the age of multimedia. Every single day, an average of 60 million photos are uploaded to Instagram. On Facebook, the number is even greater—users are said to post at least 350 million photos daily. Meanwhile, on YouTube, 100 hours of videos are uploaded every minute. In our hyperactive and fast-paced environment, presenting information through text isn’t enough. We all want to see ideas play out through engaging visuals.

Usually, presentations are focused on text, punctuated with with still images that highlight points every now and then. Multimedia presentations differ from this format. Through the use video clips, animation, sound effects, and interactivity, multimedia presentations can give the audience a better visual experience.

Because of it’s dynamic zooming animation, Prezi is already an effective tool for multimedia presentations. However, there are still other multimedia tricks you can try. Here are 3 things you can do to add more life to your prezi:

Use fade-in animation 

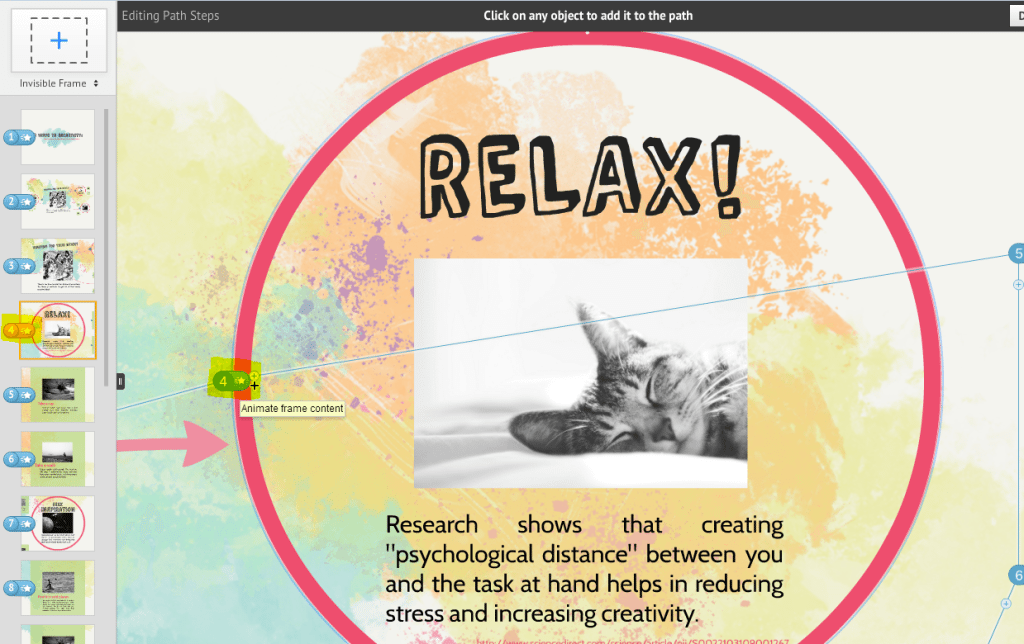
A fade-in effect will add to the dimensional look that the zooming animation already gives. With this technique, you can animate items within a frame to fade as you move along the path. Start by clicking on ‘Edit Path’ at the bottom of the left sidebar. Once in Path Mode, choose the frame you want to animate and click on the star.

prezi multimedia tricks

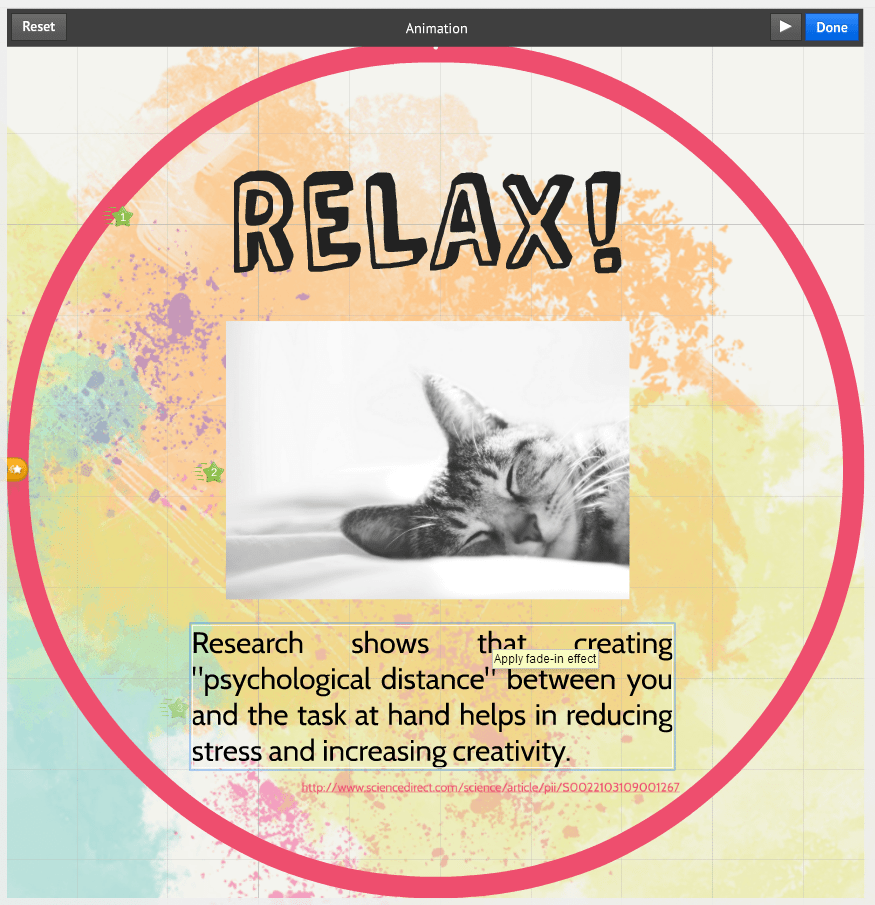
Once the Animation Wizard appears, just select the items in the progression you’d like to appear.

prezi multimedia tricks

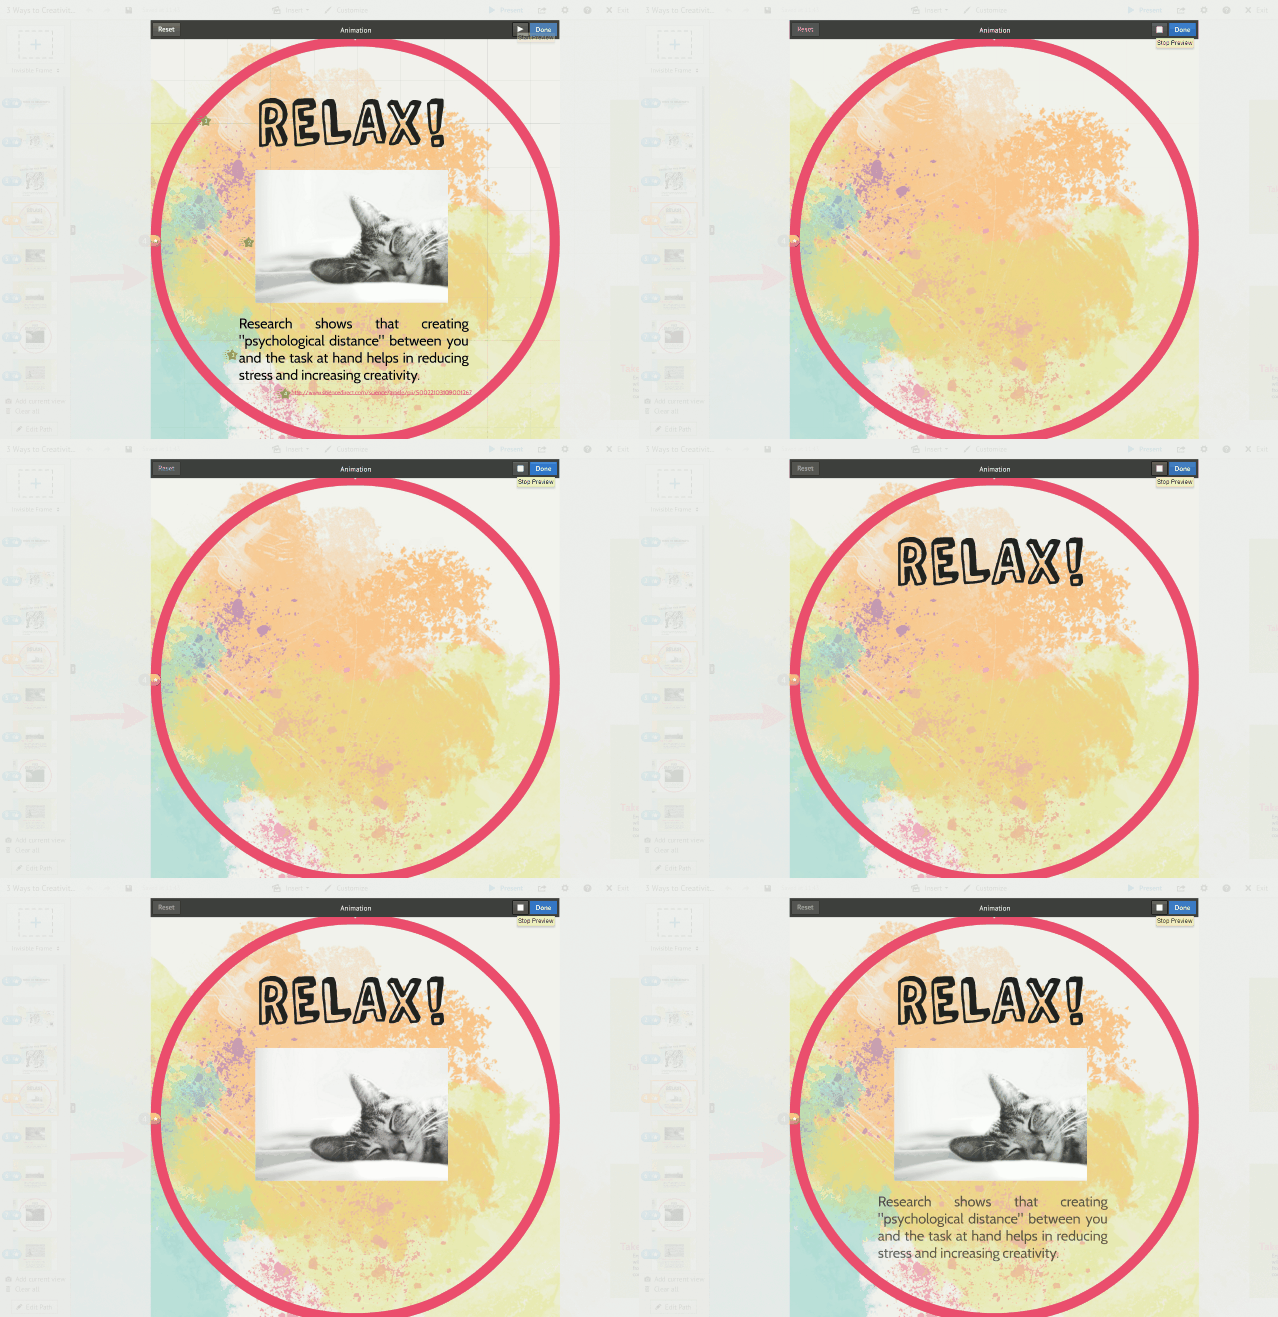
To preview the fade-in effect, click on the Play symbol above.

prezi multimedia tricks

Add background music and voice overs 

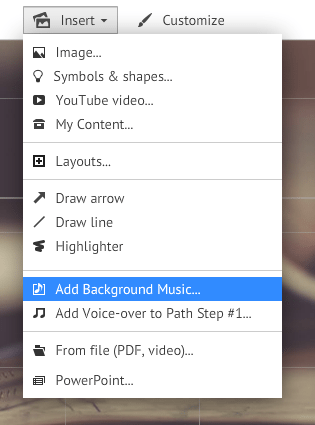
To give your audience a full multimedia experience, you can also add sound clips to your prezi. You can choose to add a background track which will play on loop as you deliver your presentation. Just click on Insert from the top menu and choose ‘Add Background Music’.

prezi multimedia tricks

Once you’ve selected the file you want, Prezi will start to upload the audio.

prezi multimedia tricks

With the upload completed, you can click on the Play symbol to preview the track. To delete track, just choose the Trash icon.

prezi multimedia tricks

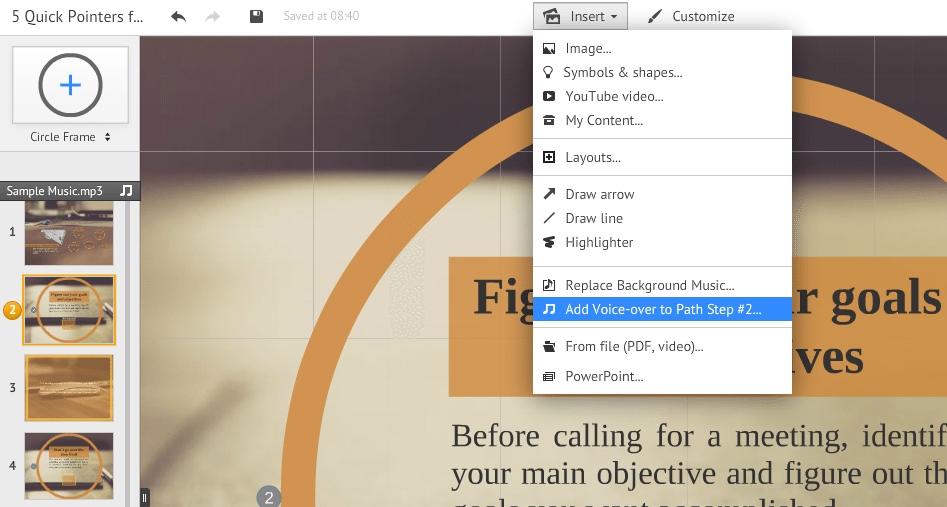
If you’re planning to share your prezi online, you can also add voice overs that will play as viewers move along the path you defined.

Select the path step or frame you want from the left sidebar, then click on Insert from the top menu.

prezi multimedia tricks

prezi multimedia tricks

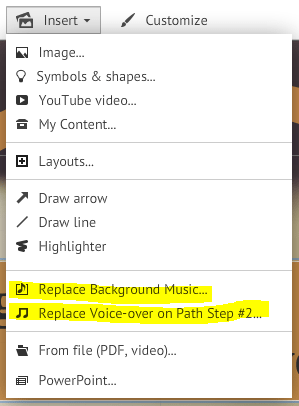
And if there’s anything you want to change, you can easily replace any of the sound files via the Insert option.

prezi multimedia tricks

Keep in mind that there’s only a handful of audio file formats you can upload. Currently, Prezi supports the following:

  • MP3
  • M4A
  • MP4
  • WMA
  • WAV
  • FLAC
  • OGG
  • AAC
  • 3GP

If the sound clip you want to use is in another format, there are tools you can use to convert your files.

Insert video clips

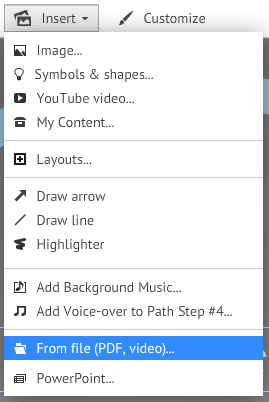
To complete your multimedia presentation, you can insert short video clips to your prezi. You can decide to upload a file from your computer or embed a video from YouTube. To add a clip that’s already saved on your computer, simply click on Insert and choose ‘From File’.

prezi multimedia tricks

You can upload videos in any of the following format:

  • FLV
  • MPG
  • MPEG
  • MP4
  • WMV
  • MOV
  • F4V
  • M4V
  • 3GP

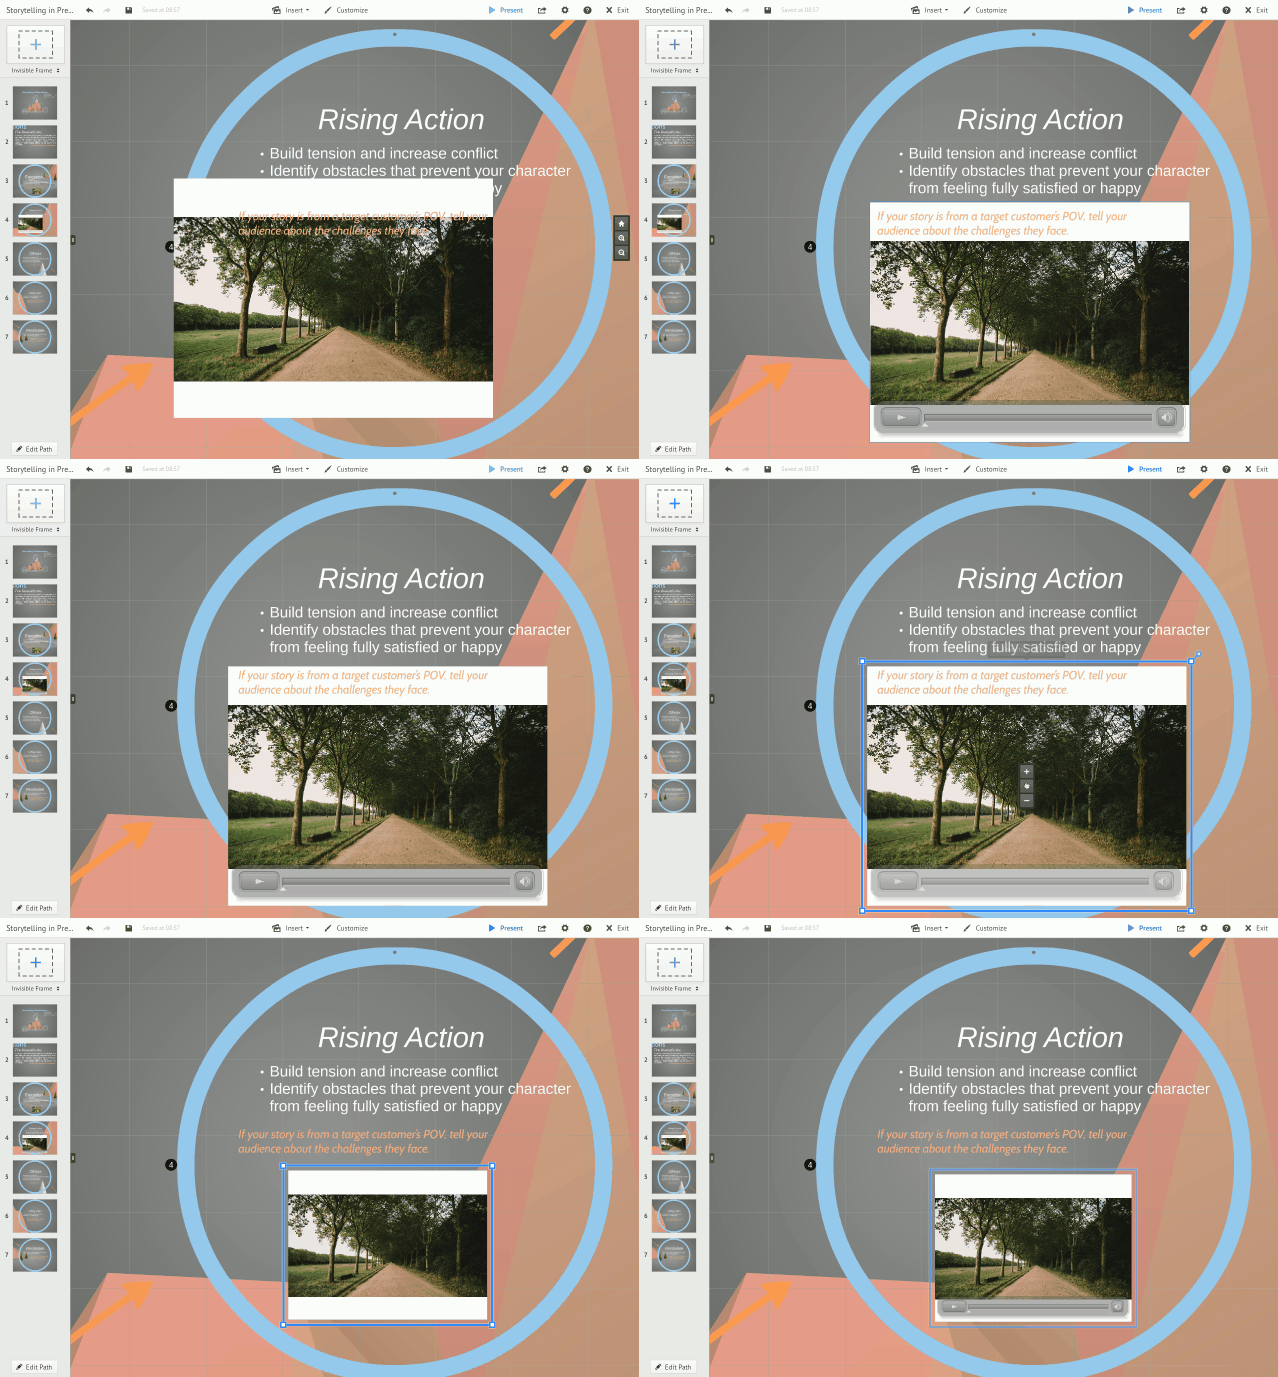
Once the upload is done, you can now move and resize the video using the transition tool.

prezi multimedia tricks

To embed from YouTube, make sure you have the video prepared in another tab. Head to the Insert option once again and choose ‘YouTube Video.’ A pop up box will appear where you’ll have to paste the YouTube link.

prezi multimedia tricks

You can then use the transition tool to make size adjustments and move your video around. Be sure to add attribution using the text tool, either in the same frame or at the end of your prezi.

There you have it! It’s not hard to come up with unique multimedia presentations, especially with a flexible tool like Prezi. Give your presentations more life than before using these 3 multimedia tricks.


Featured Image: Featured Image: Death to the Stock Photo / Prezi logo via Wikimedia Commons

Presentation Hacks: 8 Tips for the Tired Presenter

The world of business moves at such a fast pace and we all do our best to keep up. We juggle tasks to meet deadlines. We rearrange schedules to make time for more. We run as fast as we can to deliver the best results. But as hard as we try, there are times when our minds and bodies beg for us to slow down. Luckily, there are several methods and life hacks to help you run the proverbial last mile. The real challenge is having to deliver a presentation when you’re feeling worn out. How can you convince an audience when you barely have enough energy to keep going?

SlideGenius Blog Module One

Get hundreds of PowerPoint slides for free.

Sign up for your free account today.

Sign Up now

There’s no rest for the wicked, nor the presenter who spent all night polishing his presentation. Regain your energy and composure with these surprising presentation hacks:

Presentation Hack 1: Discover the power of the power nap

We often combat sleepiness with a cup of coffee, but it could be time to consider another method. According to several experts, caffeine might cause you even more fatigue in the long run. If you want to feel awake in time for your presentation, the best solution is to take a power nap.

Research has found that a quick 10-20 minute nap is enough to improve alertness and cognitive performance. Set your alarm and get a few minutes of shut-eye. Just make sure you don’t sleep for more than 30 minutes or you’ll feel even more groggy due to sleep inertia.

Presentation Hack 2: Smooth out your wrinkled clothes in the restroom

After a nap, you’ll likely find wrinkles in your clothes. To fix your shirt, simply head to the nearest restroom. Lay out your shirt on the counter and place a damp towel over the creased area, smoothing it out with your hands. Make sure you wipe the counter down first so you don’t soil your shirt further. If you have one available, you can also use a hair or hand dryer to speed up the process.

Presentation Hack 3: Chew on cinnamon gum for fresh breath

With no time for a nap, you probably had to make do with the temporary buzz that caffeine gives you. If that’s the case, you can get rid of the dreaded coffee breath by chewing on cinnamon-flavored gum. Researchers have found that Big Red, the cinnamon-flavored gum by Wrigley’s, contains ingredients that reduce bacteria in the mouth.

If you’re not a fan of cinnamon, you can also opt for gum sweetened with Xylitol.

Presentation Hack 4: Gargle with baking soda and warm water to clear your throat

Sometimes, it’s our voice that gives away how tired we feel. When your throat is feeling rough before a presentation, try combining a quarter teaspoon of baking soda with a warm cup of water. For sore throats, switch baking soda with half a teaspoon of salt.

Presentation Hack 5: Break down your core message into a 15-word summary

It’s easy to lose focus when you’re feeling sleepy. If you’re not careful, you might even trail off in your discussion. Make sure you keep track of your presentation by breaking down your core message into a 15-word summary. This can work as a sound bite, which you can constantly repeat to remind the audience (and yourself) of the main idea behind your presentation.

Presentation Hack 6: Bite back your ‘um’s and ‘like’s with deep breaths

With lack of focus, you might also find yourself blurting out some dreaded speech fillers. Whenever you catch yourself about to say “um” and “like”, stop yourself with a deep breath. Another way you can avoid these fillers is by pacing the way you speak. Give yourself sufficient time to pause after a few sentences.

Presentation Hack 7: Spend 2 minutes standing like a superhero

Amy Cuddy’s famous TED Talk discussed how “power posing” can lead to success. She suggested that simply changing our posture can affect the levels of cortisol and testosterone in the brain, leading us to feel more powerful and confident. For 2 minutes, stand straight, lift your chin, hold up your arms in a V-shape, and get that push you need.

Presentation Hack 8: Give yourself enough time to set up the venue

As busy and tired as you might be, it’s important that you set enough time to prepare before your presentation. Make sure you arrive at the venue at least 15 minutes before your presentation. Use the time to set up your PowerPoint display. If you encounter any errors, you can use this troubleshooter to solve the problem.

It’s hard to jump start any activity if you’re feeling low on energy. Give yourself the boost you need and achieve the best outcome with these simple and easy-to-do presentation hacks.

SlideGenius Blog Module One

Download free PowerPoint templates now.

Get professionally designed PowerPoint slides weekly.

Sign Up Now

Featured Image: reynermedia via Flickr

Visual Storytelling: How Stories are Told in Pictures

Are pictures really worth a thousand words? Let’s take a look at some facts.

According to a whitepaper published by NewCred and Getty Images, the following statistics are proof:

  • 40% of people will respond better to information presented visually
  • 83% of human learning is visual
  • 44% of users are more likely to engage with brands on social platforms if they post pictures
  • Articles and blog posts that contain images get 94% more views than those without

Aside from all that, there’s also proof in the way our mind works. The human brain can process visuals 60,000 times faster than information presented through text. In fact, we’re all highly attuned to our sense of sight. According to Dr. John Medina, vision trumps all of our other senses.

With these facts laid out, it’s easy to see why images are important to presentations and marketing materials. Through visual storytelling, you can use pictures to create stronger emotional impact. Pictures can tell a story that immediately allows your audience to connect with the message you’re sharing.

So whether you’re delivering a presentation or revamping your social media profiles, visual storytelling is the best way to go. When selecting pictures to use, try to keep in mind the four key characteristics of visual storytelling:

Authentic

The best stories come from candid moments. It’s why photo sharing has become so prevalent in the age of social media. Replacing the super-polished stock photos are snapshots that allow others to see the world through a more personal perspective. Take, for example, Dove’s Real Beauty campaign. Instead of featuring models that are photoshopped to perfection, Dove featured everyday women and challenged today’s absurd beauty standards.

To find images that are more authentic to your story, focus on what your brand stands for. Look for images that convey your identity and experiences as a brand. Next, look for something that will resonate with your audience. Think about the people you’re addressing and what might be authentic for them.

Relevant

Visual storytelling should also take into account what’s happening in the world. After all, your message doesn’t exist in a bubble. It’s contextualized in a milieu—a world where billions of individuals are discovering new things every single day. Make sure your visual stories are relatable and relevant to the audience you want to target. Consider what Oreo did to make the most out of a blackout that interrupted the Super Bowl. For your own visual story, choose images that evoke a sense of time and culture.

Sensory

The only thing better than a picture is the real thing. But since you can’t have real situations on a PowerPoint slide, you’re going to have to settle for the next best thing. Visual storytelling thrives on imagery that can heighten emotions and senses.

Close-up and macro shots are great for showing textures that audiences can almost touch. On the other hand, a long shot can also take your audience into a particular scene, allowing them to experience it through a wider perspective.

Archetypal

Lastly, the best of visual storytelling alludes to narratives that are practically as old as time. If you think about it, you’ll notice that all your favorite stories are tied together by recurring themes and archetypes. These are universal symbols—called such because they can be found across many different countries and cultures. For your visual stories to be a success, you need to take these symbols and turn it into your own.

Find an archetype that relates to your brand and make it your own. Get to know your own new character and find images that correspond to this new version of a well-loved symbol.
Visual storytelling is great technique to use in presentations and marketing efforts.  By weaving imagery together, you can create a story that speaks volumes about your core message.

READ MORE: The Power of Visual Storytelling – NewsCred + Getty Images (Whitepaper)

Featured Image: Ravinder M A via Flickr

Second Chance: Overcoming a Negative First Impression

We all know how important first impressions are. In the world of business, you always need to have your best foot forward. Whether you’re networking or delivering a high-stakes presentation, a positive impression is the first step to achieving the outcome you desire. As they say, “your never get a second chance to make a good first impression.”

So what happens when you commit a misstep? Is there really no way to recover from a negative first impression?

SlideGenius Blog Module One

We redesign PowerPoint presentations.

Get your free quote now.

get a free quote

We can’t escape the fact that people make mistakes. We’re all susceptible to committing errors and oversights. Maybe you told a joke that didn’t sit well with your client. Maybe you called the key decision maker by the wrong name. Maybe you tripped on your way up to the podium. Whatever the scenario, there are still ways to save the situation.

Here are a few tips for overcoming a negative first impression:

Apologize as soon as you can

It seems easier to ignore the issue, but doing so will only make the situation worst. Don’t sweep your mistakes under the rug. Face it head on and apologize.

Show your sincerity

Keep in mind that a simple “sorry” won’t fix the situation. Your apology needs to be genuine and sincere. Show that you understand your mistake and that you’re to own up to it. Don’t be defensive or shift the blame on anything else. Always own up to you did and avoid a “non apology.”

You should also be mindful that there’s danger to apologizing too much. Dwelling on your mistakes will only bring attention to it. Once is enough.

Move forward and fix the negative impression you made. Continue with your pitch or presentation, taking extra care to watch your behavior. Try to regain your confidence and focus on achieving your goals.

Don’t dwell on your mistakes

That said, the best way to move forward from a bad situation is to shake it off. Don’t assume that others think the worst of you because of a simple oversight. You’ll be surprised to learn how understanding other people are. Slight mistakes might even increase your likability. There’s no need to worry as long as you’re sincere and you work hard to correct your mistakes.

Show a bit of humor

Certain situations are better addressed with a self-deprecating joke. If your faux pas is something as minor as losing your balance on stage, use humor to deflect the tension and make everyone laugh. Keep your jokes focused on yourself so you don’t risk offending others. However, you should also use this technique sparingly as it might hurt how the audience sees you. Here’s a quick guide on how you can effectively incorporate humor to your presentations.

While first impressions matter, last impressions also hold a lot of weight. Don’t let a few missteps overshadow your hard work or the message you want to deliver.

SlideGenius Blog Module One

Download free PowerPoint templates now.

Get professionally designed PowerPoint slides weekly.

Sign Up Now

Featured Image: Jase Curtis via Flickr

The End: Tips for Concluding Presentations

In movies, beginnings are spent introducing the lead character. During this time, viewers get to connect with the story as it starts to unfold.

In the same way, the beginning of a presentation allows the audience to make an initial connection. A powerful beginning can hook an audience, urging them to ask more questions about the topic at hand.

Despite this, beginnings can’t fully account for the outcome of your presentation. There’s more to a successful outcome than an eye-catching title slide and a humorous icebreaker. Presentations also need to end on a distinct and powerful note. You can’t just thank the audience and be done with it. Your conclusion should ring true long after the audience leaves the venue.

SlideGenius Blog Module One

We redesign PowerPoint presentations.

Get your free quote now.

get a free quote

In other words, endings should create as much impact as beginnings do. Here are a few tips to keep in mind when concluding presentations:

Reiterate your main points

After a lengthy discussion, offer a refresher by reviewing the most important points of your discussion. Repeat all your main points using short and quick sentences. Don’t try to explain everything again. Just echo all the sound bites you’ve been repeating throughout your presentation. For full effect, you can make a list and display it on a slide.

Resolve the story

We’ve made a strong case for storytelling in the past. Stories can improve your presentations by allowing your audience to connect with the message you’re delivering.

Following your narrative structure, close your presentation by discussing the resolution of your story. Show the audience how the conflict you introduced is eventually worked out and put to rest.

Challenge the audience

It’s important to pose a challenge to your audience. Leave them with a thought-provoking question that will encourage them to reflect on what you’ve shared. If you do it right, your challenging questions will help keep discussions about your presentation alive.

Offer a concrete Call to Action statement

Similarly, you can also end with a Call to Action statement. Give your audience a concrete plan to consider and execute. While the previous method might work for seminars and lectures, a Call to Action statement leaves no room for doubt. If you’re pitching to investors or proposing a new project to executives, you want to make sure that your message is received loud and clear. A Call to Action statement will definitely help with that.

Much like beginnings, endings hold a lot of weight. For presentations, a strong conclusion will ensure that your message sticks with the audience. Keep these tips in mind when concluding presentations and get your intended outcome.

SlideGenius Blog Module One

Download free PowerPoint templates now.

Get professionally designed PowerPoint slides weekly.

Sign Up Now

Featured Image: Andrew Hurley via Flickr

Troubleshooting Your PowerPoint Display Issues

It’s every presenter’s worst nightmare.

You spend weeks preparing, designing slides and refining talking points. But when it’s finally time to set up your PowerPoint display, you can’t seem to make the slideshow work properly. You start to panic, realizing that your audience is slowly filling the venue. What will you do now?

Despite all your preparation, it’s hard to predict how everything will fall into place. Sometimes, there’s no avoiding technical difficulties. And it doesn’t have to be ominous as it sounds. Your presentation can still run smoothly even after a few PowerPoint display issues. Use this troubleshooter to identify and solve the problem.

PowerPoint Display Issue: The deck works well on the computer, but the projector won’t display it

After connecting all your presentation equipment, you find out that the projector isn’t working. Try these steps to solve the issue:

Double-check power switch

This might seem obvious, but it’s pretty easy to neglect when you’re focusing on a dozen different tasks at a time. Check to see if the projector’s power switch is on. If it isn’t, make sure that the projector is plugged into the outlet.

Check projector standby mode

If the power switch is on, check to see if your projector is running on standby mode. Maybe someone else was using it earlier and forgot to turn it off. The standby mode saves power and keeps the projector from overheating. Check if the fan is running even with the main bulb turned off.

Set up dual display 

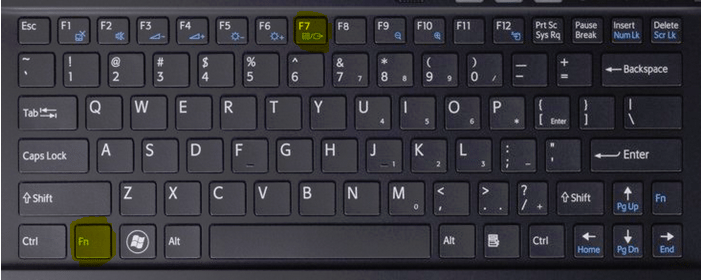
Make sure you configure dual display for your laptop or PC. After connecting your laptop to the projector, hold down the Function (Fn) key and hit the Display key. Look for a key that illustrates two different screens. For older models, this key might have “VGA” on it. If you’re on a PC, you can enable dual display by holding the Windows key and pressing the letter P.

powerpoint display - laptop fn display keys
Press Fn + Display key to configure dual display on your laptop. (Photo Source)

Use the direction keys to toggle between different display settings. Don’t forget to choose Extend if you have Presenter View enabled.

Set up projector input source

You can also check to see if you have the projector input source correctly defined. There are several different modes to choose from. Maybe the projector is on TV mode by default. Change the setting to computer mode. Use the projector’s remote or look for a button on the top of the projector.

Readjust cables

Your PowerPoint display issues might also be caused by loose cables. Readjust the cables connecting your computer and projector. Use the thumbscrews to secure the cables onto their respective ports.

Readjust projector cover

A loose projector cover is another possible problem. As a safety precaution, a projector with a loose cover won’t turn on the bulb. Turn off the device and check if everything is tight and secure. Always switch off the projector before checking for a loose cover to avoid accidents.

PowerPoint Display Issue: The slide deck shows up on screen, but the display is bad or difficult to see

The projector works, but you’re getting very poor display. Maybe the image is cropped or the text looks blurry. Maybe your slides look dim and is difficult to read. These are the steps you can take to solve poor PowerPoint display issues:

Change projector and computer resolution to match  

The resolution of your projector and computer might not be compatible. If your computer display resolution is higher than the projector’s, you might end up with a cropped image. Check to see if you can adjust the projector to match your laptop or computer. If you can’t, you can also adjust your computer’s display settings in the Control Panel.

Turn off display on your laptop

It’s also possible that your laptop doesn’t allow for a strong output signal when dual display is enabled. Depending on the nature of your presentation, it might be better to just stick with an external display. As you did when configuring dual display, hit Fn + Display or Windows + P and choose Projector only.

powerpoint display - external display
Turn off external display. Press Fn + Display on your laptop or Windows + P on your PC.

Adjust projector settings

Another thing you can do is to tweak the projector’s settings. Use the remote or the control buttons to make changes on brightness and display. You can also change the position of your projector or adjust the elevator mechanism. Make sure that the projector is at a perpendicular angle from the screen.

Check room lighting

Another possible fix is to adjust the lighting inside the venue. Turn off lights that are near the projection screen. If the image still looks washed out, your problem might be a faulty projector bulb. Projector lamps can only be used for a certain period of time. Any longer and it will lose its brightness. Ask the technical staff for assistance on replacing the lamp. If they don’t have one available, you have no other choice but to switch off as many lights as the audience is comfortable with.

Fix color contrast

When everything else seems to check out and you’re still getting poor display, the issue might be with your color choices. Make sure your background and text colors have a really high contrast. Use dark backgrounds with white text, or vice versa.
Technical difficulties are no cause for panic. Troubleshoot your PowerPoint display issues and solve the underlying problem. If you’re quick on your feet, the audience might not even realize that something went wrong.

READ MORE: 

Featured Image: CollegeDegrees360 via Flickr

PowerPoint Photo Album Feature: Add Multiple Images at Once

With a fast approaching deadline, we just don’t have enough time to meticulously arrange slides. Luckily, there are plenty of PowerPoint shortcuts that can help speed up the process. Aside from learning quick commands and customizing your toolbars, PowerPoint also allows you to add multiple images at once with the Photo Album feature. This shortcut is especially useful if you plan to use images as the focal point of your PowerPoint design.

Get started by following this step-by-step tutorial:

Create Photo Album

To access the Photo Album feature, head to the Insert tab. Click the Photo Album icon and choose New Album.

This will prompt a dialogue box where you can enter all the pictures you want to include in your presentation. Choose all the images you want to insert by clicking on the File/Disk button. You can select multiple pictures at a time by holding down either the CTRL or SHIFT key. CTRL allows you to pick and choose pictures, while SHIFT automatically selects all the files between the first picture and the last picture you click.

You can also do some customization on the dialogue box. You can specify how you want the pictures to look on the slides under Picture Layout, do some basic photo editing, and select a specific template for your photo album. Make adjustments and then click Create.

PowerPoint will automatically arrange your pictures in a new presentation, which you can edit as you like.

Add multiple pictures to an existing presentation file

You can also use the Photo Album feature to add multiple pictures to an existing presentation. Open the PowerPoint file you want to edit, then follow the same steps as indicated above. Despite having an existing presentation open, PowerPoint will still turn your photo album into a new presentation.

Copy the slides you need by selecting the thumbnails on the left sidebar of the photo album (named by default as “Presentation2”). Then, you can easily paste it to your original presentation.

Once you familiarize yourself with PowerPoint’s different function and features, you will see how easy it is to come up with quick and exciting designs. Use this tip to make sure your image-centered design concept comes to fruition.

Featured Image: martinak15 via Flickr
Images used in sample Photo Album by Death to the Stock Photo

Body Language: Signify Intent with Movement

Nonverbal cues are just as important as the slides you’re presenting. The way you stand and move across the stage can have significant impact on the message you’re delivering. Improve your presentations and increase your influence by learning more about the art of body language.

Body language is a powerful weapon

In a previous blog post, we discussed how body language plays an important role in forming positive impressions. Your first few seconds on stage is particularly crucial. In that short span of time, the audience can gather enough information to form their own opinions about you. As Mark Bowden, author of Winning Body Language, points out,

“In the first few seconds of meeting someone, they will determine whether you are friend or predator, and the rest of the time their brains will be gathering information to support that.”

A recent study conducted by Dr. Alex Pentland takes this one step further. As quoted by Susanne Garguilo of CNN, research concludes that “body language can predict the outcome of interactions such as job interviews, dating, negotiations, etc., with an average accuracy of 80%.”

As such, we can’t possibly ignore the power body language has to significantly improve presentation delivery. If you want to connect with the audience, you need to show them that you’re trustworthy and reliable. You need to form a presence that commands their attention.

How body language adds to your presentation

Contrary to popular belief, body language isn’t similar to the way we express ourselves through speech. A certain movement doesn’t necessarily correspond to a specific word or feeling. There’s no such thing as a body language handbook or dictionary that will help you crack the hidden meaning behind particular gestures. As Forbes contributor Nick Morgan writes,

Gestures are ambiguous. They can mean many things. If I cross my arms, I may be signaling my defensiveness, but I may also be cold, or simply tired and propping myself up with my arms – or just getting comfortable. And I could be signaling all those things at once. It’s possible to be simultaneously cold, tired, defensive, and desirous of comfort.”

When we’re unconscious of our movements, body language is pretty good at signifying our emotional intent.

“…research shows that whatever we’re feeling first shows up in our body, and only later (nanoseconds later) in our conscious minds. So, if we’re hungry, or impatient, or angry, or happy, our bodies know first, and they will pretty reliably signal those feelings. Learning to read body language, then, is a matter of learning to understand other people’s intents, not their specific conscious thoughts.”

If this is the case, how does body language add to presentation delivery? It works by highlighting the points and arguments you’re making. In other words, conscious adjustment of your posture, gestures, and expression will emphasize and underscore whatever your saying.

In this way, body language allows you to add an emotional dimension to your presentations. Even if your good posture doesn’t necessarily correspond to a specific meaning, it nonetheless shows the audience something positive and welcoming.

Allow body language to add intent and dimension to your presentation by reading more tips:

SlideGenius Blog Module One

Download free PowerPoint templates now.

Get professionally designed PowerPoint slides weekly.

Sign Up Now

Featured Image: -5m via Flickr

Go With the Flow: 5 Tips for Structuring Your PowerPoint Deck

Even with breathtaking visuals, it will be hard to make sense of your PowerPoint deck if it doesn’t follow a logically sound structure. Think about it: a movie filled with special effects won’t be able to hold its own without a storyline. In the same way, your PowerPoint deck needs to be guided by a structure that will allow your audience to make sense of the message you’re delivering.

These are 5 simple tips for structuring your PowerPoint deck:

Tip #1: Figure out the flow with a storyboard

Always sort out the details of your presentation before working on a PowerPoint deck. Begin by brainstorming your ideas, narrowing them down into an outline, and then arranging them into a complete storyboard. You can’t build a tight and well-structured deck if  you don’t have a proper starting point.

Tip#2: Give your audience an overview at the start of a presentation

After opening with a memorable title slide, show the audience what they can expect from you by providing a brief overview or outline. On a single slide, list down your agenda in short and repeatable phrases. Don’t forget to add related visuals and leave room for white space.

Tip #3: Break down topics into sub-sections

If you’re tackling a complex topic, you can break down your PowerPoint deck and create sub-sections. For example, Apple presentations are often divided into three major sections. To make the discussion even simpler for the audience, each section is further divided into sub-sections.

Tip #4: Utilize the footer

If you’re dealing with several sub-sections in a single PowerPoint deck, help your audience keep track of the flow of your presentation by utilizing the footer. Below each slide, create a marker that will allow people to see where your discussion falls in the overall outline. Let’s say you’re pitching to investors. You’re currently discussing your marketing strategy, which is a subsection of Marketing and Sales. Make sure your audience doesn’t get lost by having something like this on the footer of your slides:

footer01

Tip #5: If applicable, use the Assertion-Evidence Framework when building slides

It might sound like a mouthful, but the assertion-evidence framework is pretty easy to follow. Basically, it means that any statement you make in your slide should be supported by evidence that’s based on data. You can make your assertions in the headline of your slide, and use illustrations or diagrams to detail the evidence. Learn more about this simple but effective framework here.

If you want to ensure a successful outcome, you can’t just put together slides haphazardly. You need to carefully arrange your PowerPoint deck following a structure that’s logically sound and easy to follow. With these tips, you can make sure the audience is able to go with the flow.

Featured Image: Roland Tanglao via Flickr

-->