PowerPoint Lesson: The Rule of Thirds in Slide Design

PowerPoint Design

powerpoint design lessons

presentation design

rule of thirds

The Rule of Thirds is a fundamental design principle that can elevate your PowerPoint slide design by creating balance, harmony, and visual interest. Originally used in photography and art, the Rule of Thirds divides a slide into nine equal sections, creating a grid that helps you position elements in a visually appealing and effective way.Here’s how you can apply the Rule of Thirds to PowerPoint slide design:


1. Understand the Grid

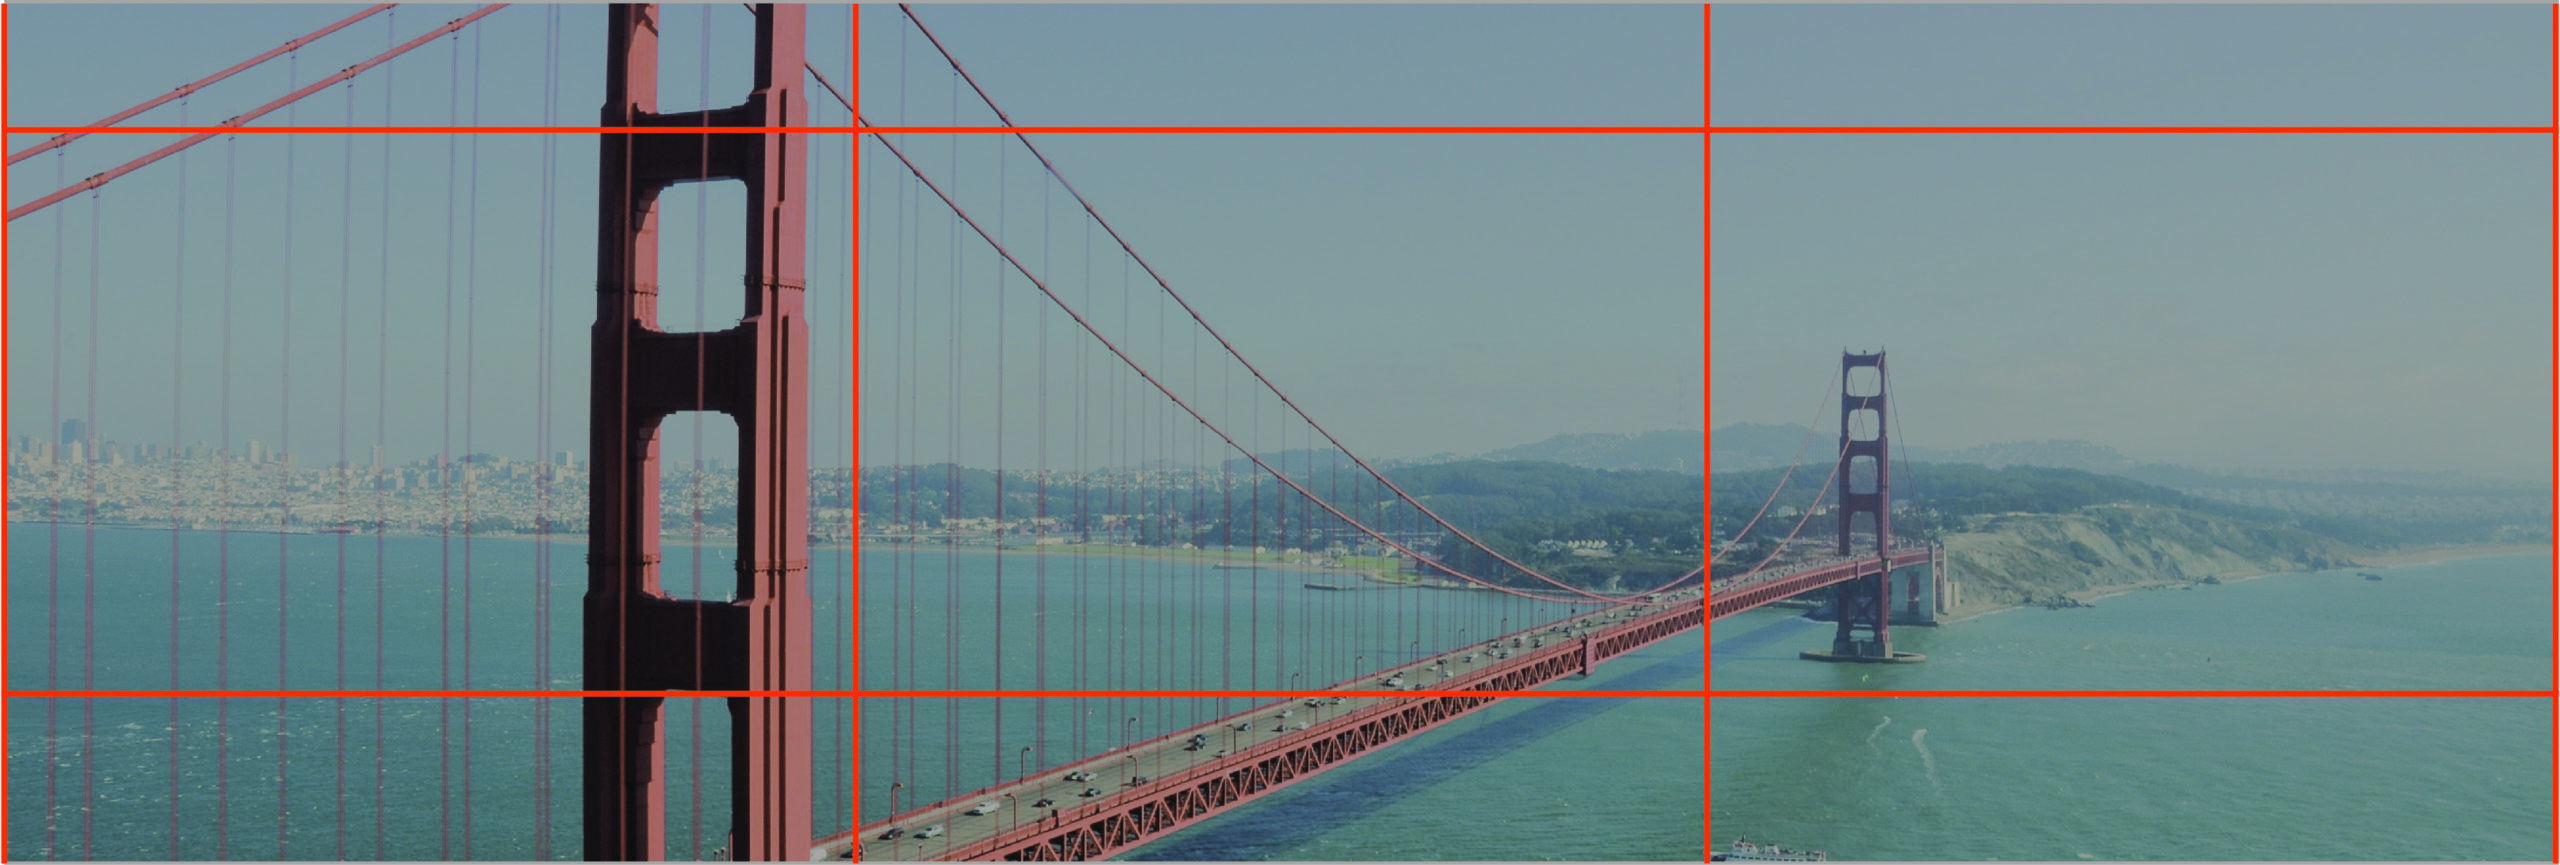
The Rule of Thirds divides your slide into three horizontal and three vertical sections, creating a grid of nine equal parts. The points where the horizontal and vertical lines intersect are called “power points,” which are ideal places to position key elements on your slide.Why It’s Important:

  • Creates Visual Balance: By positioning elements along the grid lines or at the intersections, you create a sense of balance and harmony in your design.
  • Draws Attention: Placing important elements at the power points naturally draws the viewer’s eye to those areas, helping you guide the audience’s focus.

How to Apply It:

  • Mentally divide your slide into a 3×3 grid, with two horizontal lines and two vertical lines.
  • Place important content, such as images, headlines, or key points, along the grid lines or at the intersections.

Example: Position an image on the left third of the slide and place the headline on the top right third to create a balanced and visually appealing design.


2. Position Key Elements at Power Points

The power points—the intersections of the grid lines—are the most visually impactful areas on the slide. Placing your most important elements at these intersections helps guide the audience’s attention.Why It’s Important:

  • Increases Focus: Viewers’ eyes are naturally drawn to these points, so placing critical information or visuals at these intersections ensures they capture attention.
  • Enhances Emphasis: Using power points for key content gives those elements more visual weight and importance.

How to Apply It:

  • Identify the four intersection points on the grid.
  • Place key visual elements (such as your logo, a central image, or a headline) at one of these intersections for maximum impact.

Example: If you have a product image, place it at one of the power points on the grid to draw immediate attention to it.


3. Avoid Centering Everything

A common mistake in slide design is placing all elements in the center of the slide. While centering may seem like a balanced approach, it can create a static and less dynamic design. The Rule of Thirds encourages you to position elements off-center, creating a more engaging visual layout.Why It’s Important:

  • Creates Movement: Placing elements off-center using the Rule of Thirds creates a sense of movement and flow, making the slide more dynamic and engaging.
  • Breaks Monotony: Centering everything can make your design feel predictable and repetitive. The Rule of Thirds introduces variety and visual interest.

How to Apply It:

  • Instead of placing text or images in the exact center, use the grid lines or intersections to position elements slightly off-center for a more visually appealing layout.
  • Experiment with placing your main points or visuals on the left or right third of the slide rather than in the center.

Example: Instead of placing a text box in the center of the slide, align it with the left third of the grid, while leaving space for a complementary image on the right.


4. Balance Text and Images

The Rule of Thirds helps you balance text and images on your slides. By positioning text on one-third of the slide and images or graphics on the remaining two-thirds, you create a clean, balanced design that is easy to follow.Why It’s Important:

  • Enhances Readability: When text and images are evenly balanced across the slide, the audience can easily follow the content without being overwhelmed by either element.
  • Creates Visual Harmony: The Rule of Thirds ensures that both text and visuals are given adequate space, creating a harmonious layout.

How to Apply It:

  • Use one-third of the slide for your text content and the other two-thirds for images, charts, or other visuals.
  • Ensure that the text and images are aligned with the grid lines to maintain a balanced design.

Example: On a slide explaining product features, position a list of features on the left third of the slide and use the remaining two-thirds for an image or diagram that illustrates the product.


5. Use White Space Strategically

White space, or negative space, is an essential part of slide design, and the Rule of Thirds can help you use it effectively. White space gives your design room to breathe, preventing clutter and making your content easier to read.Why It’s Important:

  • Prevents Clutter: Proper use of white space ensures that your slides aren’t overcrowded with content, making it easier for the audience to focus on key elements.
  • Improves Focus: White space draws attention to important areas of the slide by reducing distractions from surrounding elements.

How to Apply It:

  • Use the grid created by the Rule of Thirds to balance content with white space.
  • Avoid filling every section of the slide—leave some areas blank to create breathing room and draw attention to key points.

Example: Position a quote or headline on the top third of the slide, leaving the bottom two-thirds as white space to highlight the text and create a clean, uncluttered design.


Final Thoughts

The Rule of Thirds is a powerful tool for creating visually engaging, well-balanced PowerPoint slides. By dividing your slide into a grid and positioning key elements along the lines or intersections, you can guide the audience’s attention, create visual interest, and maintain a clean, professional design. Whether you’re designing a presentation for business or creative purposes, applying the Rule of Thirds can elevate the impact of your slides and improve the overall effectiveness of your message.

Extending the Metaphor: 3 Tips for Choosing Images in Prezi

images in prezi

presentation design

Prezi Feature of the Week

prezi tips

visual storytelling

Choosing the right images is essential in Prezi, where visual storytelling and movement play a central role in how ideas are conveyed. Prezi presentations rely on motion and spatial relationships between content, making it important to select images that not only support your message but also enhance the flow and storytelling.Here are three key tips for choosing images in Prezi that extend your metaphor and strengthen your presentation:


1. Choose Images that Reinforce the Metaphor

In Prezi, visuals are often used to build upon metaphors that guide your narrative. To make your presentation more cohesive and compelling, choose images that directly support and expand on the metaphor you’re using to frame your presentation.How to Do It:

  • Extend the Visual Metaphor: If you’re using a metaphor of a “journey” or “roadmap,” choose images like roads, paths, or maps to visually reinforce that concept. If your metaphor is a “growth” story, use imagery of plants, trees, or seeds sprouting to illustrate stages of development.
  • Create Consistency: Choose images with a consistent style, color palette, or theme. This helps create a cohesive narrative and makes it easier for the audience to follow the flow of your story.

Example: For a presentation on business development as a journey, you could show images of winding roads, signposts, and checkpoints to symbolize the progress and milestones along the way.


2. Use High-Quality, Simple Images

Prezi’s zooming feature allows you to move in and out of different elements, making the quality and clarity of your images especially important. High-quality images enhance the professionalism of your presentation, while simple, clean images help avoid overwhelming your audience.How to Do It:

  • Use High-Resolution Images: Because Prezi zooms in on images, you’ll want to use high-resolution visuals that retain their quality even when enlarged. Pixelated images can be distracting and diminish the impact of your presentation.
  • Avoid Overly Complex Images: Simplicity is key in Prezi. Choose images that communicate one clear idea rather than those packed with too many elements. Complex images can confuse your audience and detract from the overall message.

Example: If your presentation covers financial growth, a clean, simple bar chart or line graph works better than a crowded chart with excessive data points.


3. Align Images with Movement and Flow

One of Prezi’s strengths is its ability to move seamlessly between content areas. The images you choose should align with the movement of your presentation, both spatially and thematically, ensuring that the flow of your narrative feels natural and intuitive.How to Do It:

  • Follow the Flow of Movement: Prezi allows for zooming and panning between different sections, so place images strategically to enhance the flow. For instance, if you’re moving from one idea to the next, use images that complement that transition, such as a visual that leads the eye from one point to another.
  • Link Images to Key Messages: Use images to serve as visual anchors for important concepts. Place them in a way that makes your narrative easy to follow as the presentation zooms in and out.

Example: For a presentation on project management, you could use an image of a Gantt chart or timeline that the Prezi zooms into, helping the audience focus on specific stages of the project.


Final Thoughts

In Prezi, images do more than just supplement text—they drive the entire visual storytelling process. By choosing images that reinforce your metaphor, maintaining high quality, and aligning with Prezi’s natural movement, you can create a visually captivating and engaging presentation. These tips ensure that your images not only support your message but also help guide the audience through your narrative seamlessly.

Visual Storytelling: How Stories are Told in Pictures

Marketing

presentation design

visual storytelling

Are pictures worth a thousand words? Let’s examine some facts. According to a whitepaper published by NewCred and Getty Images, the following statistics are proof:

  • 40% of people will respond better to information presented visually
  • 83% of human learning is visual
  • 44% of users are more likely to engage with brands on social platforms if they post pictures
  • Articles and blog posts that contain images get 94% more views than those without

Aside from all that, there’s also proof in the way our mind works. The human brain can process visuals 60,000 times faster than information presented through text. In fact, we’re all highly attuned to our sense of sight. According to Dr. John Medina, vision trumps all of our other senses. With these facts laid out, it’s easy to see why images are important to presentations and marketing materials. Through visual storytelling, you can use pictures to create stronger emotional impact. Pictures can tell a story that immediately allows your audience to connect with the message you’re sharing. So whether you’re delivering a presentation or revamping your social media profiles, visual storytelling is the best way to go. When selecting pictures to use, try to keep in mind the four key characteristics of visual storytelling:

Authentic

The best stories come from candid moments. It’s why photo sharing has become so prevalent in the age of social media. Replacing the super-polished stock photos are snapshots that allow others to see the world through a more personal perspective. Take, for example, Dove’s Real Beauty campaign. Instead of featuring models that are photoshopped to perfection, Dove featured everyday women and challenged today’s absurd beauty standards. To find images that are more authentic to your story, focus on what your brand stands for. Look for images that convey your identity and experiences as a brand. Next, look for something that will resonate with your audience. Think about the people you’re addressing and what might be authentic for them.

Relevant

Visual storytelling should also take into account what’s happening in the world. After all, your message doesn’t exist in a bubble. It’s contextualized in a milieu—a world where billions of individuals are discovering new things every single day. Make sure your visual stories are relatable and relevant to the audience you want to target. Consider what Oreo did to make the most out of a blackout that interrupted the Super Bowl. For your own visual story, choose images that evoke a sense of time and culture.

Sensory

The only thing better than a picture is the real thing. But since you can’t have real situations on a PowerPoint slide, you’re going to have to settle for the next best thing. Visual storytelling thrives on imagery that can heighten emotions and senses. Close-up and macro shots are great for showing textures that audiences can almost touch. On the other hand, a long shot can also take your audience into a particular scene, allowing them to experience it through a wider perspective.

Archetypal

Lastly, the best of visual storytelling alludes to narratives that are practically as old as time. If you think about it, you’ll notice that all your favorite stories are tied together by recurring themes and archetypes. These are universal symbols—called such because they can be found across many different countries and cultures. For your visual stories to be a success, you need to take these symbols and turn it into your own. Find an archetype that relates to your brand and make it your own. Get to know your own new character and find images that correspond to this new version of a well-loved symbol. Visual storytelling is a great technique to use in presentations and marketing efforts.  By weaving imagery together, you can create a story that speaks volumes about your core message. READ MORE: The Power of Visual Storytelling – NewsCred + Getty Images (Whitepaper) Featured Image: Ravinder M A via Flickr

Themes: Customizing a Prezi That’s Unique to Your Presentation

custom themes

presentation design

Prezi Feature of the Week

prezi themes

prezi tutorial

One of the strengths of Prezi is the ability to create presentations that are highly customized and visually unique. While Prezi offers a range of themes, customizing these themes to fit your specific needs and branding is what will truly set your presentation apart.Here’s how to customize a Prezi theme to make it unique to your presentation:


1. Choose a Base Theme

Prezi offers a variety of base themes that serve as the foundation for your design. While you can start with any theme, the real customization comes from adapting it to your needs and preferences.Why It’s Important:

  • Sets the Tone: The base theme provides a visual framework, such as colors and fonts, which sets the tone for your entire presentation.
  • Gives You a Head Start: Starting with a theme allows you to focus on customizing details instead of building a design from scratch.

How to Do It:

  • Browse the Prezi theme gallery and choose a theme that matches the tone and style of your presentation.
  • Once selected, begin customizing the theme to fit your needs.

Example: If you’re creating a presentation for a creative pitch, choose a theme with bold colors and dynamic layouts. For a corporate presentation, opt for a more subdued, professional theme.


2. Customize Colors to Match Your Brand

One of the easiest ways to make your Prezi unique is by customizing the colors to match your brand. Prezi allows you to adjust the color scheme, which will be applied to backgrounds, text, and other design elements.Why It’s Important:

  • Enhances Brand Recognition: Customizing colors to match your brand makes your presentation instantly recognizable and consistent with other marketing materials.
  • Improves Visual Cohesion: A well-chosen color palette ensures that your presentation looks cohesive and professional.

How to Do It:

  • In Prezi, click on the Theme button to access the color options.
  • Choose colors that reflect your brand or the mood of your presentation. For example, you can use your company’s official colors for backgrounds, headings, and key elements.

Example: If your company’s colors are blue and orange, customize the theme’s color scheme to apply those colors to key elements like backgrounds, text, and lines.


3. Adjust Fonts for Readability and Branding

Fonts are another key element of customization. Prezi allows you to change fonts for headings, subheadings, and body text, ensuring that your presentation is both readable and aligned with your brand’s typography.Why It’s Important:

  • Reinforces Brand Identity: Using your brand’s fonts ensures consistency with your other branded materials, reinforcing your brand’s identity.
  • Improves Readability: Choosing the right font size and style makes your content easier to read, especially when viewed on large screens.

How to Do It:

  • In the Theme settings, adjust the fonts for titles, headings, and body text.
  • Choose fonts that reflect your brand’s personality and ensure they are legible at all zoom levels.

Example: If your brand uses a modern, sans-serif font like Roboto, apply this font to your Prezi headings and body text to maintain a consistent look.


4. Customize Backgrounds

The background of your Prezi sets the overall tone of your presentation. Whether you choose a subtle texture, a bold image, or a simple color, customizing the background helps create a unique and immersive experience for your audience.Why It’s Important:

  • Creates Visual Impact: The background plays a significant role in shaping the audience’s first impression of your presentation.
  • Enhances Storytelling: A well-chosen background can support your narrative and create a more engaging visual experience.

How to Do It:

  • In the Theme settings, choose Customize Background.
  • Upload your own image, choose from Prezi’s library of backgrounds, or select a solid color or gradient that aligns with your message.

Example: For a travel-themed presentation, use a high-quality image of a famous destination as your background. For a more minimalist look, stick to a clean, white background with subtle texture.


5. Use Frames and Layouts Creatively

Frames in Prezi act as containers for your content. While Prezi templates come with predefined frames, you can adjust their shapes, sizes, and positions to fit your unique design vision.Why It’s Important:

  • Adds Personalization: Customizing frames allows you to better control the flow and structure of your presentation.
  • Enhances Visual Interest: Creative use of frames helps make your Prezi more dynamic and visually engaging.

How to Do It:

  • Edit or add new frames to your Prezi by clicking on the Frames menu.
  • Customize the shape and size of frames to suit your content. For example, use circular frames to highlight key statistics or rectangular frames for step-by-step processes.

Example: For a presentation about innovation, use a spiral path with circular frames to create a visually engaging flow that mirrors the iterative process of innovation.


6. Add Your Logo

To reinforce your brand and create a fully customized Prezi, consider adding your company logo to the presentation. This helps maintain brand consistency and professionalism.Why It’s Important:

  • Boosts Brand Visibility: Including your logo ensures that your presentation is clearly associated with your brand.
  • Enhances Professionalism: A logo adds a polished, professional touch to your Prezi design.

How to Do It:

  • Drag and drop your logo into the Prezi workspace, then resize and position it where appropriate.
  • Keep the logo small and unobtrusive but visible enough to reinforce your brand throughout the presentation.

Example: Place your logo in the corner of your title and closing slides or use it as a subtle watermark on key frames to maintain brand presence.


Final Thoughts

Customizing a Prezi theme allows you to create a unique, branded presentation that stands out. By adjusting colors, fonts, backgrounds, frames, and adding your logo, you can ensure that your Prezi aligns with your message, brand, and audience expectations. With these customization tips, you can create a presentation that not only looks great but also communicates your content effectively and memorably.

Coming Up with a Presentation Design Concept

design concept

design resources

PowerPoint Design

presentation design

Designing an effective PowerPoint deck involves plenty of preparation. There’s obviously more to it than choosing a random template and then putting together a bunch of slides. Each color, picture, and font type you choose should be governed by a plan. In other words, every single element that goes into your slide should correspond to a specific concept.

This concept will direct all your design choices, leading you to a PowerPoint deck that elevates your core message. Think of it this way: If great design is the destination, a design concept is the map you’ll need to get there.

Conceptualizing Design

According to Vanseo Design, we can think of design concept in two different ways. The first is the verbal concept, where you let a particular message dictate your aesthetic. For example, you might want your PowerPoint deck to exude innovation and professionalism to match the software you’re pitching. This gives you a more abstract starting point nbut allows you to focus more clearly on the message of your presentation.

The next is the visual concept, where you start with a specific image or “look” in mind. For example, you might want to work around the different shades of blue or feature geometrical shapes prominently. While it may give you a concrete picture of your design, it might also be incoherent with the presentation you’re about to deliver. To be effective, a visual concept needs to be grounded by a specific message. It needs to be enhanced by a verbal concept to become a cohesive design plan.

With that in mind, take note of the following tips to come up with a full-bodied presentation design concept:

1. Determine the purpose of your presentation

Before you start sketching away, figure out the main purpose and message of your presentation. Why were you asked to deliver this presentation in the first place? What do you hope to accomplish? What’s the one thing you want your audience to remember? All these questions will help you draft the main message or “take away” of your presentation—a crucial element in the verbal aspect of your design concept.

2. Turn to your brand for inspiration

As you know, your brand is representative of your company identity. It gives clients and consumers insight on your story and experience, as well as the goals you want to achieve in the future. But aside from that, it can also reveal how you can go about your design concept. Look to your brand story to inspire the verbal component of your concept, and then use your logo to sort out the visuals.

3. Do your research

Of course, you can also branch out and look for inspiration elsewhere. Do your research and read as much as you can about design. It doesn’t have to be particularly related to presentations. Try to read about the basic design principles, or look through graphic design tips. You can even browse through some infographics to see best practices on condensing  and illustrating data. Immerse yourself in the world of design by exploring different blogs and websites. Here are our top picks to help  you get you started:

4. Think of what your audience might want to see

It’s also important to consider the audience. After all, it’s them that you will need to impress. Try to think about what they might want to see during your presentation. The more you consider their point of view, the more you can be sure to create an engaging and memorable experience. Like you would when working on content, use these four questions to guide your presentation design concept.

Conclusion

Your presentation can thrive if you have powerful visuals that help highlight the core message. A design concept is a way to do that. In order to come up with an effective PowerPoint deck, you’ll need a concrete plan to follow.These 4 steps are a crucial part of presentation preparation. Don’t forget to develop a complete design concept before you start working on your slides.

Reference

Bradley, Steven. “Thoughts on Developing A Design Concept.” Vanseo Design. December 23, 2010. Accessed October 13, 2014. Featured Image: Cultura de Red via Flickr

4 Presentation Design Tips for Compelling and Creative Slides

PowerPoint Design

Powerpoint tips

presentation design

The way your slides look plays a crucial role in presenting a message that sticks with your audience. We’ve all heard of “Death by PowerPoint” – caused by dreadfully bland presentation that was made all the more unbearable by its use of repetitive visuals. If you want to capture the attention and interest of your audience, you will need to move against the pack.Each slide you present should contribute to the point you’re trying to deliver. Together, they should make for a visually engaging experience. Successful presentations are highlighted by slides with clever and unique designs.Here are 4 presentation design tips to help you achieve the same success:

Presentation Design Tip #1: Match slides with the story you’re telling

A presentation needs a compelling story. If you can create tension and conflict in the way you share your message, the audience will become more emotionally responsive to what you have to say. That’s why it’s important to have slides that highlight your story, and not distract from it. Avoid crowding your slides with too many elements. Allow your audience to take in every word you say, using the slides to visualize the message you’re sharing. Build your slides to match the structure of your story. Most importantly, punctuate important points through the use of powerful imagery.

Presentation Design Tip #2: Be clever with your use of color

Color is an important element in presentation design. The correct combination can create a cohesive look that will bring individual slides together. Choose colors that don’t clash, and select only a few shades per palette. Different colors also have a set of cultural meanings attached to them. If that seems interesting, take the extra step to incorporate a more symbolic dimension to your design.

Presentation Design Tip #3: Mind your use of charts and graphs

Charts and graphs can be used to represent data in a visually compelling manner. Be as simple and straight to the point as possible, or you’ll risk confusing the audience with too much information. Streamline your charts and graphs by picking out the data that’s most relevant to the point you’re trying to make. Also, it’s important to ask yourself if a chart or graph is necessary. Maybe it will be more effective if you just share the statistics you have using compelling and descriptive language.

Presentation Design Tip #4: Create a multimedia experience

Lastly, your presentation design can be more engaging if you can create a multimedia experience. Aside from using images and illustrations, you can also enhance your message through the use of short video clips. Or how about using animation to add a bit more drama? Another option is to increase audience interaction by incorporating polling tools and feedback forms to your PowerPoint deck. Featured Image: John Morgan via Flickr

The Path to a Perfect Prezi Story

non-linear transitions

path tool

presentation design

Presentations

prezi

Prezi Feature of the Week

Prezi Path Tool

Creating a compelling and engaging story in a Prezi presentation can make a world of difference when it comes to captivating your audience. Prezi’s dynamic, non-linear format is perfect for storytelling, as it allows you to present information in a more visually stimulating and fluid way than traditional slide-based presentations. However, constructing a powerful narrative with Prezi requires careful planning and strategic design choices to ensure your story flows seamlessly and resonates with your audience.Here’s the path to creating the perfect Prezi story:


1. Define Your Core Message

Every great story starts with a clear and impactful core message. Before diving into the design of your Prezi, ask yourself: What is the one thing I want my audience to remember after this presentation? Defining your core message early on helps shape the rest of your content and ensures that your presentation stays focused.Why It’s Important:

  • Sets the Direction: A well-defined core message acts as the foundation of your story, guiding your narrative and helping you stay on track.
  • Enhances Clarity: A clear message makes it easier for your audience to understand and retain the information you’re presenting.

How to Do It:

  • Write down the single key idea you want your audience to take away from the presentation.
  • Keep your core message simple and concise, so it’s easy to convey and remember.

Example: If you’re presenting a new product, your core message could be: “This product will revolutionize the way we work by simplifying complex tasks.”


2. Outline Your Story Structure

Once you’ve defined your core message, outline the structure of your story. Think of your Prezi as a narrative journey, with a beginning, middle, and end. Organizing your content into a logical flow helps your audience follow along and keeps them engaged throughout.Why It’s Important:

  • Creates Flow: A clear structure ensures that your story progresses logically, preventing confusion and maintaining engagement.
  • Helps the Audience Navigate: Structuring your Prezi in a way that is easy to follow helps your audience absorb information without feeling overwhelmed.

How to Do It:

  • Break your story into three parts: the introduction (set the stage), the body (present the main content), and the conclusion (wrap up and reinforce the key message).
  • Ensure each section flows naturally into the next, using Prezi’s zooming and panning features to create smooth transitions.

Example: In a presentation on business growth, start by introducing the challenge, move into key strategies for overcoming it, and end with a success story or projection for the future.


3. Leverage Prezi’s Non-Linear Format

One of Prezi’s unique advantages is its non-linear format, which allows you to present information in a more dynamic, flexible way than traditional linear slide presentations. Take advantage of this feature by structuring your story in a way that moves around key ideas, zooming in and out of details, rather than moving slide-by-slide.Why It’s Important:

  • Engages the Audience: A non-linear flow keeps the audience interested and engaged, offering a break from the predictable slide transitions of PowerPoint.
  • Emphasizes Key Points: Zooming in and out of key content highlights important information and reinforces your story.

How to Do It:

  • Use Prezi’s zooming feature to transition between big-picture ideas and detailed explanations, giving your audience a sense of movement and depth.
  • Arrange content elements spatially to create visual relationships between different parts of your story.

Example: For a product launch presentation, you could start with a zoomed-out view of the market landscape, then zoom in on specific customer pain points, and finally zoom in further to show how your product addresses those needs.


4. Make Use of Visual Metaphors

Visual metaphors are an effective way to enhance your Prezi story by making complex ideas more relatable and easier to understand. Prezi’s dynamic canvas allows you to represent abstract concepts using metaphors like pathways, trees, or mountains, adding depth and creativity to your narrative.Why It’s Important:

  • Simplifies Complex Ideas: Visual metaphors break down complex information into easily digestible and relatable concepts.
  • Creates Memorable Visuals: Metaphors leave a lasting impression, helping your audience remember key points long after the presentation is over.

How to Do It:

  • Choose a metaphor that aligns with your core message. For example, a roadmap can symbolize a journey to success, while a tree can represent growth and branching out.
  • Integrate your metaphor into the overall layout of your Prezi, using the zooming feature to navigate through different parts of the metaphor.

Example: For a project timeline presentation, use a road or pathway as the central visual metaphor, with different milestones marked along the way. Zoom in on each milestone to provide more detail.


5. Use Storytelling Techniques

Crafting a compelling Prezi story goes beyond just organizing your content—it’s about creating an emotional connection with your audience. Use traditional storytelling techniques such as conflict, resolution, and a call to action to make your presentation more engaging and persuasive.Why It’s Important:

  • Builds Emotional Engagement: Storytelling techniques tap into emotions, making your presentation more memorable and impactful.
  • Encourages Action: A well-told story not only informs but also inspires action, motivating your audience to take the next step.

How to Do It:

  • Introduce a problem or conflict early on to grab the audience’s attention.
  • Present your solution or idea as the resolution to the conflict.
  • End with a clear call to action, encouraging your audience to act on the information you’ve provided.

Example: If you’re pitching a new marketing strategy, start by outlining the current challenges your company faces, then present your strategy as the solution. Conclude with a call to action, such as implementing the new strategy.


6. Keep It Visually Engaging

While storytelling is important, the visuals you use in Prezi are equally crucial to maintaining audience attention. Avoid overwhelming your audience with too much text or clutter. Instead, rely on visuals like images, icons, and videos to support your narrative.Why It’s Important:

  • Keeps the Audience Focused: Visuals are more engaging than text-heavy slides and help keep the audience focused on the key points.
  • Simplifies Complex Data: Charts, graphs, and images can help simplify complex information, making it easier for the audience to understand.

How to Do It:

  • Use high-quality images and icons to illustrate your story without overcrowding the presentation.
  • Break up large blocks of text with visuals that support the key points, such as data visualizations or case studies.

Example: In a presentation on company performance, replace text-heavy slides with charts that visually represent growth metrics, and use icons to represent key performance indicators (KPIs).


7. End with a Powerful Conclusion

The conclusion of your Prezi should bring your story full circle, reinforcing your core message and leaving the audience with a clear takeaway. It’s your final opportunity to make an impact and inspire action.Why It’s Important:

  • Reinforces the Main Idea: A strong conclusion ensures that your audience leaves with a clear understanding of your core message.
  • Calls the Audience to Action: Ending with a call to action encourages your audience to engage with your message beyond the presentation.

How to Do It:

  • Summarize the key points of your presentation, tying them back to your core message.
  • End with a clear call to action, whether it’s adopting a new idea, investing in your product, or taking the next step in a project.

Example: Conclude your presentation with a zoomed-out view of your entire Prezi, summarizing the journey you’ve taken the audience on, and finish with a call to action like “Let’s take the next step together.”


Final Thoughts

Creating a perfect Prezi story is about combining dynamic visuals, non-linear navigation, and classic storytelling techniques to craft a presentation that captivates and inspires your audience. By defining your core message, organizing your content, leveraging visual metaphors, and using Prezi’s unique features effectively, you can build a presentation that is both engaging and memorable. Follow this path, and you’ll be well on your way to delivering a powerful Prezi story that leaves a lasting impact.

Visual Simplicity is Captivating in Presentations

PowerPoint Design

presentation design

simplicity

visual simplicity

Visual simplicity is a powerful and captivating tool in presentations. By stripping away unnecessary elements and focusing on clarity, minimalist designs help the audience stay engaged and absorb the information more effectively. Here’s why visual simplicity works:

1. Enhances Audience Focus

  • Why it works: When a slide is cluttered with text, images, and graphics, the audience’s attention is divided. Simplicity narrows their focus to the essential message, making it easier for them to process and retain information. A clean design with minimal distractions allows the presenter to control what the audience focuses on.
  • Supporting evidence: According to John Medina’s Brain Rules, people remember more when information is paired with relevant visuals, but this is only true if the visuals are clear and uncluttered. Simplicity in visual design leads to better information retention.

2. Improves Comprehension

  • Why it works: Visually complex slides force the audience to work harder to understand the content. When slides are simple and only feature the necessary information, comprehension increases. The human brain prefers order and simplicity, making minimalist designs easier to follow.
  • Supporting evidence: Research by the Nielsen Norman Group shows that white space and visual hierarchy improve readability and comprehension. A simple, well-organized layout guides the audience’s eyes to the most important parts of the slide.

3. Creates a Professional and Polished Look

  • Why it works: Minimalist slides exude professionalism by conveying a sense of order and precision. They also give your presentation a modern, polished appearance. Simple slides show that you’ve curated the information thoughtfully, which can improve the audience’s perception of both the content and the presenter.
  • Supporting evidence: Business presentations by leaders like Steve Jobs at Apple have demonstrated the effectiveness of visual simplicity. Jobs’ presentations were known for using clean designs with very little text, focusing on high-quality visuals that reinforced the core message. This approach gave his presentations a sleek, professional edge.

Conclusion

By embracing visual simplicity, you create a presentation that is not only more engaging but also easier to understand and remember. It allows the audience to focus on what truly matters without being overwhelmed by unnecessary details, leading to a more compelling and professional delivery.


Sources:

  • John Medina, Brain Rules
  • Nielsen Norman Group on readability and comprehension in design
  • Case studies of Steve Jobs’ minimalist presentation style at Apple

Images for PowerPoint: 5 Tips to Improve Your Design

images for powerpoint

pictures

PowerPoint Design

presentation design

Using images in PowerPoint presentations can significantly enhance visual engagement and help convey your message more effectively. However, selecting and incorporating images in the right way is crucial to maintaining a professional and impactful presentation. Here are five tips to improve your design with images in PowerPoint.


1. Choose High-Quality, Relevant Images

The images you use should not only be visually appealing but also relevant to the content of your presentation. Avoid generic stock photos that don’t add value or context to your slides.Why It’s Important:

  • Enhances Credibility: High-quality, relevant images make your presentation look more professional and polished.
  • Supports the Message: Images should reinforce the points you’re making, helping the audience understand the information more clearly.

How to Do It:

  • Use high-resolution images to avoid pixelation, especially on larger screens.
  • Choose images that align with the theme of your presentation or that directly illustrate key points.

2. Use Images to Break Up Text

Slides packed with too much text can overwhelm your audience. Incorporate images to break up the text and make your presentation more visually engaging.Why It’s Important:

  • Improves Readability: Images break up large chunks of text, making it easier for the audience to follow along.
  • Engages the Audience: Visuals are more likely to capture attention and keep your audience engaged throughout the presentation.

How to Do It:

  • Use relevant images in place of bullet points or to complement a brief summary of your text.
  • Alternate between text and image-heavy slides to maintain balance and flow.

3. Maintain Visual Consistency

Your images should have a consistent style, color scheme, and tone to avoid making the presentation look disjointed. This cohesion ensures that your design is polished and professional.Why It’s Important:

  • Creates Cohesion: A consistent visual theme makes your presentation look more structured and professional.
  • Enhances Brand Identity: Maintaining a consistent style with your images helps reinforce your brand’s visual identity.

How to Do It:

  • Stick to a specific color palette or filter for all images to ensure visual harmony.
  • Choose images that match the overall tone of your presentation, whether formal, casual, or creative.

4. Optimize Image Placement

The placement of images on your slides should be intentional and strategic. Avoid cluttering slides with too many visuals, and ensure that your images are balanced with other content.Why It’s Important:

  • Improves Focus: Proper image placement directs the audience’s attention to key points without overwhelming them.
  • Maintains Aesthetic Balance: A well-designed slide should have balanced spacing between text, images, and white space.

How to Do It:

  • Align images with the most important points on the slide, ensuring they don’t compete with text for attention.
  • Use PowerPoint’s alignment tools to maintain consistency and proper spacing.

5. Use Images to Tell a Story

Images are powerful storytelling tools. Instead of using images just as decorative elements, use them to build a narrative that enhances your presentation’s message.Why It’s Important:

  • Enhances Storytelling: Images that support your narrative can evoke emotions and help the audience connect with your message.
  • Makes Content Memorable: Visual storytelling makes your content more memorable and impactful.

How to Do It:

  • Select images that illustrate the problem, solution, or journey in your presentation.
  • Use sequential images to walk the audience through a step-by-step process or concept.

Final Thoughts

Incorporating images effectively into your PowerPoint presentation can significantly enhance the visual appeal and engagement of your slides. By choosing high-quality, relevant images, maintaining consistency, and using visuals strategically, you can create a presentation that is both visually stunning and impactful. With these tips, you’ll be able to communicate your message more effectively and leave a lasting impression on your audience.

Want Positive Response? End Your Presentation with a Call to Action Slide

call to action

presentation content

presentation design

“Successful persuasion leads to action” –Nancy Duarte, Resonate

The Call to Action is arguably the most crucial part of your presentation. It encapsulates the main purpose of your presentation through a bold statement that urges your audience to act on the ideas you shared with them. After having made your case, the Call to Action puts the ball into their court.The Wall Street Journal‘s Brian Steinberg explains that CTAs can be extremely helpful in the context of marketing and advertising. But at the same time, a Call to Action is also useful for different kinds of presentations. Whether you’re giving a seminar, lecture, an investor pitch, or annual report, it’s important that you engage your audience with an objective they can act on.Here are two things to remember when applying CTAs to your pitch:

1. Before you design a Call to Action slide, you need to work on its content.

Keep your message consistent

Think about the main goal of your presentation and refer back to your storyboard. Is this goal clear and present in the rest of your presentation deck?Your Call to Action will feel out-of-place if you haven’t been subtly pushing your goal throughout your presentation. Highlight your presentation end-goal with key points throughout your deck.

Be brief and straight to the point

After reviewing your presentation, start writing your Call to Action by following the KISS rule: Keep it Simple, Silly. Short, simple sentences are easier to remember. Being brief will also encourage you to be as specific as possible. The message you leave with your audience should be straight to the point.Tell them exactly what you want from them in a language that is direct, active and urgent. Make use of verbs that invoke a sense of command, and show how their action can lead to a positive effect. For example, if you’re giving a healthcare presentation on dehydration, you might say: “Drink eight glasses of water a day and your body will thank you for it.”

Provide tools for concrete action

Follow the statement with proper tools that the audience can refer to after the presentation. Offer up a website, Facebook page, contact information, and the like.Aside from food for thought, give them something concrete to takeaway.

2. Work on a design that adds impact to your statement.

Be big and bold

Translate your Call to Action statement into visuals that are eye-catching and memorable. Draw the attention of your audience immediately by using large font sizes. Your statement should have the largest font size. We won’t give you hard-and-fast rules, but make sure it can be easily read until the very back of the room. You can follow up with your links and other tools below in a smaller font size, but still no less than 30 points.You can then begin illustrating your Call to Action slide. Use images that are cohesive with your statement and the rest of the PowerPoint deck. Be mindful of the color scheme you’ve been using, and be wise about when to use accent colors.

Be mindful of white space

While aiming for impact, make sure your Call to Action slide isn’t too overwhelming. Maintain a balanced aesthetic by being mindful of white space.Make sure there’s still enough room in your slide to give your content focus and impact. As you’re designing your Call to Action slide, step back every once in a while to check if there’s too much going on. You can also ask someone to check your work after you’re done.

The Final Word

Don’t say “thank you” without showing your audience a Call to Action slide. It’s important that you end your presentation with a strong statement that urges for direct and urgent action.When done correctly, the Call to Action slide will lead your audience to reflect and decide on a positive response.

Reference

Steinberg, Brian. “‘Call to Action’ Ads Give Clients Results They Can Measure.” WSJ. Accessed July 15, 2014.Featured Image: Horia Varlan via Flickr