Pigment of the Imagination: How to Choose PowerPoint Color Schemes

color combinations

colorschemer

colourlover

powerpoint color schemes

A color scheme makes a huge difference in your PowerPoint design. You might not give it much thought, but colors evoke psychological responses in your audience, that may either make or break your presentation. Using the appropriate combinations can win people over and visually engage them.But with such a wide selection to choose from, how can you know which colors work together?A little research and experimentation can help you choose the perfect PowerPoint color schemes. Here’s a little nudge in the right direction:

You can find inspiration everywhere

Inspiration for color combinations can be found anywhere. Because color is so integral to our everyday lives, you’re bound to come across something that will work out for you.Observe the colors on your favorite website.Copy the colors that decorate your favorite outfit.What colors are on the cover of the book you’re currently reading?The best way to go about it is to consider the subject and core message of your presentation, and then find something related to what you want to say. If you’re not one for spontaneity when it comes to your deck, going with your company colors is a safe way of using color combinations on your deck will remind the audience of your brand.

Resources and tools

There’s also a rich trove of resources online that you can tap into for some professional, matching schemes. You can visit sites such as COLOURlovers to find the latest trends in colors, palettes, and patterns. Below are some of their expertly arranged palettes for your use:Another option is ColorSchemer.com. The website has an extensive ‘scheme gallery’ composed of color combos created by the website’s community through its free software.Inspiration comes in everywhere, but remember that having a tried and tested color scheme to apply on your deck can ease some of the trouble for you.

Other things to keep in mind

Once you’ve made the initial color choices, there are still other factors to keep in mind.It’s important that your presentation is legible, so the colors you choose for font and background should contrast. Similarly, make sure that the pictures you use do not clash with the color scheme you’ve chosen.Image: designsojourn.comYou may also have to cut a few of the colors from your final palette. It’s best to use a few different colors in your PowerPoint presentation in order to avoid overwhelming your audience. You don’t have to limit yourself to only two colors, but don’t go with 10!If you don’t have time to pore over a deck right before an important presentation, you can always ask the help of professional PowerPoint designers to whip up an amazingly color-coordinated deck just for you.Featured Image: Carmelo Speltino via flickr

How to Find Pictures for PowerPoint Presentations in the Vast Expanse of the Internet

pictures for powerpoint presentations

Powerpoint

Presentations

SlideGenius

As the age old adage goes, “a picture is worth a thousand words.”

We previously tackled the importance of reducing text in your PowerPoint slides. Your presentation needs to be visually engaging. A block of text that simply mimics your speech is an easy way to lose your audience. Instead, stimulate their brain’s ability to easily pick up visual cues by using carefully selected pictures.The best image to use is the one that summarizes what you’d normally try to say in five bullet points.The Internet is a great resource to find pictures for PowerPoint presentations, but practice caution.Not everything that comes up in your Google image search is advisable to use. You might be in danger of infringing copyrighted materials without even knowing it!So, how do you find perfectly legal pictures for PowerPoint presentations, then? Where should you go without having to worry about possible complications?

Sites to Get Your Pictures From

1) Royalty Free Images

In exchange for a one-time fee, you can continuously use a copyrighted picture according to agreed upon terms without having to pay license fees in the future. A royalty-free license is common in stock photography.

2) Creative Commons-licensed content

You can use a photo with a creative commons (CC) license for free under specific conditions. There are different types of CC licenses, but the most important thing you’ll need to remember is Attribution. You’ll have to give credit to whoever owns the picture you decide to use.

3) Images in the public domain

An image in the public domain doesn’t hold any license, so it’s free to use. Works are considered to be part of the public domain if it meets the following:

      • the copyright has expired, or the work was never granted a valid copyright in the first place
      • the creator has relegated the work to the public domain
      • when they’re ineligible for copyright based on this criteria.

How do you find pictures like these? 

If you’d like pictures for PowerPoint presentations that are appropriate to use, don’t look for them using Google or Bing.A huge selection of CC-licensed content can be found on Flickr. The search tool can be a little tricky, though, so you can use sites that find CC content like CC Search and Wikimedia Commons. Another option is to visit photo-hosting site 500px, which gathers all CC-licensed pictures in one place.While there are no specialized searches to find photos in the public domain, Wikimedia Commons labels each picture with its license information. Public domain photos are tagged with this symbol:If, however, you’re willing to splurge a few couple of bucks, you can get royalty free images from websites like Getty ImagesiStock, and Shutterstock. While you might have to stretch your budget, the photos you get from these sites usually look more professional and polished.

References

Vision.” Brain Rules. Accessed June 12, 2014.”What Is in the Public Domain, Always, besides Ideas?PublicSherpa. Accessed June 12, 2014.Featured Image by HikingArtist from Wikimedia.org 

Power Up Your Presentations: Unleashing the Best Android Office Apps for On-the-Go PowerPoint Mastery

android

android office apps

kingsoft office

microsoft office mobile

polaris office

quickoffice

In a previous post, we featured five great presentation apps to help you prepare slides right on your iPad. This time, we’llThis time, we’ll run down the best Office apps for your Android devices. Aside from helping you create and edit PowerPoint presentations, you can also use these Office apps to access Word, Excel, and PDF files. After you finish your slides, you can review your speech and source materials on the go.

Microsoft Office Mobile

The Microsoft Office Mobile app for Android allows you to access, edit, and create new PowerPoint, Word, and Excel files just like you would on your PC. Because it’s from Microsoft itself, this is our top choice for opening any MS files you have.You might think that scaling down your PowerPoint slides to a mobile screen will mess up its layout, but Office Mobile keeps formatting intact. If you want an experience that mirrors what you’ve been used to on the PC, this app is your sure bet.You can download the Microsoft Office Mobile for free but requires an Office 365 subscription for the full experience.

Quickoffice

Developed by Google, Quickoffice is an option for those looking to functionally use an office app without having to pay for premiums or add-ons. You can create and edit all of the same file types just as you would in the Office Mobile, plus view PDF files.Best of all, Quickoffice syncs right to your Google account. This removes the hassle of uploading your files through several steps by letting you easily share your PowerPoint files through your Google Account, or attach them to emails.

Kingsoft Office

Creating and editing presentations on Kingsoft Office is a breeze. It allows you almost the same functionalities you would have on the PC.This free office app also makes sharing your slide a whole lot easier. The Shareplay function allows you to share your PowerPoint presentation to others’ Android devices, as long as they’re logged in on the same local area network.

Polaris Office

Polaris Office automatically saves the files you access from your cloud to your device, so you can continue working even without an Internet connection.Similarly, if you’re editing a PowerPoint presentation—or any other files—on the go, the changes you make are automatically saved. It also will give your different editing choices for your presentations, plus the ability to add notes and time your slideshow.Polaris Office is free, and the premium add-ons aren’t necessary for a basic, functional experience. Some of the latest Android versions also come free with Polaris, so you won’t need to download it into your mobile device anymore.

Use any one of these apps for a more mobile PowerPoint presentation experience. Bring your slides with you wherever you go, and don’t be caught unprepared.

Handy Dandy: PowerPoint, Keynote and Other Great Presentation Apps for the iPad

apple

iOS

ipad

powerpoint alternatives

presentation apps

Sometimes, you’re going to have to prep for presentations without much notice. You might even have to do it while you’re on the go. When that happens, don’t panic. Don’t they always say that there’s an app for every problem?In this case, there are plenty.You can design great presentations as long as you have your iPad on hand. Here’s a quick rundown of some presentation apps available on iOS.

PowerPoint

Let’s start with the classic: PowerPoint for iPad. This app is part of the recently released Office suite for the iPad. It’s the perfect choice for users who are used to running PowerPoint in the desktop, and would like to have the same experience in their choice of presentation apps. It has all the features you’ve grown accustomed to in a streamlined interface.You can get it for free at the App Store, although you’ll have to subscribe to Office 365 to experience it in full. You can get Office 365 at different prices. It’ll be a good investment if you prefer using the MS Office programs.

CloudOn

If you’d rather skip on the Office 365 subscription, CloudOn is a great alternative.Technically, it’s more than just a presentation app. It allows you to access MS Office files saved on your Dropbox or Google Drive. You can also create new PowerPoint, Word, or Excel files.When making your slides, you’ll be taken to an interface that looks and works exactly like the desktop version of the classic PowerPoint 2010.You can get CloudOn for free, although some features are only available as in-app purchases.

Keynote

If you’re the proud owner of several Apple devices, Keynote is still your best bet. It allows you to sync your presentations through iCloud, meaning you can edit what you started on your Mac. Plus, it’s easy to use. Keynote takes full advantage of the swipe-and-slide technology that makes the iPad super convenient.Keynote costs $9.99, but you can get it for free on any brand new iOS7 device.

Prezi

Prezi is unlike most presentation apps. It offers a little more room for creativity. You can choose from 15 templates that are different from the usual slide title + bullet points layout. You can also use photos from your Camera Roll or take new pictures while you work.Best of all, Prezi is free at the App Store.

Haiku Deck

Similar to Prezi, Haiku Deck is another app that allows for plenty of creativity. It holds a huge collection of stock images and backgrounds that you can easily access through a search function.Bonus: For the presentation itself, you can use your iPhone as a remote control or a mini teleprompter.Haiku Deck is free, and you can buy extra photos in the App Store.

Unleash Your Inner Designer: Master the Art of Customizing PowerPoint Templates

PowerPoint templates are a great starting point for presentations, but customizing them can take your presentation from average to extraordinary. With some simple design techniques, you can unleash your inner designer and make your slides unique, professional, and aligned with your brand. Here’s how to master the art of customizing PowerPoint templates.


1. Customize the Slide Master

The Slide Master controls the overall look of your presentation, including layouts, fonts, and colors. Editing the Slide Master ensures that all slides have a consistent design, saving you time by making global changes to your presentation’s appearance.Why It’s Important:

  • Ensures Consistency: Changes made to the Slide Master are applied across all slides, ensuring that your presentation has a unified look.
  • Saves Time: Rather than editing each slide individually, you can make changes in one place that apply to all slides.

How to Do It:

  • Go to the View tab and select Slide Master.
  • Make changes to the fonts, colors, and layouts on the Slide Master. These changes will apply to all the slides in your presentation.

2. Adjust the Color Scheme

Most templates come with a default color palette, but customizing it to match your brand colors or theme can make your presentation stand out. Choosing the right color scheme also enhances readability and visual appeal.Why It’s Important:

  • Reinforces Branding: Using your brand’s color scheme ensures your presentation is aligned with your brand identity.
  • Improves Visual Impact: A cohesive and appealing color scheme enhances the overall aesthetics of your presentation.

How to Do It:

  • Go to the Design tab, select Variants, and choose Colors > Customize Colors.
  • Adjust the color palette to reflect your brand’s colors or the theme of your presentation.

3. Use Custom Fonts

Fonts play a major role in the tone and professionalism of your presentation. Replacing default fonts with custom fonts that align with your brand can give your presentation a fresh, modern look.Why It’s Important:

  • Enhances Readability: Using clean, professional fonts makes your presentation easier to read and understand.
  • Adds Personality: Fonts can convey different emotions and set the tone for your presentation, whether formal, casual, or creative.

How to Do It:

  • Select the Home tab, click the font dropdown, and choose a custom font for your titles and body text.
  • Use contrasting fonts for headings and body text to create a clear visual hierarchy.

4. Incorporate High-Quality Visuals

Templates often come with placeholder images that are generic. Replace these with high-quality visuals that are relevant to your content and audience. Whether you use stock photos, custom graphics, or icons, your images should complement the message you’re delivering.Why It’s Important:

  • Increases Engagement: High-quality visuals capture attention and make your presentation more engaging.
  • Supports Your Message: Relevant visuals help illustrate your points and make complex information easier to understand.

How to Do It:

  • Use the Insert tab to add images, icons, or illustrations to your slides.
  • Ensure that the images are high resolution and aligned with the overall theme of your presentation.

5. Edit Slide Layouts

Most templates come with pre-designed slide layouts, but you can customize these to fit your specific needs. Tailoring the layout of each slide helps you present information clearly and attractively.Why It’s Important:

  • Improves Information Flow: Customizing layouts ensures that each slide is designed to present information in the clearest way possible.
  • Adds Variety: A mix of layouts keeps your presentation visually interesting and prevents monotony.

How to Do It:

  • Select the Layout dropdown in the Home tab to choose from existing layouts.
  • Modify the size and position of text boxes, images, and other elements to create a more effective design.

6. Add Branded Elements

Incorporating branded elements such as your logo, company tagline, or brand patterns can elevate the professionalism of your presentation. These elements reinforce brand recognition and help your presentation feel cohesive.Why It’s Important:

  • Builds Brand Recognition: Including your logo and other brand elements reinforces your brand identity throughout the presentation.
  • Enhances Professionalism: Branded presentations show attention to detail and convey a polished, professional image.

How to Do It:

  • Add your company logo to the Slide Master so it appears consistently on each slide.
  • Incorporate other branded visuals, such as patterns, icons, or watermarks, to create a cohesive design.

Final Thoughts

Customizing PowerPoint templates allows you to create a presentation that is uniquely yours, aligning with your brand and delivering your message in a visually appealing way. By editing the Slide Master, adjusting the color scheme, incorporating custom fonts and visuals, and adding branded elements, you can elevate your presentation from standard to standout. With these techniques, you’ll unleash your inner designer and make your next presentation more engaging and memorable.

Animating Brilliance: Elevating Your Presentations with PowerPoint Magic

animation

PowerPoint animation

presentation

Children aren’t the only ones who have short attention spans. Many adults do, too, although this is due to a number of factors – a busy schedule, issues at work, etc. So if you’re presenting a PowerPoint to your team or potential business partners, you need to step up your game. One way to do this is by adding animation to your slides.PowerPoint animations are very useful for creating a more interesting presentation. It can keep your audience engaged as you deliver each of your points. If children with short attention span are easily entertained by animated cartoons, I’m quite positive that their adult counterparts will find PowerPoint animations enjoyable as well.If you’re ready to get started, here’s how you can take advantage of PowerPoint’s animation feature:

1. Use the available animations

The Add Animation gallery provides you with simple animations you can apply to the elements on your slide. Just click any of the items you want to animate, click on the Animation tab, and then click Add Animation. Below the wide range of basic animations that control the way the items move on your slides.powerpoint animation
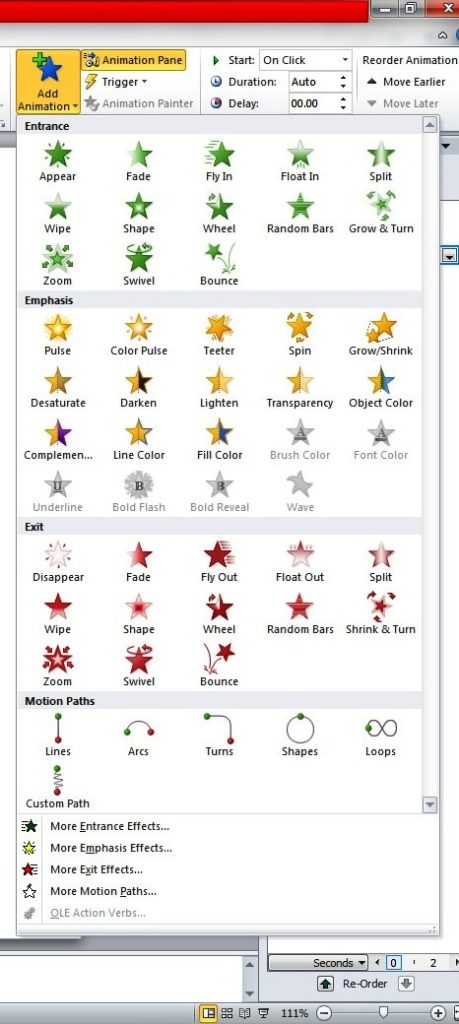
You can use these basic animations to make your items enter, exit, appear, and disappear on the slides.

2. Set the triggers

Triggers allow you to link the animation to a different action. You can do this by creating bookmarks in the presentation, which then prompt an animation to start. Alternatively, you can set an action to start upon clicking your mouse. To set a trigger for an animation, click an item and then click Trigger, which you can find in the Advanced Animation group under the Animations tab.powerpoint animations

3. Automate sequences with Animation Painter

Before, with the older versions of Microsoft PowerPoint, you will have to spend hours just to get the animation working perfectly. But now, you can easily automate your animation sequences with the help of the Animation Painter.powerpoint animation
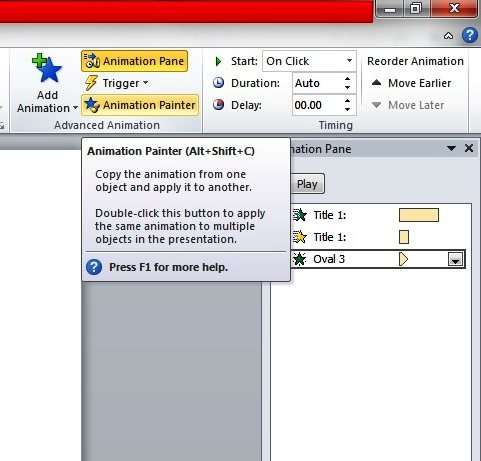
With the Animation Painter, simply click the element with the animation you like to copy and drag the pointer over the item on the slide to apply the animation settings. PowerPoint will take care of the rest.

4. Measure Entry and Exit Using Timeline

You can find the timeline at the bottom of the Animation Pane. This helps you gauge the entry and exit of the items on the slide. You can also use it to determine whether you want to adjust the time or order of events.animation2
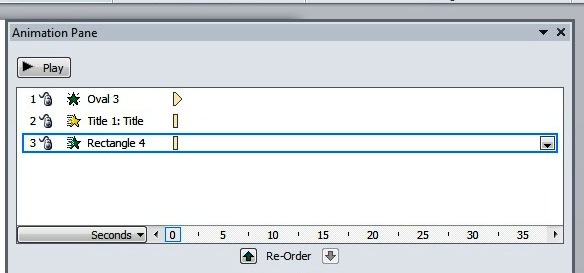
Each animation also displays the span of time through the time segment at the right of every animation entry. You may tweak the animations so that the action occurs at the exact time that you prefer. Just scroll along the timeline by clicking the small arrows at either end. You may also click the Seconds control if you want to Zoom In or Zoom Out and adjust the increments of time.

5. View Everything on the Animation Pane

As you work on the animation, you can see all the information and tools you use on the Animation Pane. To display the Animation Pane, click the Animation tab and select Animation Pane right in the Advanced Animation group. This feature lets you preview the animation, reorder animations, and see where they fall on the timeline.The important thing about using animations in your slides is to keep everything simple. PowerPoint offers a lot of features for animating any item on your slide but misusing them can confuse your audience, not to mention make your presentations look amateurish.

About SlideGenius SlideGenius.com is your business PPT guru. Based in San Diego, California, SlideGenius has helped more than 500 international clients enhance their presentations, including those of J.P. Morgan, Harley-Davidson, Pfizer, Verizon, and Reebok. Call us at 1.858.217.5144 and let SlideGenius help you with your presentation today!

Turning PowerPoint Slides Into Videos

marketing video

PowerPoint video

Youtube

With the advent of YouTube, Vimeo, and other online video sharing platforms, creating marketing videos has never been more beneficial for businesses. The Social Times’ Megan O’Neill provides a few benefits marketing videos can have on your campaign. Not only does it let you get to know your company better, it also provides small companies with the opportunity to receive greater exposure.Unfortunately, a number of business owners feel that video creation is too costly or time-consuming. What they don’t realize is that creating marketing videos doesn’t need to take so much of their time or budget. All they have to do is make a PowerPoint presentation and turn it into a video. If you want to take advantage of this opportunity, here are the things that you need to do:

Preparing the presentations

Naturally, you have to create the presentation first. Don’t forget to record and add narration. You may also want to time your PowerPoint slides for a smooth transition (At this point, you should turn the mouse into a laser pointer). After that, save your presentation by doing the following:

  • Click the File menu and select Save & Send.
  • Click the option Create a video under Save & Send.

Creating the video

Have the quality and size options displayed by clicking Computer & HD Displays, which is under the Create a Video. Then, do any of the following:

  • To create a very high-quality video with a large file size, click the option Computer & HD Displays.
  • To create a medium quality video with moderate file size, click the option Internet & DVD.
  • To create a low-quality video with very small file size, click the option Portable Devices.

To find out which one matches your needs, consider testing each of these options.

Setting the timings and narrations

If you didn’t record and time a voice narration as well as the laser pointer movements, click the option Don’t Use Recorded Timings and Narration.(Reminder: The default time for each slide is 5 seconds). You may change that by clicking either the up or down arrow in the “Seconds to spend on each slide” indicator.If you have recorded and timed narration and the pointer movements, then click Use Recorded Timings and Narrations. Next, click Create Video.

Saving the video

Once you’ve gone through all the steps, the final part of creating your marketing video is to save it.Enter a file name for your video in the File name box after browsing for the folder that will contain the file. Click Save. The default file type is Windows Media Video (.wmv). If you want to convert the video file to another format such as .avi or .mov, you may use a third-party program.These are all the steps on how you turn your PowerPoint presentation into a video. Pretty simple, isn’t it?  Take advantage of this opportunity and start making your brand felt across YouTube or anywhere else on the Internet. 

References

O’Neill, Megan. “5 Benefits of Video Marketing [Infographic].” SocialTimes. Accessed May 26, 2014.

Adding PowerPoint Table to Your Slide

Draw table

Insert table

PowerPoint slide

PowerPoint table

Tables are a great way to organize and present data in an easy-to-read format. Whether you’re displaying financial figures, project timelines, or survey results, adding a table in PowerPoint can help make complex information more digestible for your audience. In this guide, we’ll walk you through the process of adding a table to your PowerPoint slide, customizing it, and ensuring it fits seamlessly into your presentation.

Step 1: Open Your PowerPoint Presentation

Begin by opening your PowerPoint presentation. Navigate to the slide where you want to add the table or create a new slide dedicated to displaying your table.

To Create a New Slide for Your Table:

  1. Click on the “Home” tab.
  2. Select “New Slide” and choose a layout that works best for the table. The Title and Content layout is ideal because it provides space for a title and a content area where you can easily insert the table.

Step 2: Insert a Table

Once you’ve selected the slide for your table, it’s time to insert the table:

  1. Click on the “Insert” Tab: In the ribbon at the top of the PowerPoint window, click on the Insert tab.
  2. Select “Table”: In the Tables group, click on the Table option. A grid will appear that allows you to choose the number of rows and columns you want.
  3. Choose Your Table Dimensions: Move your mouse over the grid and select the number of rows and columns by highlighting the appropriate squares (for example, 3 rows by 4 columns). You can also click “Insert Table” at the bottom of the grid and manually enter the number of rows and columns you need.

Once you’ve made your selection, PowerPoint will insert the table into your slide.

Step 3: Customize the Table

Now that you have your table on the slide, it’s time to customize it according to your needs. PowerPoint offers several formatting and design options for tables, allowing you to create a table that fits seamlessly with your presentation’s theme.

1. Entering Data:

  • Click inside any cell and start typing your data.
  • Press the Tab key to move to the next cell, or use the arrow keys for more precise navigation.

2. Resize the Table:

  • To adjust the size of the table, click and drag the sizing handles (small squares or circles) around the table.
  • You can also resize individual columns and rows by hovering over the border between cells until your cursor changes into a double-headed arrow, then dragging to adjust the width or height.

3. Design and Style the Table:

  • Table Design Options: After selecting the table, the Table Tools will appear at the top of the window, showing two tabs: Design and Layout.
  • Design Tab: This tab offers various pre-made table styles, shading options, and borders. Here’s what you can do:
    • Table Styles: PowerPoint provides several table style templates. Scroll through the options in the Table Styles gallery and click on one to apply it to your table.
    • Header Row: If you want to emphasize the first row of your table as a header, check the Header Row box under Table Style Options. This will automatically apply a distinct style to the top row.
    • Banded Rows or Columns: You can check the Banded Rows or Banded Columns options to alternate the shading of rows or columns, making your table easier to read.
    • Borders: You can also adjust border settings (style, color, weight) in the Borders group. This allows you to add or remove borders, or change their appearance, making your table more professional.

4. Adjust Table Layout:

  • Add or Remove Rows and Columns: In the Layout tab, you can add or remove rows and columns. Click on the Insert Above, Insert Below, Insert Left, or Insert Right buttons in the Rows & Columns group to add new rows or columns to your table.
  • Merge or Split Cells: If you need to merge two or more cells, select them, then click Merge Cells in the Layout tab. To split a cell into multiple columns or rows, click Split Cells.
  • Align Text: You can adjust the alignment of text within the table by selecting the text and using the alignment options in the Layout tab (e.g., center, left, right, top, or bottom alignment).

5. Adjusting Table Dimensions:

  • In the Cell Size group, you can manually adjust the height and width of your table’s rows and columns. This is useful if you need precise measurements for specific data.

Step 4: Enhance the Table with Graphics or Additional Features

Sometimes tables alone aren’t enough to convey your message clearly. You can enhance your table’s visual appeal and clarity by adding images or additional design elements.

Add Graphics or Icons:

  • Inserting Images: To make your table more visually engaging, you can add small images or icons. Click inside the cell where you want to insert the image, then go to the Insert tab and choose Pictures. This allows you to insert a picture from your computer or online sources.
  • Using Icons: PowerPoint 2013 also allows you to insert icons that can visually represent the data in your table. Go to the Insert tab and select Icons, then choose from a wide range of icons relevant to your content.

Add Chart for Comparison:

  • If you need to compare data, consider adding a chart next to or within the table. You can insert a chart by clicking on InsertChart and choosing a chart type that complements your table (e.g., bar, pie, or line charts).

Step 5: Review and Finalize Your Table

Before finishing your slide, take a few moments to review your table:

  • Check for Consistency: Ensure that the data is properly aligned, and the table looks consistent with the rest of your presentation design.
  • Proofread the Data: Double-check for any typos or incorrect information.
  • Adjust for Readability: Make sure your font size and colors are easy to read for your audience, especially when projected on a screen.

Final Thoughts

Adding a table to your PowerPoint presentation is a simple yet effective way to organize data and present information clearly. By following the steps outlined above, you can create tables that are not only functional but also visually appealing and aligned with the overall design of your slides. Whether you’re showcasing numerical data, timelines, or comparisons, well-designed tables will help your audience better understand and retain the information you’re presenting.