Slidegenius, Inc.

3 Ways to Live Stream Your PowerPoint Presentation

Distance shouldn’t be a barrier between you and your audience. Bring your pitch out of the boardroom and into the Web. Reach out to a wider audience with your deck without sacrificing your presence.

Live-stream your PowerPoint in three ways:

1. Share as a Link

In his article on digital video hub Field59, Michael Worringer gives his readers a run-through on how to broadcast your presentation from PowerPoint 2010 and 2013 by sharing it as a link.

For the purpose of this tutorial, we’ll be using PowerPoint 2013.

Unlike its 2010 version, whose Broadcast Slide Show option is found in the Slide Show tab, PowerPoint 2013 lets you live-stream your presentation through the Share option in the File tab.

How to live stream your PowerPoint: Present OnlineA dialog box will appear with your presentation’s custom URL once you click Present Online. Copy the link or send it via email to your audience.

After they’ve received the link, click Start Presentation. Now you’ll be able to guide your viewers through each slide in real time at your own pace.

How to live stream your PowerPoint: Start Presentation

Below, you’ll find how Presenter View will appear on your screen. However, your audience will only see your slide show as you present it.

How to live stream your PowerPoint: Presenter View

Once you’re done, exit the slide show mode and select End Online Presentation in the Present Online tab.

How to live stream your PowerPoint: End Online Presentatin

The slight downside to this broadcast method is that while you’re free to share your PowerPoint, some of your original deck’s features may be compromised. All transitions will be set to ‘fade’ from the audience’s view, and a file size may be imposed on your upload, depending on your broadcast service.

A compact and concise deck is more advisable for this PowerPoint live-stream technique to minimize the lag in your loading times.

2. Use Office Mix

If you’re using PowerPoint 2013 and are subscribed to Office 365, live streaming becomes even easier with the downloadable free add-in Office Mix.

Unlike the previous method, Office Mix is more accommodating with your slide contents. You’re free to add audio, video, polls, and quizzes to your slides. This is especially helpful for educators who want to track their students’ progress outside the classroom and for presenters who want to maximize audience engagement using their deck.

These are all available in the Quizzes Video Apps found in the Mix tab that will appear once you’ve downloaded it.

How to live stream your PowerPoint: Quizzes Videos AppsSource: https://mix.office.com/watch/qn821zf10bni

There’s also live digital inking, a more hands-on approach to presentation that lets you guide students through your slides in real time using video, audio, and illustration.

How to live stream your PowerPoint: Live Digital InkingSource: https://mix.office.com/watch/1uoglxt8jp9mt

Office Mix has its own site dedicated to help users navigate through this handy feature. First-timers can benefit from its tutorials that show Mix at work.

Similar to the Broadcast Slide Show in PowerPoint 2010, Office Mix requires an Internet connection to share your presentation to a selected audience. However, another unique option of this add-in lets your audience review and play back your slides to their own pace even after you’ve exited your slide show.

True to its name, Mix crosses the boundaries between the Microsoft Office programs. Import viewers’ data and feedback on your deck for a more in-depth analysis.

3. Upload to Online Platforms

The third route to live-streaming your PowerPoint doesn’t let you interact with your audience as much, but it may be the easiest yet.

If you don’t have the last two PowerPoint features, you can upload and design your presentation using a private account to online platforms made for deck hosting, such as SlideShare.

Publishing your slides on online platforms is meant to improve reaching out to a wider audience. Although you can configure your uploaded deck’s settings to selected viewers, following default settings leaves your deck open for public viewing. You can add tags to make your PowerPoint easily searchable online, further reinforcing its inclination towards mass sharing.

At the same time, this technique can be considered a combination of the previous two PowerPoint live-streaming methods. It has a file size limitation like PowerPoint 2010, but it lets your audience enjoy your presentation at their pace, like Office Mix. Making use of online platforms requires compressing your slide contents into a file size that you can manually upload to the website.

Conclusion

Your deck is an important part of your presentation. Don’t let the distance between you and your audience deter you.

Broadcast your slide deck using three different methods, depending on the type of program available to you and on your intended audience. Share your PowerPoint with a link and broadcast it live with PowerPoint 2010 and 2013. Interact with your viewers in real time with Office Mix. However, if neither of these are available to you, you can always upload your presentation to an online platform like SlideShare.

There are a number of ways to make your presentation accessible. Just reach out to the one that works best for you.

SlideGenius Blog Module One

Get hundreds of PowerPoint slides for free.

Sign up for your free account today.

Sign Up now

References

Worringer, Michael. “How to Broadcast a PowerPoint Presentation with a Live Stream.” Field59 Inc. April 21, 2015. www.field59.com/broadcast-powerpoint-presentation-live-stream
“What Is Office Mix.” Office Mix for Teachers. www.mixforteachers.com/what-is-office-mix.html

Featured Image: “Man Holding Laptop Computer Typing While Dog Watches” by Image Catalog on flickr.com
Save Your Deck: Methods to Recover an Unsaved PowerPoint File

Sheer panic—that’s probably your first reaction when you realize that you couldn’t save the PowerPoint file you were working on. Maybe the power went out, or your computer unexpectedly crashed. Perhaps you were too preoccupied that you didn’t think to hit “Save.” Whatever the reason, you’ve suddenly lost hours of hard work and have no clue how to get it all back.
Luckily, there’s no reason to stress over losing an unsaved PowerPoint file. Using the latest versions of PowerPoint, you can easily retrieve and recover all your hard work. Follow these steps to recover a PowerPoint file you accidentally lost:

Need a Presentation Designed?
Click Here To View Our Amazing Portfolio!

Method One: Recover Unsaved Presentations

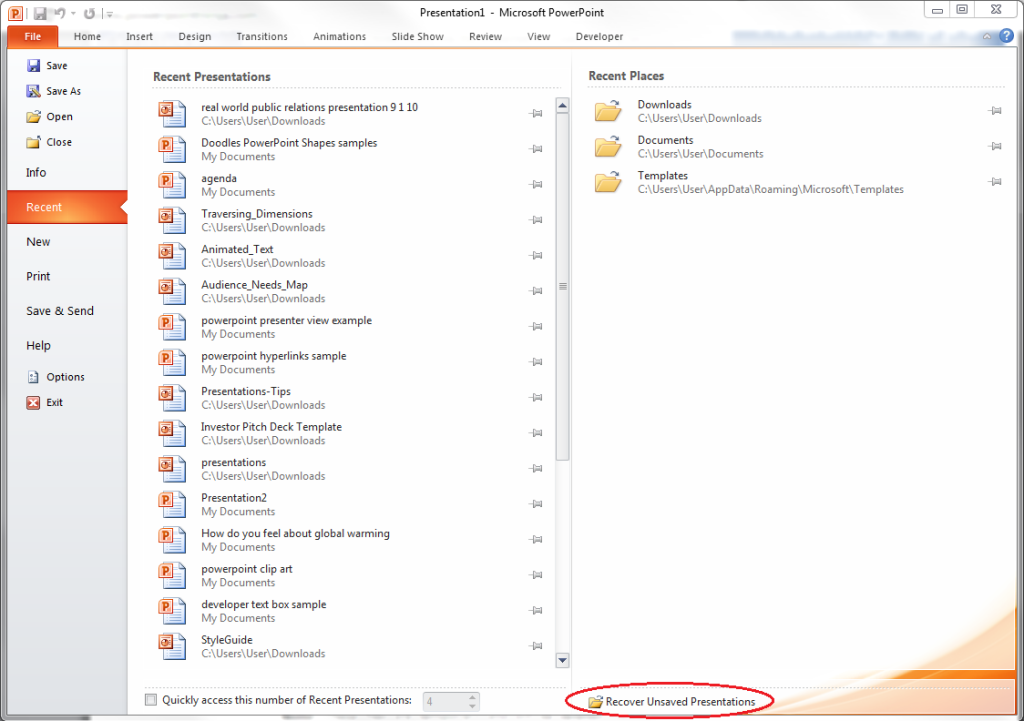
If you were interrupted before saving your PowerPoint file, you could simply look for it in the Microsoft Unsaved Files folder. Go to the File tab, make sure you’re on Recent, and click on Recover Unsaved Presentations. The icon is right below the list of folders under Recent Places.

Recover-Unsaved-Presentations

Everything in the Unsaved folder is a temporary file. Make sure you recover and save everything you need because you might lose it after a few days.
Method Two: AutoRecover

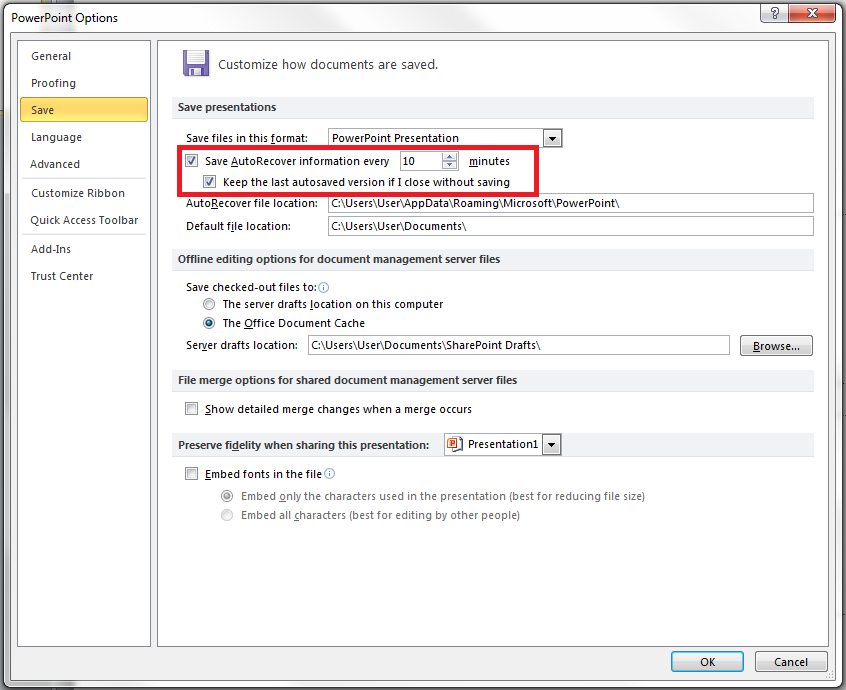
If you’ve been periodically saving your work but was interrupted before you could save specific changes, you can retrieve your PowerPoint file using the AutoRecover function. First, check if you have it enabled. Go to the File tab, click on Options and go to Save. Make sure your options are similar to those in this picture:
PowerPoint-Files-AutoRecover
If you don’t have AutoRecover enabled, there’s no other way to retrieve the changes you made to your PowerPoint file. You will have to redo your work from the last save. But if everything looks good, you can then follow these steps:
1.) Copy the file destination path in the same dialogue box.
PowerPoint-Files-AutoRecover-02
2.) Open Windows Explorer, paste the path on the address bar, and hit Enter.
PowerPoint-Files-AutoRecover-025
To avoid losing crucial information, ensure AutoRecover is enabled every time you create a PowerPoint deck.

Need a Presentation Designed?
Click Here To View Our Amazing Portfolio!

ConclusionSGBlog_SaveYourDeck_Supporting image_SG01_JE-01

Retrieving an unsaved PowerPoint file is a no-brainer as long as you know these basic recovery methods.
You can either open the “Recover Unsaved Presentations” found in the “Recent Places” or use the AutoRecover function to check where that unsaved document must be hiding.
Learn these tricks by heart so you don’t have to worry about getting your presentation back!

How to Set the Playback Options in PowerPoint 2013

As discussed in the previous post, you can embed videos from YouTube to PowerPoint in a few, easy steps. Just go to the insert tab, paste the YouTube video’s embed code in the Insert window, and presto! You have a video on your slide.

Your presentation can now be even more dynamic with the addition of a video. However, you can take this further by setting how you want your video to play.

Set the playback options in PowerPoint 2013 to make specific adjustments and gain more control over your videos throughout your pitch.

In this post, we’ll focus on how to use the Playback option under the Video Tools group for a more professional way of presenting videos with the right timing.

Play a Video Clip Automatically or When Clicked

Before you play a video automatically, open the PowerPoint file first and embed a video in your deck.

1. Check if the deck is set in the Normal view, then click on the video slide object. Once you’re done, you’ll notice that Video Tools will appear in the ribbon, which includes the Format and Playback options.

Set the Playback Options in PowerPoint 2013 Tutorials: Video Tools2. Select Playback, and then choose the Automatically option in the Start menu under the Video Options group. This will play the video automatically when you start viewing the slide containing the video itself.

Set the Playback Options in PowerPoint 2013 Tutorials: PlaybackChoose the On Click option if you want to play the video upon clicking the mouse.

Set the Playback Options in PowerPoint 2013 Tutorials: Start on ClickNote: Before setting this option, make sure to disable any animations you’ve applied to your video to avoid any interruptions. Follow the steps above if you haven’t put any animations to it.

Hide and Loop a Video

Aside from simply putting a video into your slide, you can also hide it before playing it. Here’s how:

1. Click the video frame, and under the Video Tools, select Playback.

Set the Playback Options in PowerPoint 2013 Tutorials: Video tools  src=

To loop a video which allows you to repeat the video you’ve included in your slide, check the Loop until Stopped box under the Video Options.

Set the Playback Options in PowerPoint 2013 Tutorials: Loop until StoppedConclusion

With PowerPoint’s functions, not only can you embed videos, but you can also control them at your own discretion.

Doing this gives your deck the engaging and persuasive power with the addition of customizing video playback timing and appearance for a seamless presentation overall.

If you’re going for a dynamic and interesting pitch, take advantage of including video playback options in your deck.

To deliver a winning PowerPoint presentation, SlideGenius experts can assist you and offer you a free quote!


Resource:

“Set the ‘Playback’ Options for a Video in Your Presentation.” Office Support. Accessed January 24, 2016. https://support.office.com/en-nz/article/Set-the-Playback-options-for-a-video-in-your-presentation-1267985a-670f-462a-a746-813beae52258

Looking for creative presentations that can leverage your business? Enjoy free PowerPoint templates from SlideStore! Sign up today.

Get More Organized with PowerPoint Presenter View

PowerPoint contains powerful features that often get buried under the comfortable confines of default settings. Unlock the potential of the Presenter view for your presentation and get more out of the program.

Our previous article talked about the different views in PowerPoint 2013 and how these views can help you customize your workflow. There, we explored the eight types of views and the additional two views.

In this post, we’ll be going in-depth on one of the additional views – the Presenter View.

This view essentially acts as the remote control to your presentation. It lets you set the precise length of your presentation and helps you look at your notes when the inevitable mind slip occurs.

You’ll amaze your audience with your ability to move from slide to slide with precise timing. The secret to ending your presentation on the dot is all in the Presenter View.

Maximize all Useful Features of Presenter View

This tutorial uses the version of PowerPoint 2013 with a computer that has two monitors to fulfill the requirement of having two screens present to activate Presenter View.

Starting your slide show automatically brings up Presenter View if you’re using PowerPoint 2013. The program also detects if you have two screens so that it can display the Presenter View and the Slide Show separately. Make sure to check if you already have a projector plugged in.

Press F5 on your keyboard to bring up the Presenter View, which simultaneously brings up the Slide Show.

PowerPoint Presenter View: The Key Areas

PowerPoint Presenter View: Key Areas

The image above labels the four main areas you’ll notice in the Presenter View. The first, Toolbar (1), has three components: Show Taskbar, Display Settings, and End Slide Show as you see below.

PowerPoint Presenter View: Toolbar

a. Show Taskbar simply shows your computer’s taskbar below the Presenter View. Collapse and expand the taskbar by clicking on this button. The taskbar is hidden by default during your presentation, and this menu item is useful if you need to bring it up.

b. Display Settings is the only item on the menu that has an inverted triangle beside it, indicating that there are other options available in the dropdown menu. Swap Presenter View switches the position of the Presenter view and Slideshow view. The Duplicate Slide Show fills both of your screens with the Slide Show View.

c. End Slide Show closes both screens displaying the Slide Show and the Presenter view.

PowerPoint Presenter View: Full Screen vs window

The Minimize, Restore Down, and Close buttons on the upper right corner of the Presenter view Toolbar as highlighted above are another simple but useful set of features.

The Minimize button minimizes the Presenter view. The Restore Down button allows you to resize Presenter view. It looks much more compact than the full-screen view as the image above shows. Be careful since the Close button exits both the Slide Show and Presenter view to end your presentation.

Slide Timing, Preview, and Navigation Area

PowerPoint Presenter View: Slide timing

The most crucial feature in the second area is the Timer. Here, you can see how long each slide plays down to the second. The pause and play icons beside the time display allow you to control how long you want a slide to last on screen. Stay within your presentation time limit and cover all your talking points with the help of the timer.

Format your slides to only last a specific duration of time to keep you on track during your pitch. It’s even more important now to rehearse your speech so that you don’t rush your delivery.

See what your current slide looks like in the Slide Preview window between the Timer and Navigation. This understandably takes up the largest space in the Presenter view so that you can see an overview of the slide. In his tutorial on IndieZine, Geetesh Bajaj expounds on the extra controls below the Slide Preview area.

The Slide Navigation (2) at the bottom tells you which slide number you’re on and the total number of slides in your deck.

Next Slide and Notes Area

PowerPoint Presenter View: Notes area

The last two areas beside the Slide Preview are Next Slide (3) and Notes (4). The former displays your upcoming slide to give you time to prepare your next thoughts.  The latter area displays your notes. The text size is adjustable on the Notes area so that you can adjust your notes to be readable from afar.

Conclusion

This thorough look at the Presenter view proves how the program is packed with features that need to be explored. It’s one of many views you can use in PowerPoint 2013 to improve your workspace and help you be in control of precise timing during your pitch.

Presenter view is useful in checking how long your slides are playing and keep you aware and alert of the time you’re spending on stage. In addition to these useful functions, you can preview your next slide and notes.

Prepare yourself with the use of these settings and make Presenter view a valuable helper for your next, big presentation.


Reference

Bajaj, Geetesh. “PowerPoint 2013 Tutorials – Enhanced Presenter View in PowerPoint 2013.” Indezine.
November 9, 2012. Accessed January 7, 2016. www.indezine.com/products/powerpoint/learn/powerpoint-2013/enhanced-presenter-view-ppt2013.html

3 Cost-Effective PowerPoint Tips to Enhance Your Deck

PowerPoint is designed to be a user-friendly tool. Because of this, anyone can easily access and operate the program to create a basic deck.

However, we’ve barely scratched the surface of this diverse presentation program.

There’s more to the visual aid than meets the eye.

Here are three tips on how to save time with PowerPoint to ease your design process:

1. Edit Your Images in PowerPoint

If you’re struggling with a third party program and you want to see your pictures alongside the actual slide layout, edit your images directly in PowerPoint.

Although this won’t give you the same flexibility compared to editing programs like Photoshop, it does give you options to enhance images in your slides. You can use this option for basic formatting, especially if you’re still beginning with design essentials.

A Format tab will appear once you’ve selected your desired object. Explore the options on this tab to transform your pictures into attractive slide elements.

Format images in powerpointOne of the most common editing tools in PowerPoint is the Crop tool. It cuts your image down to size without adjusting its dimensions.

format image in powerpoint: cropYou can also select a number of designs for your image with Picture Styles. This frames your picture, and even changes its shape and angle.

format image in powerpoint: picture stylesDraw attention to key objects without needing to make the rest of your slide too plain. Tick Artistic Effects to make your images stand out from your background.

format image in powerpoint: artistic effectEditing straight in PowerPoint saves you time and money that would have taken to design your images in a separate platform.

2. Adjust Your Slide Size

Most presenters stick with the default slide dimensions on PowerPoint. Earlier versions were in the standard 4:3 square size. There worked best for presentations that will be printed later on.

This changed with PowerPoint 2013 onwards, where the default slide size used the 16:9 widescreen format. This configuration was used with visual content reserved only for on-screen presentations.

Other than that, these later versions now also let you adjust your slides to whatever size you choose.

PowerPoint 2013 users will find this option under the Design tab. Click Slide Size > Custom Slide Size to modify your slide according to the size you want it to be.

According to the guide, 4:3 is best used for decks to be printed or presented on different media. On the other hand, 16:9 is best for presentations that are going to stay on screen, particularly for formal conferences or business presentations.

Knowing which sizes are compatible with your presentation leaves out the trouble of printing slides that are too small, or presenting a deck that’s too big onscreen.

3. Check Out Their New Features

PowerPoint is a constantly evolving program.

Its developers are aware of the criticisms hurled against it, so the presentation aid’s been optimized to respond with even better features.

For example, just last year, Microsoft released two new add-ins for Microsoft 2016 – Designer and Morph.

Designer eliminates the hassle of customizing layouts and color schemes to fit your chosen background. Just insert an image in PowerPoint and the program will analyze what design goes best with it.

Morph also gives you an easier job at crafting transitions and basic animation.

Simply drag the object you want to animate along a path after clicking the Morph option, and the slide element will follow that path once you play the Slide Show.

Make sure to check the new add-ins for a cost-effective PowerPoint that improves both your experience and deck design.

Conclusion

PowerPoint is a deceivingly simple tool to use, but there are plenty of things yet to be discovered about its functions. Most of these will help you cut back on time and effort, while still producing a winning deck for your presentation.

Edit your images directly in PowerPoint using the options in the Format tab.

Adjust your slide size to match your presentation type.

Always update yourself with the latest PowerPoint add-ins to find out what can make your designing a breeze.

Need help with your presentation design needs? Contact our SlideGenius experts today for a free quote!


Reference

“What Slide Size Should You Use?” Presentitude. November 19, 2014. Accessed December 29, 2015. http://presentitude.com/slide-size-use

Choose and Customize View Panes in PowerPoint 2013

Ribbons? Tabs? Status Bar? Views? Familiarize yourself with PowerPoint’s layout so you won’t get lost. A little customization can help make you feel at home.

We’ll cover basic information on the different kinds of views in PowerPoint under the View tab. There are eight available views in this tab plus the two additional views, the Slide Show view and the Presenter view.

It’s overwhelming to see these features for the first time, even more so when you don’t know what they’re for. These views are meant to make your PowerPoint experience faster and easier. Find out which view works best for your tasks.

PowerPoint 2013 Basics

Customize View Panes in PowerPoint 2013: PowerPoint basic tabsUnder the View tab, you will find eight views: Normal, Outline View, Slide Sorter, Notes Page, Reading View, Slide Master, Handout Master, and Notes Master.

1. Normal View is the default view, and therefore the most familiar type of view. It has three areas, The Slides pane, the Slide area and the Notes.

The Slides pane is where you can preview a thumbnail-sized image of your slide. The Slide area is the largest area where you directly add elements to your slide. The Notes pane is where you can add your notes. This can also be expanded or collapsed by clicking and dragging the thin border above it.

2. Outline View is similar to Normal View, except it replaces the visual thumbnail views in the Slides pane with a textual, outlined list of the slide’s content. You’ll only see the text in your slide when you use this view, helping you focus only on the text instead of the visual elements on your slide.

3. Slide Sorter Don’t be alarmed, the Slide area hasn’t disappeared. This view is a single area that shows all your slides as thumbnails. It’s a great view to use when you need an overview of your deck.

Group your slides much easier with Slide Sorter.

4. Notes Page shows a vertical view of your slide. The page has two sections: the upper section that contains your slide, and the lower section that contains your notes.

Use the notes page to focus on adding notes to your deck.

5. Reading View is very similar to the Slide Show view since both display your slide in full-screen mode. The difference is that Reading View shows the title bar and status bar of PowerPoint to help you keep track of which slide you’re currently viewing.

6. Slide Master has a similar layout to Normal view. Changes in this slide affect all the slides under it. It’s the perfect view when you need to apply plenty of elements to many slides quickly.

Apply your company’s logo consistently and in perfect alignment by placing it in this view.

7. Handout Master provides a single, vertical view of your work area similar to the Notes page. But this view groups your slides into one page.

Print materials from PowerPoint using this view to leave spaces for notes and compress enough slides in one page for easier viewing.

8. Notes Master is a printer-friendly version of your Notes page. Every change you make in the Notes Master also affects the Notes page view. If providing more notes is your priority, the vertical orientation of the page gives you more area for writing down notes.

Additional Views

Customize View Panes in PowerPoint 2013: Slide Show Tab Additional View

Access the Slide Show view from the ribbon. It contains four commands under the Start Slide Show category and four commands under the Set Up category. These two categories help you synchronize your slide timings.

Customize View Panes in PowerPoint 2013

The Presenter View is a special setting that gives you more control of your slides.  This view pops up once you start your slide show.

Presenter View only runs on computers with dual screen capabilities, so make sure you have a projector plugged in. The main monitor displays the Presenter view, while the screen the audience sees is projected on your other monitor or projector.

The Presenter View has four areas as shown in the image above:

1. The Toolbar (1) menu on top has a button that allows for the toolbar to expand or collapse, another button that swaps the presenter view and the slide show, and a button to end the slide show which closes the Presenter view.

2. The Timer, Slide Preview, Slide Navigation (2) are all located in the second area highlighted in the image above. More of these are explained in our article on how to be more organized using the Presenter view.

The extra tools underneath the Slide Preview give more slide options for the presenter. These options include the pen and laser pointer, see all slides, zoom into slide, black or white-out screen and even more slide options.

The Timer displays the duration of a slide, and the Slide Navigation lets you move from slide to slide by clicking on the forward and backward arrows. It also tells you what slide you’re on, and displays the number of slides in total.

3. A small area on the upper right previews the next slide and is called the Next Slide Preview (3).

4. The Notes (4) area exists below the next slide preview box and displays the notes for the current slide if there are any available. You can change the text size of your notes if you’re viewing them from a distance.

Change Your Views

The View panes in PowerPoint presents many options for you to manage your workspace for slide creation.

You can get better insight and control of your presentation with the help of these additional views. Choose the Normal view for a balanced layout perfect for slide creation.

Outline View helps you focus on the content and structure of your slides by doing away with thumbnails.

Slide Sorter, Slide Master, Handout Master, Notes Master are perfect for slide management while the Slide Show and Presenter View helps you to rehearse for the final touches in your presentation.

Arrange your slides and append notes faster and easier using these views.


References

Bajaj, Geetesh. “PowerPoint 2013 Views for Windows.” Indezine. June 6, 2013. Accessed December 18, 2015. www.indezine.com/products/powerpoint/learn/interface/powerpoint2013-views.html
“Get A Change Of View With PowerPoint.” Microsofttraining.net. May 24, 2011. Accessed December 18, 2015. www.microsofttraining.net/article-1698-change-view-with-powerpoint.html

How to Rehearse Timings in PowerPoint 2013

Microsoft PowerPoint has animation features to create a livelier, more memorable presentation. These include a wide variety of options to visually enhance your topic.

But what if you’ve prepared a well-developed and engaging speech, then all of a sudden, your slide transitions seem stilted, or outright don’t work?

In this post, we’ll cover how you can take advantage of PowerPoint’s transitions and animation pane to get your timing on point.

What Can Go Wrong?

Awkwardly timed transitions on each slide might distract your audience from your main point. If a slide plays for too long, you might resort to using filler words until the next slide plays. But if the slide ends abruptly, you’ll scramble your thoughts in an attempt to keep your presentation on track.

Both outcomes make you look unprofessional. So we highly recommend rehearsing timings in PowerPoint 2013 to create a seamless flow during your pitch.

Set your timing right for live or self-running presentations. End your live presentations on the dot and create a compact and coherent self-running deck with the help of PowerPoint.

Simple Timing and Transitions

A simple presentation focuses on the core message. This avoids misleading the audience with distracting motions and effects. A standardized flow of timings and transitions works well with a simple deck.

If you have a simple presentation at hand, open it and we’ll quickly add timings and transitions.

1. Click on the slide object itself that you want to adjust, then select the Transitions tab.

rehearse timings in PowerPoint 2013: PPT logo2. Under the Timing group, go to the Duration box to set how many seconds you want the object’s animation to last.

rehearse timings in PowerPoint 2013: timing3. Set your slide’s duration under the same group. Check the After box and put in the amount of time you want your slide to appear on screen.

rehearse timings in PowerPoint 2013: After OptionYou can click Apply to All if you want to set the same duration to all the slide objects and slide timing. But you won’t be warned by a dialog box to accept the changes, so be careful about applying this option to your entire deck.

rehearse timings in PowerPoint 2013: Apply to AllAdvanced Timing and Transitions

When we need to impress a client, a bare-bones presentation won’t cut it. Rehearse your timings to see the overall appearance of your deck and synchronize your delivery with each slide.

We’ll need to have a deck ready for this tutorial. So open up your presentation and we can synchronize your slide timings and animation.

1. Go to the Slide Show tab. Under the Set Up group, click on the Rehearse Timings icon.

rehearse timings in PowerPoint 2013; rehearse timings2. Your presentation will now play in Slide Show mode. On the upper left corner, the Recording menu will appear. It has three buttons and two timers.

rehearse timings in PowerPoint 2013: recordingClicking Next will take you to the next slide to record your next timing. You can also click on the slide itself to move to the next slide.

The Pause Recording button pauses your recording. A dialog box will prompt you to resume it.

The Repeat button will delete your recording. Use it when you need to repeat the recording of your slide timings.

The middle timer displays how long the current slide is playing, while the second displays the total running time of recorded slide timings.

3. When you’re finished recording, a dialog box will show you the total running time of your presentation.

rehearse timings in PowerPoint 20134. Click Yes. You’ll be sent back to Normal view.

rehearse timings in PowerPoint 2013: Normal ViewYou can see how long each slide timing lasts by going to the View tab and selecting Slide Sorter view under the Presentation Views group.

rehearse timings in PowerPoint 2013: Slide sorter viewIn the bottom-right corner of each slide, you’ll be able to see the time you recorded with the Rehearse Timings function marked with a small gray star.

Now let’s return to Normal view. If you need to go back to a slide to change how long it plays, go to the Transitions tab and look for the Timing group. Click the arrows in the After box to add or subtract one second to the slide timing. Refine your slide timing and leave enough room in your speech to pause before the next slide begins.

rehearse timings in PowerPoint 2013: timingMore Tips

If you’re wondering why your presentation won’t run at the exact amount you specified when you look at the timer in Presenter view, it’s because the total running time of your slide will be the sum of the numbers found in the Duration and After box.

rehearse timings in PowerPoint 2013: durationThe Duration box contains the length of your transition’s animation, while the After box contains the amount of time that your slide will last between the transition until the next slide.

Run Presenter view again and look at the timer then return to the Transitions tab to make the adjustments.

Delete all your timings in one go by going to the Slide Show tab and clicking on the dropdown menu below Record Slide Show in the Set Up group.

rehearse timings in PowerPoint 2013: Record Slide showChoose Clear from the dropdown menu and select Clear Timings on All Slides.

rehearse timings in PowerPoint 2013: Clear Timings on all slidesA dialog box won’t prompt you about confirming the changes, so be careful of clicking this option.

Final Pointers

Before inserting animations and transitions to your slide deck, choose transitions wisely to avoid confusing audiences. If your slides discuss simple topics, it’ll be better to set all the slides to the same duration to promote consistency and readability.

Double check if each slide’s speed timing is set. This prevents you from an awkward and mistimed presentation. If you notice that a slide doesn’t have any transition synchronized, check the setting again.

Preview each slide and observe if each animation functions. Check the other animation options, such as entrance or exit, to see if they’re all working. If one of them fails, rearrange and redo until you get it right.

Ensure that your timings and transitions don’t distract from your overall message.

Apply each reminder and be mindful of these tips to deliver clear and successful pitches.

To help you make an error-free PowerPoint presentation, SlideGenius experts can offer you a free quote!


References

Michael, Jackie. “How to Troubleshoot a PowerPoint Animation Problem.” EHow. Accessed January 29, 2016. www.ehow.com/how_7289937_troubleshoot-powerpoint-animation-problem.html
“Rehearse Timings for a Slide Show.” Office Support. Accessed January 28, 2016. https://support.office.com/en-US/Article/Rehearse-timings-for-a-slide-show-4fcac25a-d244-4047-b340-c3d683c3f549

Your Quick Guide to Outline Text Fonts in PowerPoint 2013

Outlining fonts in PowerPoint allows you to emphasize words or statements displayed on-screen. Aside from helping your audience better understand your main idea, it also lets them read your text clearly using a few adjustments. In this post, we’ll focus on how to outline fonts to emphasize your key message.

Bring Up the Interface in PowerPoint 2013

1. Select the text that you wish to format by dragging your cursor from the start to the end of the word. You can also select all of the text by using the keyboard shortcut Ctrl+A.

2. Right-click on the highlighted text. A context menu will appear.

3. Click on the “Format Text Effects…”, which is the second to the last option.

Outline Text Fonts in PowerPoint 2013 Tips:  Format text effectThe Format Shape window pane will appear on the right side of the screen. It displays two main options: Shape Options and Text Options.

Outline Text Fonts in PowerPoint 2013 Tips:  Format Shape4. Click on Text Options. There will be three icons underneath.

5. Click the leftmost icon which is the Text Fill & Outline icon (this is the “A” icon with a rectangular shape beneath it).

Outline Text Fonts in PowerPoint 2013 Tips: Fill text and outline6. Click on Text Outline to expand the menu.

Text Outline

There are two submenus underneath Text Options, namely Text Fill and Text Outline. These settings individually control the look of your font. Expand or collapse each submenu by clicking on the triangle on the left of each word. Outline text fonts in PowerPoint 2013 by toggling the three options underneath Text Outline

If you don’t want any outline effect on the selected text, click on No line. This is selected by default.

Outline Text Fonts in PowerPoint 2013 Tips: No lineChoose the Solid line option under the Text Outline if you want your text outlined with a single flat color. You can also adjust the transparency, width, compound lines, dashes, cap, and join type.

Outline Text Fonts in PowerPoint 2013 Tips: Solid LineClick the Gradient line button if you want the outline to start from one color and slowly fade into another color. You can choose what specific colors the gradient should use, how it should look (Linear, Radial, Rectangular, or Path), and what angle it should show at. You can also adjust its Position, Transparency, and Brightness.

Outline Text Fonts in PowerPoint 2013 Tips: Gradient lineText Fill

1. Select Text Fill under Text Options to alter the font color without making any changes on the text outline.

Outline Text Fonts in PowerPoint 2013 Tips: Text fill2. Click the Text Effects This is the icon next to Text Fill & Outline icon, which is also an “A” icon with only an outline. Choose among the six submenus: (Shadow, Reflection, Glow, Soft Edges, 3-D Format, and 3-D Rotation) to apply additional effects to the selected text.

In the example below, the Glow effect is used to improve the appearance of the selected text.

Outline Text Fonts in PowerPoint 2013 Tips:  GlowCustomize Your Text

You don’t need to download a different font every time you want it to look a certain way. Simply format a pre-existing font within PowerPoint and have free reign on your font’s design. Outlining text enhances your key points, making them more readable and understandable for your audience. If you want to highlight your text and convince the crowd to focus on your main idea, apply the instructions above to achieve visually compelling PowerPoint presentations.

Aiming to deliver a more visually-pleasing PowerPoint presentation? SlideGenius experts can assist you by offering you a free quote!


References

“Change the Color of WordArt.” Office Support. Accessed January 22, 2016. www.support.office.com/en-US/article/Change-the-color-of-WordArt-4F506FF1-9C83-4214-A0AE-390D394813CD
Weedmark, David. “How Do I Outline a Font in PowerPoint?” eHow, January 10, 2015. Accessed September 17, 2015. www.ehow.com/how_7195619_outline-font-powerpoint.html

How to Open the .ODP Format Using PowerPoint 2013

The OpenOffice program’s OpenDocument Presentation (.odp) format is mostly used by professionals as a “lighter” alternative to Microsoft PowerPoint. The free software suite is an open-source program used for word processing, spreadsheets, presentations, graphics, and other business endeavors, much like its paid counterpart. OpenOffice can also store lecture materials, documents, and business presentations.

While this may save costs for investing in the “heavier” Office Suite, the main issue is the .odp file format’s several incompatibilities with the Office Suite.

PowerPoint’s flexibility lets you open OpenDocument Presentation (.odp) files without a need to set up any tools or programs on your desktop or laptop. Just open the document as it is and view it from inside the program.

Some features of PowerPoint, such as SmartArt and transition sounds, aren’t supported by the OpenDocument Presentation format. So a PowerPoint user might have to make several accommodations for an OpenOffice user and vice versa, which takes time.

However, compatibility issues don’t make it impossible to open .odp in PowerPoint.

How to Open the .ODP Format Using PowerPoint 2013

1. Open Microsoft PowerPoint 2013.

open PPT 20132. Click the File tab and you’ll be taken to the Backstage view. Click on Open in the vertical ribbon.

click File3. Select the Computer icon and choose Browse. A dialog box named Open will appear.

choose Browse4. Make it easier to find your file by filtering your documents to only show “.odp” files. You can do this by clicking on the dropdown menu named All PowerPoint Presentations in the bottom right corner of the dialog box named Open.

Click on the dropdown menu named All PowerPoint Presentations5. Select OpenDocument Presentation from the dropdown menu.

Select OpenDocument Presentation6. Now, open your OpenDocument Presentation file.Open OpenDocument Presentation file

Important Information about the .ODP Format

Opening an OpenDocument Presentation might show up differently in PowerPoint 2013 because both programs don’t have all of each other’s supported features. Take a look at this list from Office.com to see which features of .odp are supported in PowerPoint.

Since compatibility is a major concern between the two programs, it’s best not to use advanced animations and complex transitions, especially those with sounds from PowerPoint. These won’t be able to show up in an OpenDocument Presentation.

Another step you should take is to check your .pptx file before forwarding it to your colleague or client. When you send the presentation as an .odp file, see if it looks the same when viewed in OpenOffice.

To make sure your formatted objects made from PowerPoint appear in OpenOffice, convert the formatted elements into an image in your PowerPoint file so that it can be viewed in an OpenOffice Presentation. Take note that when you save your charts or shapes as an image, you won’t be able to edit it afterwards.

Yes, PowerPoint Can Definitely Open .ODP!

Make sure to follow each step above to help you open this file format. Don’t forget to consult the list from Microsoft Office for concerns on compatibility.

To help you with your presentation needs, our PowerPoint professionals can help you out with a free quote!


References:

Bennet, Kirk. “How to Open .Odp Files on PowerPoint.” Business & Entrepreneurship. n.d. yourbusiness.azcentral.com/open-odp-files-powerpoint-4304.html
“Supported Features in OpenDocument Presentation (.odp) Format.” Office. n.d. support.office.com/en-us/article/Supported-features-in-OpenDocument-presentation-odp-format-f6d5b015-a417-4096-bf61-a5c3f58d125f
“Use PowerPoint to Open or save a Presentation in the OpenDocument Presentation (.odp) Format.” Office. n.d. support.office.com/en-us/article/Use-PowerPoint-to-open-or-save-a-presentation-in-the-OpenDocument-Presentation-odp-format-e32d52a1-a793-49a3-aa2a-6bb1420fab60

How to Optimize and Embed Audio in PowerPoint 2013

Emailing a PowerPoint presentation isn’t as simple as it seems. You need to consider if your file is compressed enough for easy e-mail attachment.

There are other important factors to consider. You can’t be there to supervise how your deck is to be viewed, and your deck will be shown on a different computer. There may also be some formatting or compatibility issues you won’t detect.

Issues with audio playback failure and unmanageable audio file size are some of the common problems that viewers and presenters face. Address this common problem with a simple solution. Embed your audio clips and optimize your audio to save yourself the hassle.

Here’s why embedding can assist your PowerPoint:

What about Embedding?

In previous versions of PowerPoint, you had the choice between linking and embedding your audio. The latter is more appropriate for storing audio clips within your presentation. Linking requires access to files on your hard drive. If the recipient of your presentation has no copy of the linked audio, it will be flagged as missing, and the music won’t play.

That’s why it’s recommended to embed sounds into your PowerPoint file. By default, only .wav files under 100KB each can be embedded.

If you’re planning to increase the size of the embedded sound, a maximum of 50MB is acceptable—but it may noticeably slow your presentation down.

In PowerPoint 2013, there’s no clear limit to how much audio you can embed in a deck. Your main concern is how to send your file once it exceeds your e-mail attachment limitation. For example, Google has a 25MB file limit for email attachments.

Google drive 25mb attachment capacityIt might be inconvenient for your recipient if you redirect them to Google Drive to download your file. Since uploading or downloading large files might take longer, you need to keep your PowerPoint file under a manageable size so that your recipient will get your file without any problem.

How Embedding Works

This tutorial uses the Windows 10 operating system. Let’s embed audio in PowerPoint 2013 by first making sure you have your speakers or headphones plugged in. Without a way to listen to sound, you’ll get an error message that will prevent you from inserting audio:

How embedding works: Embed audio in PowerPoint 2013Once you’ve plugged in your headphones or speakers, the program will now allow you to insert an audio file.

SlideGenius Tip:
Pay attention to what View you’re using. You won’t be able to insert audio from the Slide Sorter View, Notes Page View, Reading View, Handout Master View, and Notes Master View. Let’s use Normal View for this tutorial.

1. Go to the Insert.

Embed audio in PowerPoint 2013: Insert2. Click on the Audio icon under the Media group at the far right.

Embed audio in PowerPoint 2013: insert audio3. A dropdown menu will reveal two options. Choose “Audio on my PC…”.

Embed audio in PowerPoint 2013: insert audio on my pc4. A window called Insert Audio will appear. Choose the audio file you want to embed.

Embed audio in PowerPoint 2013: select audio filePowerPoint 2013 can embed audio files with the following extensions: (AIFF Audio file) .aiff, (AU Audio file) .au, (MIDI file) .mid or .midi, (MP3 Audio file) .mp3, (Windows Audio file) .wav, and (Windows Media Audio file) .wma. Only versions of PowerPoint 2013 and later can support (Advanced Audio Coding – MPEG-4 Audio file) .m4a and .mp4. The Microsoft Office page provides these details and more.

5. Once you’ve made your choice, click Insert in the lower right corner of the window.

Embed audio in PowerPoint 20136. Your audio file will now appear on your slide with a sound icon.

Embed audio in PowerPoint 2013: audo iconOptimize your Audio File

This version of PowerPoint has improved the use of audio in presentations. It now has two new features: optimization and compression.

Because embedded audios can now be optimized, files can be smaller using the Advanced Audio Coding technique. This leaves you free from worrying about audio quality.

To optimize audio clips, click on the File menu and go to the Info page, then select Optimize Compatibility in the Optimize Media Compatibility group. If this option can’t be found, the audio has either already been optimized or can’t be optimized for whatever reason.

Embed audio in PowerPoint 2013: optimize media compatibilityYour clips can also be compressed to reduce your deck’s file size. Click on the File menu and go to Info. Under the Media Size and Performance group, click on Compress Media. There are three quality options: Presentation Quality, Internet Quality, and Low Quality.

Embed audio in PowerPoint 2013: media size and performanceJust be aware that the more you compress a file, the more its quality gets reduced.

Other Methods of Embedding Audio Files

Click the Audio icon from the Media group under the Insert tab. Select “Record Audio…” from the list. A small recording menu named Record Sound will appear.

Embed audio in PowerPoint 2013: record audioPress the red button to start recording, and the blue square when you’re finished. A sound icon will appear on the slide with recorded audio.

Embed audio in PowerPoint 2013: recorded soundConclusion

Sharing and uploading presentations online can be less of a chore with our tips on embedding and optimizing your file.

Similar to live speeches, you may also encounter unexpected technical problems that can undermine your credibility. Sidestep the audio playback issues by embedding them straight into your PowerPoint file.


References:

Lipera, Roger. “Working with Sound in PowerPoint 2013.” Interactive Media Center. January 2014. titus.ulib.albany.edu/imc/pdf/WorkingWithSoundinPowerPoint2013.pdf
“Add Audio to Your Presentation.” Office. n.d. support.office.com/en-US/article/Add-audio-to-your-presentation-c3b2a9fd-2547-41d9-9182-3dfaa58f1316
“Compress the Media Files in Your Presentation.” Office. n.d. support.office.com/en-us/article/Compress-the-media-files-in-your-presentation-f0927964-25f3-460c-ac42-c6cc3308604c
“Video and Audio File Formats Supported in PowerPoint.” Office. n.d. support.office.com/en-US/article/Video-and-audio-file-formats-supported-in-PowerPoint-d8b12450-26db-4c7b-a5c1-593d3418fb59
“PowerPoint 2013: Improved Audio and Video Options.” TEL@Tees. February 3, 2015. blogs.tees.ac.uk/teltees/2015/02/03/powerpoint-2013-improved-audio-and-video-options


-->