Illustrate Your Ideas with PowerPoint SmartArt

powerpoint tool

powerpoint tutorial

smartart graphics

SmartArt is a PowerPoint feature that allows you to transform your bullet points and text into visually engaging diagrams. Whether you’re illustrating processes, hierarchies, or relationships, SmartArt can help you visually communicate complex ideas in a clear and organized way.Here’s how to use PowerPoint SmartArt to illustrate your ideas effectively:


1. Choose the Right SmartArt Graphic

SmartArt offers a variety of graphics designed for different purposes, such as lists, processes, cycles, hierarchies, and more. Choosing the right graphic is key to effectively illustrating your idea.Why It’s Important:

  • Communicates Structure: SmartArt helps you convey the relationships between different elements in a visually appealing way.
  • Simplifies Complex Concepts: Instead of listing text or bullet points, SmartArt presents information in a more organized, digestible format.

How to Do It:

  • Go to the Insert tab, then click SmartArt.
  • Browse the categories (e.g., Process, Hierarchy, Cycle) and choose the graphic that best represents your content.

Example: Use a Cycle SmartArt graphic to represent a recurring process, like the product development cycle.


2. Add and Customize Text

Once you’ve chosen your SmartArt graphic, you can add and customize the text to match your content.Why It’s Important:

  • Aligns Visuals with Content: Customizing the text ensures that your SmartArt accurately reflects your message.
  • Increases Clarity: Clear and concise text helps viewers quickly understand the relationships or processes being illustrated.

How to Do It:

  • Click on each SmartArt shape and type your content directly into the text boxes.
  • If needed, use the Text Pane (available under the SmartArt Tools tab) to add or remove elements.

Example: In a Hierarchy SmartArt graphic, you could label each box with the name of a department or team member to illustrate an organizational structure.


3. Customize the Design

PowerPoint allows you to customize the appearance of SmartArt graphics to match your presentation’s style and color scheme.Why It’s Important:

  • Enhances Visual Appeal: Customizing the design ensures that your SmartArt fits seamlessly with the overall look of your presentation.
  • Improves Readability: Adjusting colors, shapes, and fonts can make your graphic more readable and visually appealing.

How to Do It:

  • Use the SmartArt Tools tab to change the colors, styles, and layouts of your graphic.
  • Choose from built-in color themes or manually adjust the colors to match your branding or presentation theme.

Example: Use a simple, monochromatic color scheme for a professional look, or choose vibrant colors to make key elements stand out.


4. Add Animations to SmartArt

To make your presentation more dynamic, you can add animations to your SmartArt graphic. Animations can help you control the flow of information and emphasize key points.Why It’s Important:

  • Increases Engagement: Animations capture your audience’s attention and help guide them through the content step by step.
  • Emphasizes Key Points: Animating individual elements allows you to focus on specific parts of the graphic as you explain them.

How to Do It:

  • Select your SmartArt graphic, then go to the Animations tab.
  • Choose an animation, such as Fade, Fly In, or Wipe, and apply it to the entire graphic or specific elements.
  • Use the Effect Options to adjust how and when each part of the SmartArt appears.

Example: In a Process SmartArt, you can animate each step to appear sequentially, helping your audience follow along as you explain the process.


5. Resize and Reposition

Once your SmartArt graphic is complete, you may need to resize or reposition it on your slide to ensure it fits well with other content.Why It’s Important:

  • Ensures Visual Balance: Properly resizing and positioning SmartArt helps maintain visual balance on your slide.
  • Improves Layout: Repositioning SmartArt allows you to integrate it with other elements, such as text or images.

How to Do It:

  • Click on the SmartArt graphic to select it, then drag the corners to resize it proportionally.
  • Click and drag the graphic to move it around the slide, ensuring it’s centered or positioned appropriately.

Example: If you’re using SmartArt on a slide with text, position the graphic on one side of the slide and the text on the other for a balanced layout.


Final Thoughts

SmartArt is a powerful tool that allows you to visually communicate information in a clear and organized way. By choosing the right graphic, customizing the design, adding animations, and ensuring proper placement, you can elevate the visual appeal of your PowerPoint presentations and make complex ideas easier to understand.

PowerPoint Tutorial: Adding YouTube Videos to Slides

powerpoint tutorial

videos

Youtube

Incorporating videos into your PowerPoint presentation can make it more engaging and dynamic. One way to do this is by embedding YouTube videos directly into your slides. This can help demonstrate a point, provide visual context, or simply break up the flow of a text-heavy presentation.Here’s a step-by-step tutorial on how to add YouTube videos to your PowerPoint slides:


Step 1: Copy the YouTube Video Link

Before you can embed a YouTube video, you’ll need the URL of the video you want to include.How to Do It:

  • Open your web browser and navigate to YouTube.
  • Find the video you want to use, then copy its URL from the address bar.

Step 2: Open PowerPoint

Next, open PowerPoint and go to the slide where you want to embed the video.How to Do It:

  • Open PowerPoint and navigate to the slide where you want the video to appear.
  • Select the slide and ensure there’s enough space for the video.

Step 3: Insert the YouTube Video

Now, you can embed the YouTube video using PowerPoint’s built-in video feature.How to Do It:

  • Go to the Insert tab in the PowerPoint ribbon.
  • Click on Video, then select Online Video from the dropdown menu.
  • Paste the URL of the YouTube video into the text box and click Insert.

Step 4: Resize and Position the Video

Once the video is embedded, you can adjust its size and position on the slide to fit your presentation layout.How to Do It:

  • Click on the video to select it.
  • Drag the corners of the video to resize it, or click and drag to reposition it on the slide.

Step 5: Preview the Video

Before presenting, you should always test the video to make sure it works properly.How to Do It:

  • Click on the Play button in PowerPoint to preview the video and ensure that it loads correctly.

Final Thoughts

Adding YouTube videos to PowerPoint is a great way to enhance your presentation by providing visual content that supports your key points. Make sure to test the video beforehand to ensure smooth playback during your presentation, especially if you’re presenting in a location with limited internet access.

No Photoshop? Edit Pictures in PowerPoint

photo editing in powerpoint

presentation design

PowerPoint isn’t just a tool for creating presentations—it can also serve as a powerful photo editing platform, especially if you don’t have access to professional tools like Photoshop. With PowerPoint’s built-in features, you can perform a variety of photo edits such as cropping, resizing, applying filters, removing backgrounds, and adding effects, all within the application.Here’s how to edit pictures in PowerPoint without the need for Photoshop:


1. Cropping and Resizing Images

One of the most basic and useful photo editing features in PowerPoint is the ability to crop and resize images. Cropping allows you to focus on specific parts of the image, while resizing helps you fit the image into your slide layout.How to Crop and Resize:

  1. Insert Your Image: Go to the Insert tab, click Pictures, and choose the image you want to edit.
  2. Select the Image: Once inserted, click on the image to select it.
  3. Crop the Image:
    • Go to the Picture Format tab and click on the Crop button.
    • Drag the black crop handles to focus on the area of the image you want to keep.
    • Press Enter to apply the crop.
  4. Resize the Image: Drag the corners or edges of the image to resize it without distorting the aspect ratio.

2. Removing Backgrounds

PowerPoint’s Remove Background feature is incredibly useful for isolating subjects in images. It automatically detects the background and removes it, leaving just the central subject.How to Remove Backgrounds:

  1. Select the Image: Click on the image, then go to the Picture Format tab.
  2. Click “Remove Background”: The areas PowerPoint detects as background will be highlighted in purple.
  3. Mark Areas to Keep or Remove:
    • Use the Mark Areas to Keep and Mark Areas to Remove tools to fine-tune the selection.
  4. Apply the Changes: Once you’re satisfied, click Keep Changes to remove the background.

3. Applying Artistic Effects and Filters

PowerPoint has a variety of artistic effects that can be applied to images, mimicking photo filters you might find in dedicated editing software.How to Apply Artistic Effects:

  1. Select the Image: Go to the Picture Format tab and click on Artistic Effects.
  2. Choose an Effect: Browse through effects like Blur, Pencil Sketch, Watercolor Sponge, and more.
  3. Adjust Transparency and Brightness: Use the Corrections and Color options in the same tab to adjust the brightness, contrast, and overall look of the image.

4. Adding Borders and Shadows

PowerPoint allows you to add borders, shadows, and other effects to images, making them stand out more in your presentation.How to Add Borders and Shadows:

  1. Select the Image: Click the image and go to the Picture Format tab.
  2. Click “Picture Border”: Choose a color for the border and adjust the thickness.
  3. Add Shadow Effects: Under Picture Effects, select Shadow and choose from preset shadow styles.

5. Combining Images with Shapes

If you want to place your images into a custom shape, you can use PowerPoint’s Merge Shapes feature to combine images and shapes creatively.How to Merge Images and Shapes:

  1. Insert a Shape: Go to Insert > Shapes and select a shape.
  2. Insert Your Image: Follow the steps to insert the image on top of the shape.
  3. Merge the Shape and Image:
    • Select both the shape and the image by holding Ctrl and clicking each one.
    • Go to the Shape Format tab, click Merge Shapes, and choose Intersect to merge the image with the shape.

6. Adding Text and Overlays

If you want to add text overlays or combine multiple images, PowerPoint makes it easy to create layers and add design elements to your photos.How to Add Text and Overlays:

  1. Insert a Text Box: Go to Insert > Text Box, then type your text on the image.
  2. Format the Text: Use the Home tab to change font style, size, and color.
  3. Position the Text: Drag the text box over the desired area of the image.
  4. Add Overlays: Insert additional shapes or images to layer over or under your main image.

Final Thoughts

PowerPoint is a surprisingly powerful tool for basic photo editing, offering features that allow you to crop, resize, remove backgrounds, and add artistic effects—all without needing Photoshop. Whether you’re creating a professional presentation or simply editing an image for a project, PowerPoint provides a flexible and user-friendly platform for your editing needs.

How to Work with a Professional PowerPoint Designer

powerpoint designer

presentation design

presentation designer

professional PowerPoint designer

Even with a working knowledge of PowerPoint, there will be times when you’d rather hire a presentation designer than work on it on your own. Either you’re too busy and don’t have the time or the event is too important for a DIY presentation. In any case, having a professionally designed PowerPoint gives you a number of advantages.For one, you can be sure that your slides are given a lot of tender, loving care. You know can’t go wrong once you step in front of your potential audience with your PowerPoint. Professional PowerPoint designers can certainly come up with attractive and mind-blowing designs. They don’t even need your help or input at all, right? Wrong.There’s more to working with presentation designers than telling them your preferred design and paying for their expertise. There are still some things expected of you to ensure that your presentation would look unique and not as though it was made using a cookie cutter template. To make the most of your collaboration (and your budget), here are some tips that you may want to follow when working with a designer:

Prepare your content

Unless you want your presentation to contain generic stock photos, you’ll need to provide your designer with appropriate materials to use. You also have to make sure that the text data is complete and ready.This way, the designer can work on your PowerPoint immediately and get it done according to your time frame.

Communicate properly

Your designer needs to understand your objectives for your presentation. If for some reason you’re going to be busy for the next couple of days, be sure to provide him or her with a description of what you want your slides to convey. This includes the general style, feel, and tone.If there are any specific colors and typeface that you want, then say so. Avoid giving general instructions such as “make it look awesome” or telling the designer to “surprise me.” Vague instructions can be interpreted in many different ways and really “surprise” you in the end.

Trust your designer’s instinct

When in doubt, put your trust on your designer. For sure, he or she has an extensive experience and the right skills to deliver great results.If you have some ideas that wouldn’t jive with the overall presentation design, let your designer work on a solution. After all, you’re working with an expert.

Conclusion

Working with a professional PowerPoint designer is not a one-way street. Both of you want the same thing: A well-designed PowerPoint presentation that will leave a great impression. So, as much as possible, be open to suggestions and if you’re presented with a concept, respond constructively.Keep in mind that successful projects are generally the result of a great collaboration between two people who respect each other’s skills and capabilities. 

Reference

Colors and Typography.” Virginia Tech. Accessed June 27, 2014.

Empowering Collaboration: Unleashing the Potential of Comments with PowerPoint

powerpoint tools

powerpoint tutorial

In today’s fast-paced, interconnected world, effective collaboration is more crucial than ever. Whether you’re working on a team project, preparing a business presentation, or developing educational content, the ability to seamlessly share ideas and provide feedback can make all the difference. Microsoft PowerPoint, a staple in the realm of presentations, has evolved to meet these collaborative needs with a powerful yet often underutilized feature: comments.Comments in PowerPoint are more than just notes in the margins; they are a dynamic tool that can transform the way teams work together. By leveraging comments, you can enhance communication, streamline the review process, and ultimately create more polished and impactful presentations. Here’s how you can unleash the potential of comments in PowerPoint to empower collaboration.### Enhancing CommunicationOne of the primary benefits of using comments in PowerPoint is the ability to facilitate clear and concise communication among team members. Instead of sending multiple emails or holding lengthy meetings to discuss changes, team members can leave comments directly on the slides. This ensures that feedback is contextual and specific, reducing the likelihood of misunderstandings.For instance, if a colleague suggests altering a chart, they can leave a comment right next to the chart with detailed instructions. This not only saves time but also ensures that the feedback is easily accessible and actionable.### Streamlining the Review ProcessThe review process can often be a bottleneck in project timelines. With PowerPoint comments, you can streamline this process significantly. Reviewers can leave their feedback directly on the slides, and presenters can address these comments in real-time. This iterative process allows for quick revisions and ensures that all team members are on the same page.Moreover, PowerPoint’s comment feature supports threaded discussions. This means that team members can reply to comments, ask for clarifications, and engage in a dialogue without leaving the presentation. This level of interaction fosters a collaborative environment where ideas can be refined and improved collectively.### Tracking Changes and AccountabilityAnother advantage of using comments in PowerPoint is the ability to track changes and maintain accountability. Each comment is tagged with the author’s name and a timestamp, making it easy to see who provided which feedback and when. This transparency is particularly useful in larger teams where multiple people may be working on the same presentation.Additionally, the ability to mark comments as resolved helps keep the review process organized. Once a comment has been addressed, it can be marked as resolved, allowing team members to focus on outstanding issues. This feature ensures that no feedback is overlooked and that the presentation continues to improve with each iteration.### Encouraging Constructive FeedbackConstructive feedback is essential for growth and improvement. PowerPoint comments provide a structured way to offer and receive feedback. By using comments, team members can provide specific, actionable suggestions rather than vague criticisms. This encourages a culture of constructive feedback where everyone is focused on enhancing the quality of the presentation.Furthermore, the ability to leave comments anonymously can be particularly beneficial in situations where team members may feel hesitant to provide candid feedback. Anonymity can encourage more honest and open communication, leading to more meaningful improvements.### Facilitating Remote CollaborationIn an era where remote work is becoming increasingly common, the ability to collaborate effectively from different locations is paramount. PowerPoint comments are a valuable tool for remote teams, allowing members to work together seamlessly regardless of their physical location. By using comments, remote team members can participate in the review process, share their insights, and contribute to the presentation’s development just as effectively as if they were in the same room.### ConclusionEmpowering collaboration through the use of comments in PowerPoint is a game-changer for teams striving to create impactful presentations. By enhancing communication, streamlining the review process, tracking changes, encouraging constructive feedback, and facilitating remote collaboration, comments can unlock the full potential of your team’s collective creativity and expertise. So, the next time you’re working on a PowerPoint presentation, don’t overlook the power of comments. Embrace this feature and watch as your team’s collaboration reaches new heights.”

Powerful Presentation: Creating a Captivating Trade Show Video Loop with PowerPoint

powerpoint 2013

powerpoint 2013 loop

set up slide show

Slide Show

trade show video loop

trade shows

Trade shows are excellent opportunities to showcase your brand, products, or services, and one of the most effective tools you can use is a video loop created with PowerPoint. A well-designed video loop can captivate attendees, attract them to your booth, and communicate key messages quickly and efficiently. Here’s how to create a powerful trade show video loop using PowerPoint.


1. Keep It Short and Engaging

Trade show attendees typically move quickly from booth to booth, so your video loop should capture their attention within a few seconds. Focus on delivering key information concisely and visually.Why It’s Important:

  • Captures Attention Quickly: Short, engaging content ensures that attendees are drawn to your booth without overwhelming them.
  • Keeps the Audience Interested: A concise video loop prevents viewers from losing interest, encouraging them to stop and learn more.

How to Do It:

  • Limit your video loop to 2-3 minutes, with each slide lasting no longer than 10-15 seconds.
  • Use bold visuals and headlines to quickly convey your message.

2. Focus on Visuals Over Text

At a busy trade show, attendees won’t have time to read through lengthy text. Instead, focus on strong visuals like product images, short video clips, and icons that quickly communicate your brand message.Why It’s Important:

  • Increases Engagement: Visually appealing content is more likely to attract attention in a crowded trade show environment.
  • Simplifies Messaging: Images, videos, and icons can communicate ideas faster and more effectively than text.

How to Do It:

  • Use large, high-resolution images and short video clips to showcase your products or services.
  • Replace long paragraphs of text with short, impactful phrases or bullet points.

3. Add Smooth Transitions and Animations

Smooth transitions and animations between slides can make your video loop more dynamic and engaging. However, it’s important not to overdo it—simple, elegant transitions work best for maintaining a professional look.Why It’s Important:

  • Keeps the Audience Engaged: Well-timed animations and transitions help keep the viewer’s attention without being distracting.
  • Enhances Professionalism: Subtle animations give your presentation a polished, high-quality feel.

How to Do It:

  • Use PowerPoint’s Fade or Wipe transitions between slides for a smooth and professional effect.
  • Animate key points or product features to draw attention, but keep the animations simple and unobtrusive.

4. Incorporate Brand Colors and Logos

Your trade show video loop is an extension of your brand, so it’s important to maintain brand consistency. Use your company’s colors, fonts, and logos throughout the presentation to reinforce brand recognition.Why It’s Important:

  • Builds Brand Recognition: Consistent branding ensures that attendees associate the content with your company.
  • Creates a Professional Image: A cohesive color scheme and branded elements make your presentation look more professional.

How to Do It:

  • Apply your brand’s color palette to slide backgrounds, text, and icons.
  • Include your company logo on each slide in a subtle but visible location, such as the bottom corner.

5. Include a Call to Action (CTA)

A well-designed trade show video loop should encourage viewers to take action. Whether it’s visiting your website, contacting your sales team, or signing up for a product demo, include a clear call to action (CTA) that directs attendees to the next step.Why It’s Important:

  • Encourages Engagement: A clear CTA invites attendees to interact with your booth, learn more about your products, or contact your team.
  • Drives Conversions: By providing clear instructions, you increase the likelihood that attendees will take the next step in the buyer’s journey.

How to Do It:

  • Use bold text or buttons with CTAs like “Visit Our Website,” “Schedule a Demo,” or “Contact Us for More Information.”
  • Place the CTA at the end of the video loop or throughout the presentation to ensure viewers see it multiple times.

6. Set the Video to Loop Continuously

At a trade show, your video needs to play on a continuous loop so that it runs automatically throughout the event. PowerPoint allows you to set your video presentation to loop seamlessly, ensuring it repeats without interruption.Why It’s Important:

  • Maximizes Exposure: A continuous loop ensures that your presentation is always running, capturing the attention of new attendees as they approach.
  • Minimizes Setup Effort: Once your presentation is set to loop, you don’t have to manually restart it during the event.

How to Do It:

  • Go to Slide Show > Set Up Slide Show and select Loop continuously until ‘Esc’.
  • Test the loop function before the event to ensure that the transitions and timing work seamlessly.

Final Thoughts

Creating a captivating trade show video loop using PowerPoint is an effective way to engage attendees and showcase your brand. By focusing on visuals, keeping the content short and engaging, and incorporating smooth transitions and branded elements, you can create a powerful presentation that draws people to your booth and communicates your message effectively. Don’t forget to include a clear call to action and set your presentation to loop continuously for maximum impact.

Power Up Your PowerPoint: Elevate Your Presentations with Video Clips

embed video in PowerPoint

multimedia slide

powerpoint tutorial

ppt tips

Rick Enrico

SlideGenius

We’ve discussed playing your slides on loop, but here’s another PowerPoint tutorial for you. Did you know that you can easily embed videos to your slide deck? Consider adding a short clip to your slides.It’s an effective way to engage your audience, especially if you’re working with a younger crowd. Although the majority of the population leaning towards visual learning would be engaged enough with images, videos make your slides even more visual, adding another dimension to the usual presentation design.Compared to an image – like a picture or a diagram – a video clip is a culmination of sensory engagement on a slide. As long as your video of choice is relevant to your pitch, then it may definitely help leverage your points.Here’s a quick rundown of how you can add motion to your deck, and what you need to take note of as you embed this media file on your slides:

Consider video formats

There are several video formats, and it’s important you consider which one can work best for your PowerPoint presentation design. Some formats allow for larger, higher quality videos. Other formats compress videos into a smaller size. A smaller file size means that they’re easier to share.These are the video file formats that PowerPoint supports:

  • Windows Media Video File (.wmv)
  • Windows Media File (.asf)
  • Audio Video Interleave (.avi)
  • Movie File (.mpg)
  • MP4 Video File (.mp4, .m4v, .mov)
  • Adobe Flash Media (.swf)

You can read more about the specifics of each of these file types here. Knowing what clip type would work best on the slide will save you the trouble of clips that can’t be embedded, or worse, won’t load once you start your slide show.

How to add videos to your slides

The newer versions of Microsoft PowerPoint (2010 onwards) allow you to add videos in just a few steps. In this tutorial, we’ll be using PowerPoint 2010.You have two options.Option 1: You can go to the Insert tab and choose the Video icon in the Media group.Option 2: From the Placeholder in your slide, click on the Video icon that says ‘Insert Media Clip‘.Both options will prompt a dialogue box allowing you to choose video files from your computer.You can add videos you’ve made yourself, or clips you’ve downloaded online. If there are videos from YouTube or other video streaming sites that you’d like to use, you can download them using free tools available online like ClipConverter and KeepVid. A quick Google search will help you find one that works best for you.

Conclusion

Videos can definitely add a unique life to your slide. While images may engage the viewers’ gaze, the unique function of a multimedia slide can help pique their interests further.Try out this new feature of PowerPoint to gain positive attraction. If you’re unsure of how to incorporate videos into an appropriately interesting deck, set up a consultation with a presentation guru today! All it takes is 15 minutes.

Reference

Gordon, Whitson. “What’s the Difference Between All These Video Formats, and Which One Should I Use?Lifehacker. Accessed June 19, 2014.Featured Image: Daniel STL via flickr.com

Unleash Your Inner Designer: Master the Art of Customizing PowerPoint Templates

PowerPoint templates are a great starting point for presentations, but customizing them can take your presentation from average to extraordinary. With some simple design techniques, you can unleash your inner designer and make your slides unique, professional, and aligned with your brand. Here’s how to master the art of customizing PowerPoint templates.


1. Customize the Slide Master

The Slide Master controls the overall look of your presentation, including layouts, fonts, and colors. Editing the Slide Master ensures that all slides have a consistent design, saving you time by making global changes to your presentation’s appearance.Why It’s Important:

  • Ensures Consistency: Changes made to the Slide Master are applied across all slides, ensuring that your presentation has a unified look.
  • Saves Time: Rather than editing each slide individually, you can make changes in one place that apply to all slides.

How to Do It:

  • Go to the View tab and select Slide Master.
  • Make changes to the fonts, colors, and layouts on the Slide Master. These changes will apply to all the slides in your presentation.

2. Adjust the Color Scheme

Most templates come with a default color palette, but customizing it to match your brand colors or theme can make your presentation stand out. Choosing the right color scheme also enhances readability and visual appeal.Why It’s Important:

  • Reinforces Branding: Using your brand’s color scheme ensures your presentation is aligned with your brand identity.
  • Improves Visual Impact: A cohesive and appealing color scheme enhances the overall aesthetics of your presentation.

How to Do It:

  • Go to the Design tab, select Variants, and choose Colors > Customize Colors.
  • Adjust the color palette to reflect your brand’s colors or the theme of your presentation.

3. Use Custom Fonts

Fonts play a major role in the tone and professionalism of your presentation. Replacing default fonts with custom fonts that align with your brand can give your presentation a fresh, modern look.Why It’s Important:

  • Enhances Readability: Using clean, professional fonts makes your presentation easier to read and understand.
  • Adds Personality: Fonts can convey different emotions and set the tone for your presentation, whether formal, casual, or creative.

How to Do It:

  • Select the Home tab, click the font dropdown, and choose a custom font for your titles and body text.
  • Use contrasting fonts for headings and body text to create a clear visual hierarchy.

4. Incorporate High-Quality Visuals

Templates often come with placeholder images that are generic. Replace these with high-quality visuals that are relevant to your content and audience. Whether you use stock photos, custom graphics, or icons, your images should complement the message you’re delivering.Why It’s Important:

  • Increases Engagement: High-quality visuals capture attention and make your presentation more engaging.
  • Supports Your Message: Relevant visuals help illustrate your points and make complex information easier to understand.

How to Do It:

  • Use the Insert tab to add images, icons, or illustrations to your slides.
  • Ensure that the images are high resolution and aligned with the overall theme of your presentation.

5. Edit Slide Layouts

Most templates come with pre-designed slide layouts, but you can customize these to fit your specific needs. Tailoring the layout of each slide helps you present information clearly and attractively.Why It’s Important:

  • Improves Information Flow: Customizing layouts ensures that each slide is designed to present information in the clearest way possible.
  • Adds Variety: A mix of layouts keeps your presentation visually interesting and prevents monotony.

How to Do It:

  • Select the Layout dropdown in the Home tab to choose from existing layouts.
  • Modify the size and position of text boxes, images, and other elements to create a more effective design.

6. Add Branded Elements

Incorporating branded elements such as your logo, company tagline, or brand patterns can elevate the professionalism of your presentation. These elements reinforce brand recognition and help your presentation feel cohesive.Why It’s Important:

  • Builds Brand Recognition: Including your logo and other brand elements reinforces your brand identity throughout the presentation.
  • Enhances Professionalism: Branded presentations show attention to detail and convey a polished, professional image.

How to Do It:

  • Add your company logo to the Slide Master so it appears consistently on each slide.
  • Incorporate other branded visuals, such as patterns, icons, or watermarks, to create a cohesive design.

Final Thoughts

Customizing PowerPoint templates allows you to create a presentation that is uniquely yours, aligning with your brand and delivering your message in a visually appealing way. By editing the Slide Master, adjusting the color scheme, incorporating custom fonts and visuals, and adding branded elements, you can elevate your presentation from standard to standout. With these techniques, you’ll unleash your inner designer and make your next presentation more engaging and memorable.

Animating Brilliance: Elevating Your Presentations with PowerPoint Magic

animation

PowerPoint animation

presentation

Children aren’t the only ones who have short attention spans. Many adults do, too, although this is due to a number of factors – a busy schedule, issues at work, etc. So if you’re presenting a PowerPoint to your team or potential business partners, you need to step up your game. One way to do this is by adding animation to your slides.PowerPoint animations are very useful for creating a more interesting presentation. It can keep your audience engaged as you deliver each of your points. If children with short attention span are easily entertained by animated cartoons, I’m quite positive that their adult counterparts will find PowerPoint animations enjoyable as well.If you’re ready to get started, here’s how you can take advantage of PowerPoint’s animation feature:

1. Use the available animations

The Add Animation gallery provides you with simple animations you can apply to the elements on your slide. Just click any of the items you want to animate, click on the Animation tab, and then click Add Animation. Below the wide range of basic animations that control the way the items move on your slides.powerpoint animation
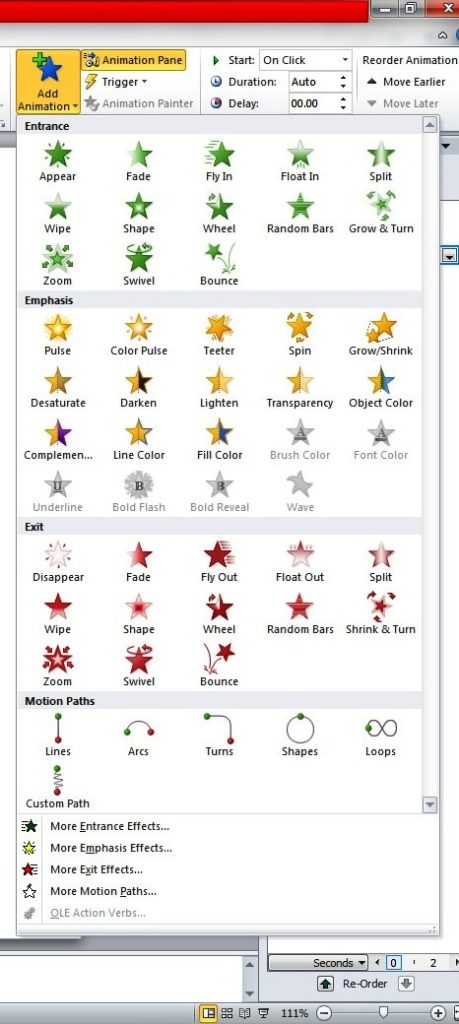
You can use these basic animations to make your items enter, exit, appear, and disappear on the slides.

2. Set the triggers

Triggers allow you to link the animation to a different action. You can do this by creating bookmarks in the presentation, which then prompt an animation to start. Alternatively, you can set an action to start upon clicking your mouse. To set a trigger for an animation, click an item and then click Trigger, which you can find in the Advanced Animation group under the Animations tab.powerpoint animations

3. Automate sequences with Animation Painter

Before, with the older versions of Microsoft PowerPoint, you will have to spend hours just to get the animation working perfectly. But now, you can easily automate your animation sequences with the help of the Animation Painter.powerpoint animation
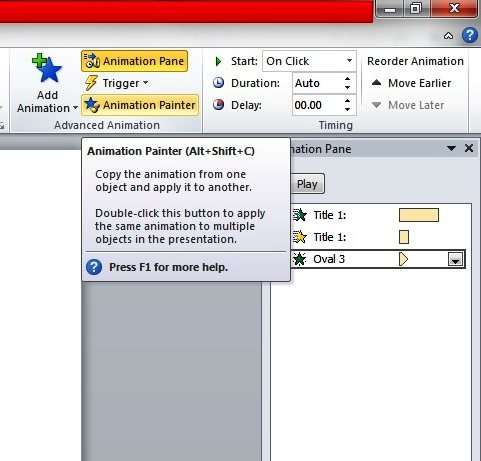
With the Animation Painter, simply click the element with the animation you like to copy and drag the pointer over the item on the slide to apply the animation settings. PowerPoint will take care of the rest.

4. Measure Entry and Exit Using Timeline

You can find the timeline at the bottom of the Animation Pane. This helps you gauge the entry and exit of the items on the slide. You can also use it to determine whether you want to adjust the time or order of events.animation2
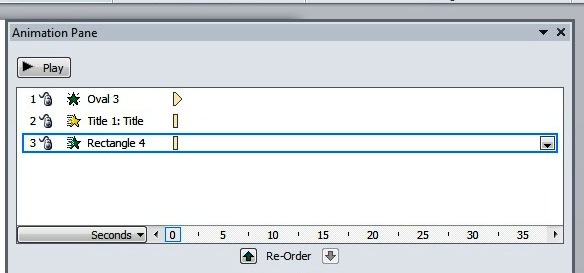
Each animation also displays the span of time through the time segment at the right of every animation entry. You may tweak the animations so that the action occurs at the exact time that you prefer. Just scroll along the timeline by clicking the small arrows at either end. You may also click the Seconds control if you want to Zoom In or Zoom Out and adjust the increments of time.

5. View Everything on the Animation Pane

As you work on the animation, you can see all the information and tools you use on the Animation Pane. To display the Animation Pane, click the Animation tab and select Animation Pane right in the Advanced Animation group. This feature lets you preview the animation, reorder animations, and see where they fall on the timeline.The important thing about using animations in your slides is to keep everything simple. PowerPoint offers a lot of features for animating any item on your slide but misusing them can confuse your audience, not to mention make your presentations look amateurish.

About SlideGenius SlideGenius.com is your business PPT guru. Based in San Diego, California, SlideGenius has helped more than 500 international clients enhance their presentations, including those of J.P. Morgan, Harley-Davidson, Pfizer, Verizon, and Reebok. Call us at 1.858.217.5144 and let SlideGenius help you with your presentation today!

Turning PowerPoint Slides Into Videos

marketing video

PowerPoint video

Youtube

With the advent of YouTube, Vimeo, and other online video sharing platforms, creating marketing videos has never been more beneficial for businesses. The Social Times’ Megan O’Neill provides a few benefits marketing videos can have on your campaign. Not only does it let you get to know your company better, it also provides small companies with the opportunity to receive greater exposure.Unfortunately, a number of business owners feel that video creation is too costly or time-consuming. What they don’t realize is that creating marketing videos doesn’t need to take so much of their time or budget. All they have to do is make a PowerPoint presentation and turn it into a video. If you want to take advantage of this opportunity, here are the things that you need to do:

Preparing the presentations

Naturally, you have to create the presentation first. Don’t forget to record and add narration. You may also want to time your PowerPoint slides for a smooth transition (At this point, you should turn the mouse into a laser pointer). After that, save your presentation by doing the following:

  • Click the File menu and select Save & Send.
  • Click the option Create a video under Save & Send.

Creating the video

Have the quality and size options displayed by clicking Computer & HD Displays, which is under the Create a Video. Then, do any of the following:

  • To create a very high-quality video with a large file size, click the option Computer & HD Displays.
  • To create a medium quality video with moderate file size, click the option Internet & DVD.
  • To create a low-quality video with very small file size, click the option Portable Devices.

To find out which one matches your needs, consider testing each of these options.

Setting the timings and narrations

If you didn’t record and time a voice narration as well as the laser pointer movements, click the option Don’t Use Recorded Timings and Narration.(Reminder: The default time for each slide is 5 seconds). You may change that by clicking either the up or down arrow in the “Seconds to spend on each slide” indicator.If you have recorded and timed narration and the pointer movements, then click Use Recorded Timings and Narrations. Next, click Create Video.

Saving the video

Once you’ve gone through all the steps, the final part of creating your marketing video is to save it.Enter a file name for your video in the File name box after browsing for the folder that will contain the file. Click Save. The default file type is Windows Media Video (.wmv). If you want to convert the video file to another format such as .avi or .mov, you may use a third-party program.These are all the steps on how you turn your PowerPoint presentation into a video. Pretty simple, isn’t it?  Take advantage of this opportunity and start making your brand felt across YouTube or anywhere else on the Internet. 

References

O’Neill, Megan. “5 Benefits of Video Marketing [Infographic].” SocialTimes. Accessed May 26, 2014.