Slidegenius, Inc.

3 Ways to Play and Present Your Own PowerPoint on TV

There are multiple mediums to show your PowerPoint presentation in. The program’s accessibility allows you to display your deck from your laptop to the Web, on mobile, on a traditional projector and screen, and even on a TV.

The latter is especially recommended for informal settings where you want to present a slideshow of your photo album. It can also work for more formal occasions like classroom or boardroom presentations.

High Quality, Fast, Columbus PowerPoint Design
Get a FREE Design Quote Now!

Here’s how you can play your PowerPoint on TV:

1. Connect from Your PC

PowerPoint on TV: Connect from Your PC

Need a Presentation Designed?
Click Here To View Our Amazing Portfolio!

This is one of the most common methods of showing your deck on a screen. Most television sets these days come with an HDMI port to connect your laptop via cable. Simply locate your TV and PC’s HDMI ports and plug in the two ends of the cable. Make sure you’ve pressed the AV button on your television remote control to select the correct HDMI output.

Once you’ve connected the two devices, your laptop screen should automatically show on your TV.

Control the flow of your presentation from your PC like a standard PowerPoint but project it on a bigger screen. This lets you engage your audience by putting your visuals on a widescreen while having complete control of your deck

2. Save It as a Video

PowerPoint on TV: Save as a Video

Need a Pitch Deck Designed?
Click Here To View Our Amazing Portfolio!

If you want to free your hands entirely as you present, save your PowerPoint as a video instead, as suggested in Microsoft Office’s guides.

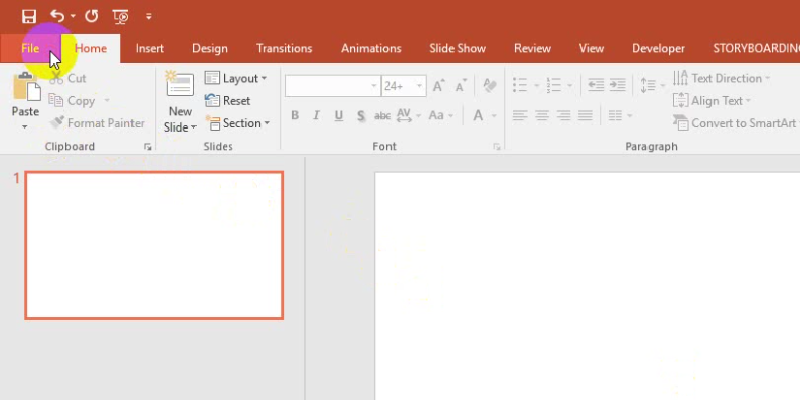
This is an option available on PowerPoint 2010 onward. On the File menu, click Save & Send, then select Create a Video.

You can still play your deck on a TV in this format by saving your video to a USB flash drive or burning it on a DVD. Most flat-screen televisions have USB ports to attach your flash drive and open video files.

On the other hand, those without a flash drive can burn their video presentation into a CD or DVD. A self-presenting deck in this form aids your presentation while letting you focus on content and delivery.

3. View It on Apple TV

PowerPoint on TV: View on Apple TV

Enterprise Presentation Design at Scale…
Click Here To View Our Amazing Portfolio!

Apple TV is a micro-console that uses a Wi-Fi connection or local network to stream media to your television screen. Apple developed it to bring the innovation of apps to TV. To use Apple TV for your PowerPoint, you’ll still need to save it as a video file.

Make sure that the file format is compatible with Apple TV. If you’re not sure what to save your presentation as the usual file format is .MP4. You can also upload your video presentation on iTunes and sync it with Apple TV.

From there, you can watch and present your video hands-free as well. However, since this option needs the macro-console around the television, you may need to reserve it for intimate family gatherings or occasions where there’s no pressure to set up quickly.

Bonus Tip: Two Different Screens

PowerPoint on TV: Different Screens

Have an Upcoming Conference?
Click Here To View Our Amazing Portfolio!

Although PowerPoint was initially meant to be projected from a computer screen to a bigger one, the two screens don’t have to show the same thing.

For example, if you have helpful comments attached to your slides, you’ll be able to view them using the Presenter View feature without projecting your notes to the audience. Seeing your original screen can give you more than just a guide to follow during your pitch.

Your notes act as prompts when you encounter mental blocks. You don’t have to read directly from them, but specific keywords may help trigger a thought you plan to expound on. However, remember to move away behind your laptop and engage the audience with your body language.

If there aren’t any helpful notes on your slides, you can either have someone click on the next slide for you or use a remote control to move across slides according to your pace. Either way, the purpose of having two screens is to interact with the audience without being glued to your PowerPoint.

Remember that your deck is only there to support your presence, not replace you completely. No matter where you decide to project your slides, you’re still obliged to connect with the audience emotionally and physically. This ensures you leave a memorable impression on your listeners during and after your speech.

The Wider, the Better
PowerPoint on TV: Present on TV

We Service the Globe…
Click Here To View Our Amazing Portfolio!

You can play your PowerPoint anywhere—from the small screen of a mobile device to the wide screen of a TV. If you’re aiming for the latter, connect directly from your TV to your PC through an HDMI cable. Go through your presentation slide by slide by controlling your TV deck as you would on your computer.

You can also save your presentation as a video and copy it in a USB, burn it to a DVD, or stream it through Apple TV. This leaves your hands free enough to engage your audience with hand gestures and appropriate body language. The last option can take some time setting up, so you might not be able to use it all the time.

Television has evolved to far more uses than viewing shows. Use it to showcase your deck to family and friends in the confines of your living room, or use it in a corporate setting.

If you’re having trouble with your presentation needs, our SlideGenius experts are here to lend an ear. Contact us today for a free quote!

High Quality, Fast, Columbus PowerPoint Design
Get a FREE Design Quote Now!

References

“Apple – Apple TV.” Apple. www.apple.com/tv/
“Turn Your Presentation into a Video.” Office Blogs. www.support.office.com/en-us/article/Turn-your-presentation-into-a-video-c140551f-cb37-4818-b5d4-3e30815c3e83

3 Ways to Live Stream Your PowerPoint Presentation

Distance shouldn’t be a barrier between you and your audience. Bring your pitch out of the boardroom and into the Web. Reach out to a wider audience with your deck without sacrificing your presence.

Live-stream your PowerPoint in three ways:

1. Share as a Link

In his article on digital video hub Field59, Michael Worringer gives his readers a run-through on how to broadcast your presentation from PowerPoint 2010 and 2013 by sharing it as a link.

For the purpose of this tutorial, we’ll be using PowerPoint 2013.

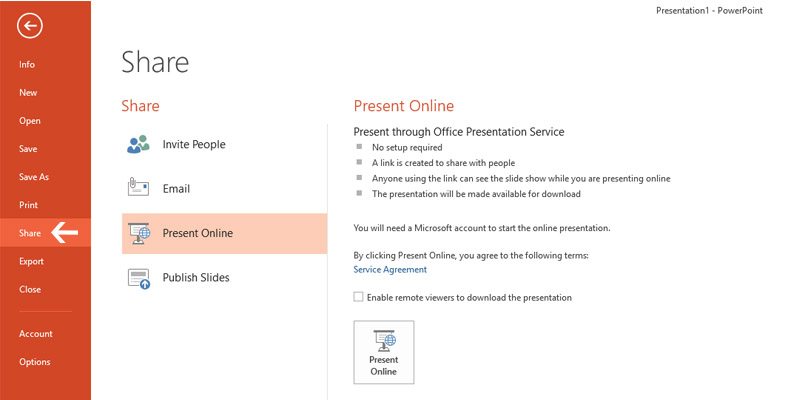
Unlike its 2010 version, whose Broadcast Slide Show option is found in the Slide Show tab, PowerPoint 2013 lets you live-stream your presentation through the Share option in the File tab.

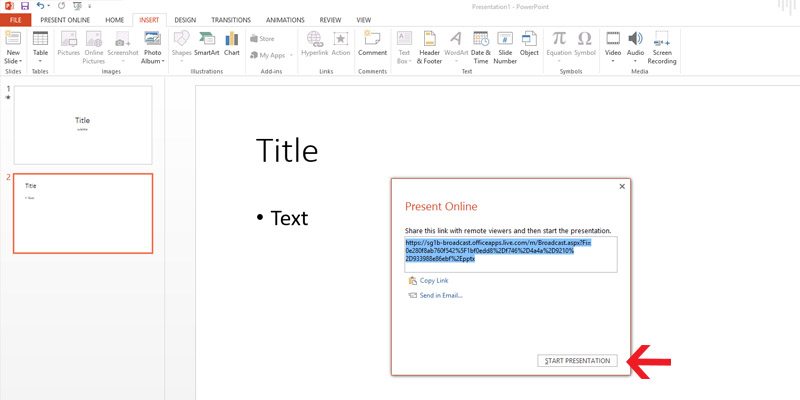
How to live stream your PowerPoint: Present OnlineA dialog box will appear with your presentation’s custom URL once you click Present Online. Copy the link or send it via email to your audience.

After they’ve received the link, click Start Presentation. Now you’ll be able to guide your viewers through each slide in real time at your own pace.

How to live stream your PowerPoint: Start Presentation

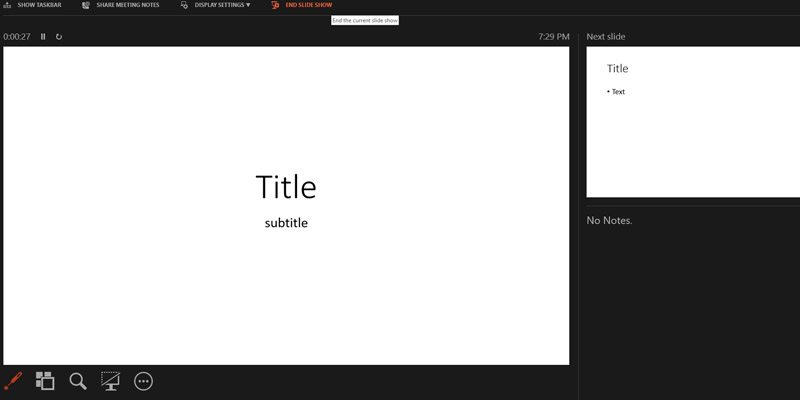
Below, you’ll find how Presenter View will appear on your screen. However, your audience will only see your slide show as you present it.

How to live stream your PowerPoint: Presenter View

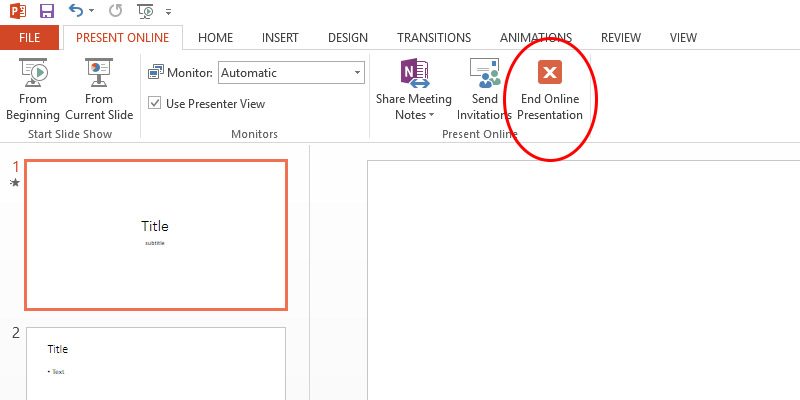
Once you’re done, exit the slide show mode and select End Online Presentation in the Present Online tab.

How to live stream your PowerPoint: End Online Presentatin

The slight downside to this broadcast method is that while you’re free to share your PowerPoint, some of your original deck’s features may be compromised. All transitions will be set to ‘fade’ from the audience’s view, and a file size may be imposed on your upload, depending on your broadcast service.

A compact and concise deck is more advisable for this PowerPoint live-stream technique to minimize the lag in your loading times.

2. Use Office Mix

If you’re using PowerPoint 2013 and are subscribed to Office 365, live streaming becomes even easier with the downloadable free add-in Office Mix.

Unlike the previous method, Office Mix is more accommodating with your slide contents. You’re free to add audio, video, polls, and quizzes to your slides. This is especially helpful for educators who want to track their students’ progress outside the classroom and for presenters who want to maximize audience engagement using their deck.

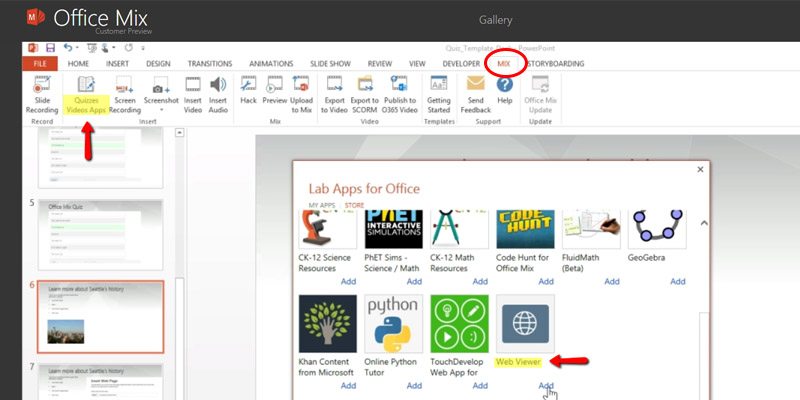
These are all available in the Quizzes Video Apps found in the Mix tab that will appear once you’ve downloaded it.

How to live stream your PowerPoint: Quizzes Videos AppsSource: https://mix.office.com/watch/qn821zf10bni

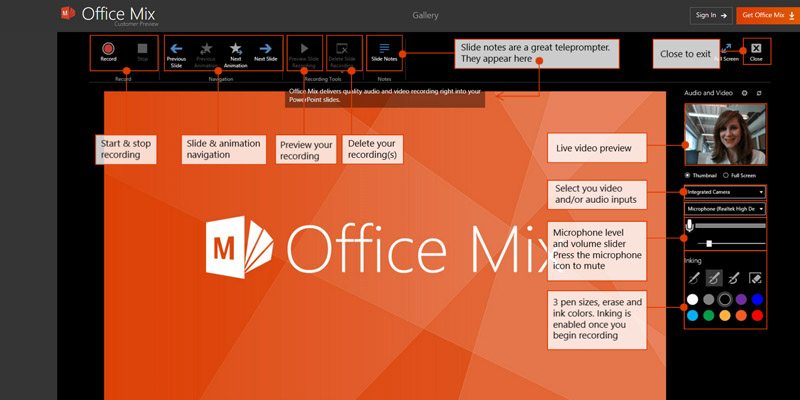
There’s also live digital inking, a more hands-on approach to presentation that lets you guide students through your slides in real time using video, audio, and illustration.

How to live stream your PowerPoint: Live Digital InkingSource: https://mix.office.com/watch/1uoglxt8jp9mt

Office Mix has its own site dedicated to help users navigate through this handy feature. First-timers can benefit from its tutorials that show Mix at work.

Similar to the Broadcast Slide Show in PowerPoint 2010, Office Mix requires an Internet connection to share your presentation to a selected audience. However, another unique option of this add-in lets your audience review and play back your slides to their own pace even after you’ve exited your slide show.

True to its name, Mix crosses the boundaries between the Microsoft Office programs. Import viewers’ data and feedback on your deck for a more in-depth analysis.

3. Upload to Online Platforms

The third route to live-streaming your PowerPoint doesn’t let you interact with your audience as much, but it may be the easiest yet.

If you don’t have the last two PowerPoint features, you can upload and design your presentation using a private account to online platforms made for deck hosting, such as SlideShare.

Publishing your slides on online platforms is meant to improve reaching out to a wider audience. Although you can configure your uploaded deck’s settings to selected viewers, following default settings leaves your deck open for public viewing. You can add tags to make your PowerPoint easily searchable online, further reinforcing its inclination towards mass sharing.

At the same time, this technique can be considered a combination of the previous two PowerPoint live-streaming methods. It has a file size limitation like PowerPoint 2010, but it lets your audience enjoy your presentation at their pace, like Office Mix. Making use of online platforms requires compressing your slide contents into a file size that you can manually upload to the website.

Conclusion

Your deck is an important part of your presentation. Don’t let the distance between you and your audience deter you.

Broadcast your slide deck using three different methods, depending on the type of program available to you and on your intended audience. Share your PowerPoint with a link and broadcast it live with PowerPoint 2010 and 2013. Interact with your viewers in real time with Office Mix. However, if neither of these are available to you, you can always upload your presentation to an online platform like SlideShare.

There are a number of ways to make your presentation accessible. Just reach out to the one that works best for you.

SlideGenius Blog Module One

Get hundreds of PowerPoint slides for free.

Sign up for your free account today.

Sign Up now

References

Worringer, Michael. “How to Broadcast a PowerPoint Presentation with a Live Stream.” Field59 Inc. April 21, 2015. www.field59.com/broadcast-powerpoint-presentation-live-stream
“What Is Office Mix.” Office Mix for Teachers. www.mixforteachers.com/what-is-office-mix.html

Featured Image: “Man Holding Laptop Computer Typing While Dog Watches” by Image Catalog on flickr.com

7 of PowerPoint 2016’s Best New Features

PowerPoint is one of the most important programs in Microsoft Office. It features a competitive range of graphical and presentation tools, making it useful for both personal and business applications. PowerPoint 2016, its most recent version, marks almost three years of productivity since the last update. This newest application doesn’t come with dramatic changes. In fact, most of its additional features are enhancements from the previous version.
What sets the real difference with PowerPoint 2016 (and with Office 2016 in general) is the fact that it focuses on enhancing user experience on the cloud. It encourages a collaborative workspace where documents can be shared and used online. It also aims to represent and ultimately fine-tune the synergetic culture that pervades the current work system.
Basically, what Microsoft wants is to get consumers into a new way of thinking about its products. The techno giant wants its brand to be associated with cloud availability, innovation, and timeliness. By offering new features and constant updates, Microsoft aims to pan out its new brand identity—but, of course, consumers need to be onboard for that to happen.

Is This Upgrade Worth Your Money?

Now, the question is, would upgrading to PowerPoint 2016 be in your best interest? Or can you work just as fine with the version you have, however old? The simple answer is this: you won’t miss out on anything big by choosing to not upgrade. Upgrading is not compulsory, after all. You’ll still have the basics that come with every version—all you’ll miss are the new features.
So, the real question now is whether you want the new features or not. Remember, a new version means a new software, and a new software means smarter and more updated features. Finally, you have to remember that PowerPoint is used by over 500 million users worldwide, with 120 million of them using it for business and educational purposes. Just imagine how many of that number have already chosen to upgrade their accounts. Worth a thought, isn’t it?
To help you decide whether or not PowerPoint 2016 is worth your money, here’s an infographic outlining some of its best and newest features.

Resources:

Bjork, Dawn. “What Are the Top 10 PowerPoint 2016 New Features?” The Software Pro. n.d. thesoftwarepro.com/powerpoint-2016-new-features
Sartain, JD. “Check Out PowerPoint 2016’s Best New Features: Charts, Effects, and More.” PC World. January 18, 2016. www.pcworld.com/article/3018735/software/check-out-powerpoint-2016s-best-new-features-charts-effects-and-more.html
“PowerPoint Usage and Market Share.” Infogram. n.d. infogr.am/PowerPoint-usage-and-Marketshare
“What’s New in PowerPoint 2016.” Microsoft Training. August 17, 2015. www.microsofttraining.net/b/whats-new-powerpoint-2016

2 Ways to Easily Embed Videos in PowerPoint 2016

DOWNLOAD HUNDREDS OF FREE POWERPOINT PRESENTATIONS

Click Here to Sign Up for FREE
Note: This tutorial is also applicable to Microsoft PowerPoint 2013.
Videos are effective at both informing and entertaining audiences and are useful for minimizing text.  As visual aids, they’re great for explaining complicated subjects or demonstrating a product or process, making your presentation more dynamic and engaging.
That’s why you should embed videos in PowerPoint 2016 for an audience that has trouble paying attention to long strings of text. Videos can also be useful for minimizing the slides you need so your pitch can be more succinct.

High Quality, Fast, Columbus PowerPoint Design
Get a FREE Design Quote Now!

Open Today!

You’d be impressed to find out that you can put videos into your deck without even leaving PowerPoint. Let’s run through two ways you can place videos into your slides for a more dynamic and engaging presentation.
Before you start embedding videos into your slide, check if the videos you want to use are free for personal or commercial use. If not, ask for permission from the video owner first.

DOWNLOAD HUNDREDS OF FREE POWERPOINT PRESENTATIONS

Click Here to Sign Up for FREE

A. Embedding Online Videos

When you link a video to your PowerPoint, it can only be played if you have an online connection. If you’ll use videos from the Web, make sure you have a reliable Internet network during your pitch.
There’s plenty of video-sharing Web sites out there, but for this tutorial, let’s use YouTube as an example.
1. Go to the ribbon and click on the Insert tab.
how to insert video in powerpoint 20162. Under the Media group, click on Video and select “Online Video…” from the dropdown options.
how to insert online video in powerpoint 20163. A window named Insert Video will appear. This will look different from the option to insert a video directly from your PC. If you’re signed in with your Windows ID, you’ll see an additional option aside from YouTube and From Video Embed Code: OneDrive – Personal, which lets you embed videos directly from your OneDrive account.

High Quality, Fast, Columbus PowerPoint Design
Get a FREE Design Quote Now!

Open Today!

how to insert video in powerpoint 20164. If you’re not signed in, or if you don’t have a Windows ID, only YouTube and From Video Embed Code will appear as your options.
 how to insert YouTube video and From Video Embed Code in powerpoint 2016This is a helpful feature to have when you’re editing a presentation on the go. However, you need to make sure you’re logged in with your Windows ID to access this feature.

High Quality, Fast, Columbus PowerPoint Design
Get a FREE Design Quote Now!

Open Today!

how to embed video in powerpoint 2016
These options each have a box beside it, which you’ll fill out with relevant information. We’ll walk you through each one below.
YouTube
Simply paste your video’s URL into this field. Additionally, PowerPoint can do more than just that.
6*SlideGenius tip:
This field also serves as a search box. You can type a few keywords, and all videos related to your search query will show up.
how to embed video in powerpoint 2016: choosing video for powerpoint
Wait for the video’s thumbnail to load. Once it’s loaded, click on it. Then, click Insert to place the video into your slide. You can drag the video around and resize it whichever way you want.
embed video to powerpoint 2016
From Video Embed Code
You can grab a video’s embed code from its YouTube page and paste it into this field. Be sure to check the video’s pixel width and height in the embed code (written as ‘width=”___” height=”___”’). Plugging in this code will resize the video to those dimensions and may result in different resolutions across screens.
You can also manually edit the numbers in the “width” and “height” sections to make the video fit your slides. This helps if you want all of your videos to follow a specific size throughout your presentation.

how to embed video in powerpoint through video embeded codeB. Embedding Videos from Your PC

You can’t always rely on reliable Internet access when embedding online videos. The good thing is that you can embed videos you’ve saved on your computer. Whether your venue has good reception or not, deliver your presentation as you intended—with visually impressive results.
1. Go to the ribbon and click on the Insert tab.
how to embed video from my computer in powerpoint 20162. Under the Media group, click on Video and select Video on My PC… from the dropdown options. A window named Insert Video will appear, which will allow you to choose among your personal or downloaded files.
how to embed video from my PC to powerpoint presentation3. Once you’ve clicked on the video you want to embed, go to the lower right corner of the Insert Video window and click on the Insert button.
inserting video clip in powerpoint 2016
That’s it! You’ve embedded an offline video into your PowerPoint.

Bonus Info: Where to Find Video Embed Codes in YouTube

1. Open your Web browser of choice. Then, go to the YouTube page of the video you want to embed.
Where to Find Video Embed Codes in YouTube2. Look for the Share button below the Subscribe button. Click on it to reveal three tabs: Share, Embed and Email.
Where to Find Video Embed Codes in YouTube3. Click on the Embed tab. A box with the highlighted embed code will appear.
Where to Find Video Embed Codes in YouTube4. Once you’ve found the embed code, right click on the highlighted text and copy. You can also use the keyboard shortcut Ctrl + C. To do this, hold down Ctrl, then press the C key on your keyboard.

Where to Find Video Embed Codes in YouTube

Watch this video tutorial and learn how to embed videos in PowerPoint 2016

[vc_raw_html]JTNDc2NyaXB0JTIwY2hhcnNldCUzRCUyMklTTy04ODU5LTElMjIlMjBzcmMlM0QlMjIlMkYlMkZmYXN0Lndpc3RpYS5jb20lMkZhc3NldHMlMkZleHRlcm5hbCUyRkUtdjEuanMlMjIlMjBhc3luYyUzRSUzQyUyRnNjcmlwdCUzRSUzQ2RpdiUyMGNsYXNzJTNEJTIyd2lzdGlhX3Jlc3BvbnNpdmVfcGFkZGluZyUyMiUyMHN0eWxlJTNEJTIycGFkZGluZyUzQTU0LjE3JTI1JTIwMCUyMDAlMjAwJTNCcG9zaXRpb24lM0FyZWxhdGl2ZSUzQiUyMiUzRSUzQ2RpdiUyMGNsYXNzJTNEJTIyd2lzdGlhX3Jlc3BvbnNpdmVfd3JhcHBlciUyMiUyMHN0eWxlJTNEJTIyaGVpZ2h0JTNBMTAwJTI1JTNCbGVmdCUzQTAlM0Jwb3NpdGlvbiUzQWFic29sdXRlJTNCdG9wJTNBMCUzQndpZHRoJTNBMTAwJTI1JTNCJTIyJTNFJTNDZGl2JTIwY2xhc3MlM0QlMjJ3aXN0aWFfZW1iZWQlMjB3aXN0aWFfYXN5bmNfZWhrbHd3a2dpaSUyMHZpZGVvRm9hbSUzRHRydWUlMjIlMjBzdHlsZSUzRCUyMmhlaWdodCUzQTEwMCUyNSUzQndpZHRoJTNBMTAwJTI1JTIyJTNFJTI2bmJzcCUzQiUzQyUyRmRpdiUzRSUzQyUyRmRpdiUzRSUzQyUyRmRpdiUzRQ==[/vc_raw_html]

Now you know how to embed offline and online videos!

Thanks to continuous software updates, images and videos are now easier to embed, giving you more possibilities to visually enhance your presentation. Make sure that you carefully apply each step for a more effective and attention-grabbing PowerPoint deck.
To deliver a more dynamic and engaging animated PowerPoint presentation, get in touch with a SlideGenius expert. We can even offer you a free quote.

DOWNLOAD HUNDREDS OF FREE POWERPOINT PRESENTATIONS

Click Here to Sign Up for FREE

Recover Your Unsaved File in PowerPoint 2013

Unsaved work can happen for a number of reasons. It can happen when there’s a power failure or a system crash, or for whatever reason, maybe you just forgot to hit “Save.”
Don’t worry. Recovering an unsaved file is possible in PowerPoint. In fact, there’s more than one way to recover it. These features are enabled by default, so you’re guaranteed to get your file back.
Be warned that it’s generally not recommended to change these settings because you’ll never know when you need to save unsaved work again.
This guide will point you to where an unsaved file usually goes and what to do to recover it.

Unsaved Files

For owners of Microsoft Office 2010 and higher, recovering an unsaved file is made even easier. However, for users that have the older version of Microsoft Office, refer to this link.
This tutorial will be using PowerPoint 2013, meaning we can access the option also known as AutoRecover.
1. Go to the ribbon and click on File.
recover your unsaved file in PowerPoint 2013: Autorecover
2. In the second column that displays Recent Presentations, scroll down to the bottom and you’ll see a button that reads Recover Unsaved Presentations.
recover your unsaved file in PowerPoint 2013: recover unsave powerpoint
The files in this folder are only stored temporarily, so save your recovered file properly once you find it. Temporary files are deleted automatically from the system. Do not rely on recovery methods to save your work.
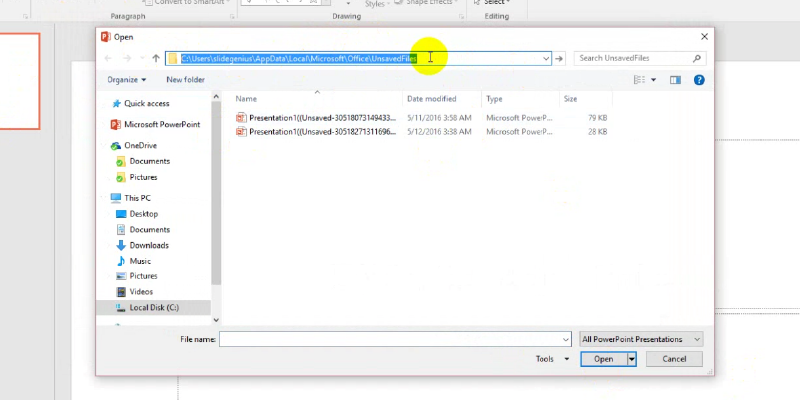
3. A dialog box labelled “Open” will appear which will contain your unsaved file.
recover your unsaved file in PowerPoint 2013: label
Click on the address bar as highlighted in the image. This will show the filepath, displaying the exact location of your file.
Copy and paste the filepath to Windows Explorer: C:\Users\<username>\AppData\Local\Microsoft\Office\UnsavedFiles
Don’t forget to replace <username> with yours when copying the filepath from this article:
You can retrieve an unsaved presentation using this method with ease.

Interrupted Changes

This next method is suitable when your changes were interrupted and you wish to restore the changes you made in your work.
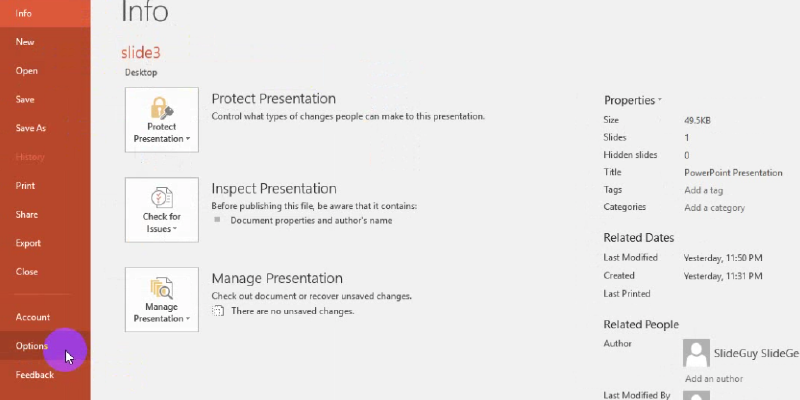
1. Go to the ribbon and click on File> Options.
recover your unsaved file in PowerPoint 2013: interruptive changes
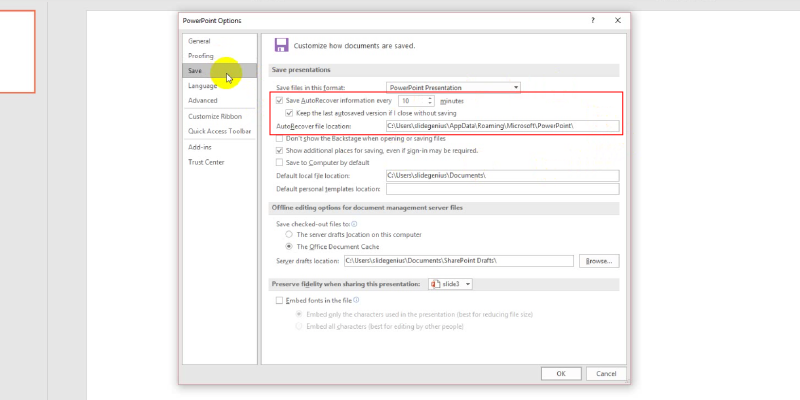
2. A dialog box called “PowerPoint Options” will appear. Go to Save and see if the boxes are checked ☑ in the highlighted image. If yes, then you may proceed to the next step.
recover your unsaved file in PowerPoint 2013
These options need to be present to restore your file’s unsaved changes. You won’t be able to recover your file’s previous state when these aren’t checked.
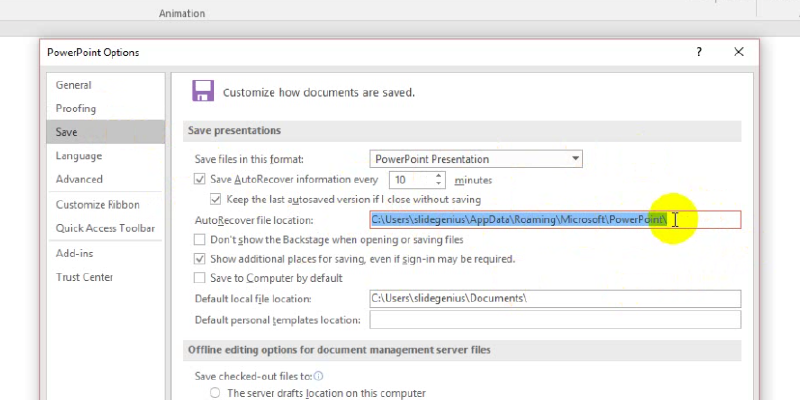
3. Copy the filepath located in the box beside AutoRecover file location. The file can be directly accessed by pasting the filepath in Windows Explorer.
recover your unsaved file in PowerPoint 2013: autorecover file location
Since this tutorial uses PowerPoint 2013 and runs on Windows 8, the filepath looks like this:
C:\Users\<username>\AppData\Local\Microsoft\Office\UnsavedFiles
This filepath will lead you directly to your file. Save this as a separate PowerPoint file and pick up the changes from where you left off.

A Few More Pointers

Avoid relying too much on the recovery functions to save your work because they’re only hosted temporarily in their respective folders. If you leave them there, you’ll never be able to retrieve them after a certain period of time has passed. Always remember to save your files outside of these temporary file folders.
You also don’t want to risk damaging or corrupting your presentation save-states by changing the save settings in PowerPoint. It can be tempting to tweak the settings, but only advanced users should make these changes. In fact, changing these settings is highly discouraged because file recovery is placed there by default for good measure.
Save yourself from any potential headaches in the future and save your files properly.

Resource:

“Recovery of MS PowerPoint Content from Temp Files.” officerecovery.com. www.office-recovery.com/powerpoint.asp

Exporting PowerPoint to Paper: Tips for Enticing Printout Content

Every presenter has been requested the same thing at one point or another: being asked if they have—or if members of the audience can have—printouts of their PowerPoint presentations. This is not a bad thing, per se, especially if you have a great deck with a superb design and an enlightening message that people will want to go back and review everything they learned from your talk.

However, the issue is that slides were designed to be seen through a projector… unless you had the foresight to create your deck specifically for printing. Well then, good for you.

Going from digital to printout isn’t as easy as it looks. Specifically now, in the modern age, there are humongous monitors and projectors that display every pixel perfectly despite their sizes. Ah, the wonders of technology. But transitioning from the old to the new isn’t seamless, and paper sizes can’t compare to digital visual outlets.

To do that, you first need to do a bit of tinkering and adjusting to get your desired quality on paper. Here are a few pointers to consider first.

Exporting PowerPoint to Paper: Check Your Printer

Check Your Printer

As with any competition, you can expect that manufacturers follow different formats with their products. If there’s one constant as far as printers are concerned, it’s that they don’t typically reach the paper’s edge. Printouts will always have margins. However, this is not a printer limitation; it’s rather the software—the printer driver—that causes this.

To remedy this, you can manually adjust it, and this is where the tinkering comes in. You can set custom margins on your printouts and potentially include an additional slide or two. There are different customizations you can do from this screen and in the next, which is…

Exporting PowerPoint to Paper: Print Preview

Print Preview

Print Preview is your friend. Let it guide, help, and aid you. If you’re not sure about the whole format of your printout, you should check it out before you waste ink.

There, you can set and customize different options for your final product: how many slides per page, the spaces in between each slide, the margins (see previous subheading), etc. There are also other settings for whether you want to print on both sides of the paper, the printing sequence (Collated), and whether black and white or grayscale (see next subheading).

This window is basically your last chance to fix how you want your handouts to come out, so appropriating everything according to your preference will make your task easier.

Exporting PowerPoint to Paper: Check Your Design

Check Your Design

Less on the printer, more on your slides now.

The rules are basically the same when creating slides. You’ve got your design basics: colors, background, typography, etc. You’ve also got your image: powerful and meaningful. Lastly, your text as the meat of your talk. Then you’re out to print it.

The question is: “Do your slides look the same on screen and on paper?”

If you are printing your PowerPoint file out, you always have to consider how your slides will look on your handouts—plus the limitations on your printer, vis-à-vis ink levels—and prepare for it. If you’ve got too many images, either beef up your ink supply or delete some. Another option is to print in grayscale or black and white (which, as you would imagine, comes with another set of adjustments).

The bottom line here is that you should tailor your deck to be readable on both mediums. If you need to reduce elements, then do so.

Exporting PowerPoint to Paper: Convert powerpoint into .pdf file

Don’t Print Your Slides

Don’t worry. It’s not what it means; rather, it’s a small technicality that involves converting your PowerPoint file into a type that is considered more universal: PDF

One reason why PDF files are more commonly used is the general ease with printing using Acrobat or Adobe (or other software that can read this file type). There may be more or less the same options, but Acrobat is more in depth than PowerPoint, so it’ll usually take care of problems before your printouts even reach the printer. With such ease, you’re more likely choosing this same route yourself.

Another issue solved is transferring to another computer, for, say, printing purposes since you don’t have a printer. You don’t assume that your PowerPoint settings are the same as everyone’s (unless you’re not customizing your software). Therefore, you’re more likely to meet different formatting altogether when opening your file on a computer that doesn’t adhere to the same settings. This goes especially when you use many customized backgrounds, images, and fonts.

Converting to PDF makes your task—and life—easier by making the file more printable and readable on any computer.

There are multiple considerations to make when shifting from digital to print. With the almost complete independence of technology from traditional media, there’s still the wide gap between the two. Of course, with sufficient study and preparation, the divide is not as big as it seems.

Take the following options to heart. Soon, you’ll be asked to have printouts of your presentation. Take it easy and plan ahead. You’ll do yourself some good that way.


Resources:

Temple, Cooper. “Adjusting Paper Margins in PowerPoint.” Chron. n.d. smallbusiness.chron.com/adjusting-paper-margins-powerpoint-29281.html

Terberg, Julie. “Gain Control over PowerPoint Handouts by Exploring the Print Options.” Training Magazine. November 1, 2002. ip-50-63-221-144.ip.secureserver.net/article/gain-control-over-powerpoint-handouts-exploring-print-options

Wood, James T. “Why Does PowerPoint Print Out the Wrong Margins?” Chron. n.d. smallbusiness.chron.com/powerpoint-print-out-wrong-margins-26575.html

Woods, Paul. “Create PowerPoint Slides Designed Specifically for A4 or Letter Printing.” The New Paperclip. May 26, 2010. www.thenewpaperclip.com/2010/05/26/create-powerpoint-slides-designed-specifically-for-a4-or-letter-printing/#

“How to Create PDF Handouts in PowerPoint 2010.” Cometdocs. November 7, 2011. blog.cometdocs.com/how-to-create-pdf-handouts-in-powerpoint-2010

“Printing PowerPoint: Slide Size v. Printer Page Size.” PPTools. June 7, 2011. www.pptfaq.com/FAQ00774_Printing_PowerPoint-_Slide_size_v-_Printer_Page_size.htm

“Saving Paper and Increasing Readability of PowerPoint Handouts.” Pittsburgh Technical College. n.d. www.ptcollege.edu/uploads/HS-teachers/Saving-Paper-and-Increasing-Readability-of-PowerPoint-Handouts.pdf

Looking for creative presentations that can leverage your business? Enjoy free PowerPoint templates from SlideStore! Sign up today.

Save Your Deck: Methods to Recover an Unsaved PowerPoint File

Sheer panic—that’s probably your first reaction when you realize that you couldn’t save the PowerPoint file you were working on. Maybe the power went out, or your computer unexpectedly crashed. Perhaps you were too preoccupied that you didn’t think to hit “Save.” Whatever the reason, you’ve suddenly lost hours of hard work and have no clue how to get it all back.
Luckily, there’s no reason to stress over losing an unsaved PowerPoint file. Using the latest versions of PowerPoint, you can easily retrieve and recover all your hard work. Follow these steps to recover a PowerPoint file you accidentally lost:

Need a Presentation Designed?
Click Here To View Our Amazing Portfolio!

Method One: Recover Unsaved Presentations

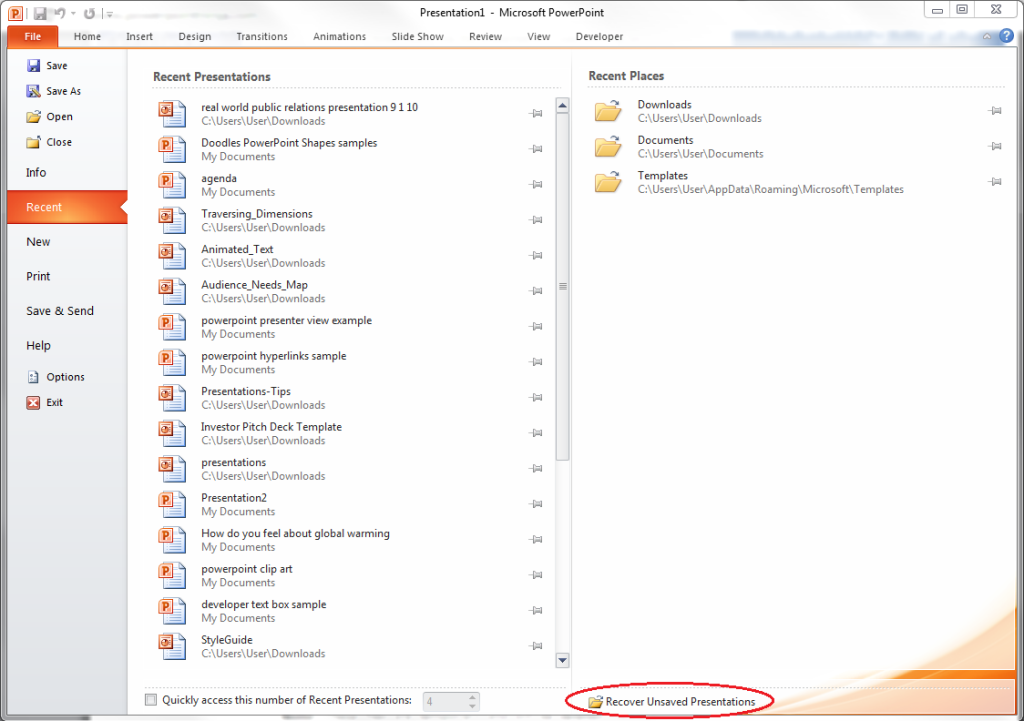
If you were interrupted before saving your PowerPoint file, you could simply look for it in the Microsoft Unsaved Files folder. Go to the File tab, make sure you’re on Recent, and click on Recover Unsaved Presentations. The icon is right below the list of folders under Recent Places.

Recover-Unsaved-Presentations

Everything in the Unsaved folder is a temporary file. Make sure you recover and save everything you need because you might lose it after a few days.

Method Two: AutoRecover

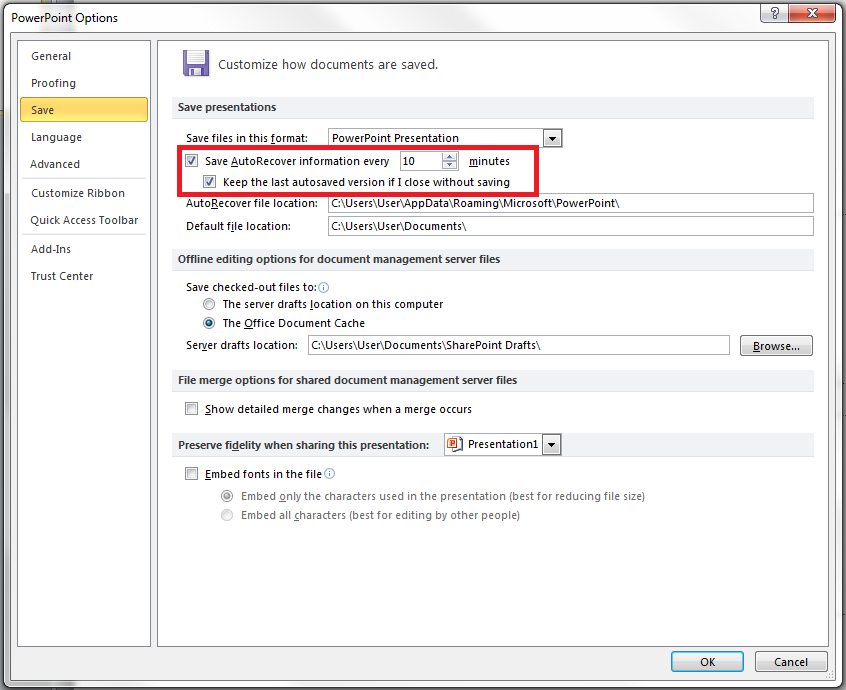
If you’ve been periodically saving your work but was interrupted before you could save specific changes, you can retrieve your PowerPoint file using the AutoRecover function. First, check if you have it enabled. Go to the File tab, click on Options and go to Save. Make sure your options are similar to those in this picture:
PowerPoint-Files-AutoRecover
If you don’t have AutoRecover enabled, there’s no other way to retrieve the changes you made to your PowerPoint file. You will have to redo your work from the last save. But if everything looks good, you can then follow these steps:
1.) Copy the file destination path in the same dialogue box.
PowerPoint-Files-AutoRecover-02
2.) Open Windows Explorer, paste the path on the address bar, and hit Enter.
PowerPoint-Files-AutoRecover-025
To avoid losing crucial information, ensure AutoRecover is enabled every time you create a PowerPoint deck.

Need a Presentation Designed?
Click Here To View Our Amazing Portfolio!

ConclusionSGBlog_SaveYourDeck_Supporting image_SG01_JE-01

Retrieving an unsaved PowerPoint file is a no-brainer as long as you know these basic recovery methods.
You can either open the “Recover Unsaved Presentations” found in the “Recent Places” or use the AutoRecover function to check where that unsaved document must be hiding.
Learn these tricks by heart so you don’t have to worry about getting your presentation back!

How to Group, Ungroup, and Regroup Objects in PowerPoint 2013

Slide elements and text boxes can get buried under a heavy pile of objects without proper management. Now, you no longer have to sift through overlapping images, text boxes, and charts once you learn how to group slide objects.

The group function is very useful to learn so you can keep your slide workspace organized and save yourself from headaches. With this function, you no longer have to drag each slide object one by one. As the name implies, you can group all them at once and drag them around with ease.

Grouping shapes and images in PowerPoint lets you manage different objects at the same time. This is helpful for moving and rearranging different groups as a single object.

How to Group Objects in PowerPoint 2013

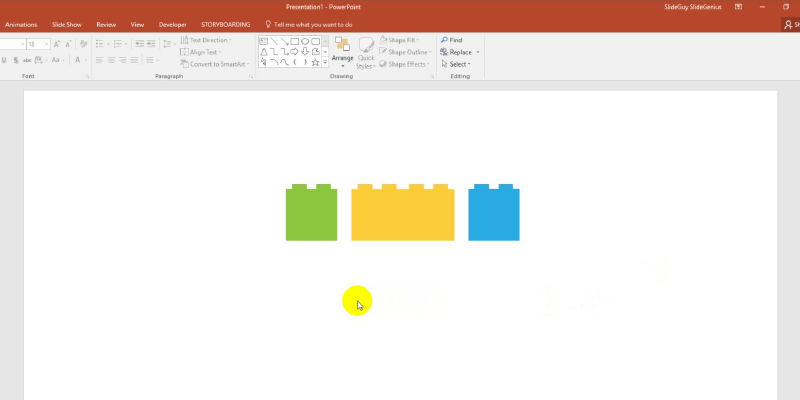
1. Open your PowerPoint file and decide which objects you want to combine or reorganize.

How to Group, Ungroup, and Regroup Objects in PowerPoint 2013

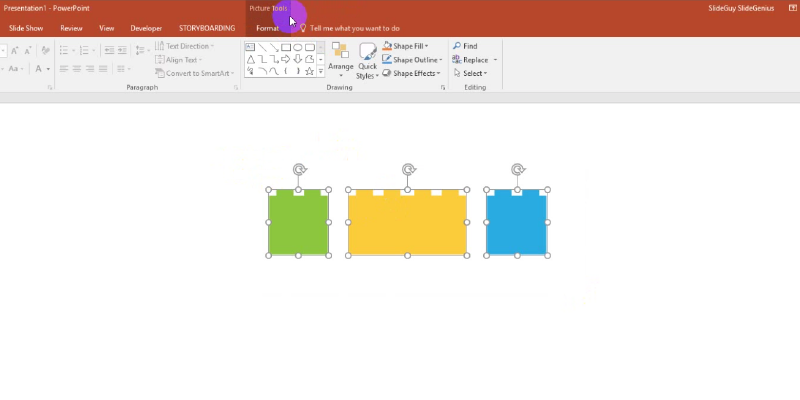
2. Click on the slide you choose to adjust. Press and hold Shift then left-click each object that you want to group.

Group, Ungroup, and Regroup Objects in PowerPoint 2013: Group

3. Selecting the images automatically brings up Picture Tools above the Format tab.

Group, Ungroup, and Regroup Objects in PowerPoint 2013: Picture tools  src=

  • You can also press Ctrl+G to group your selected slide objects.

How to Ungroup?

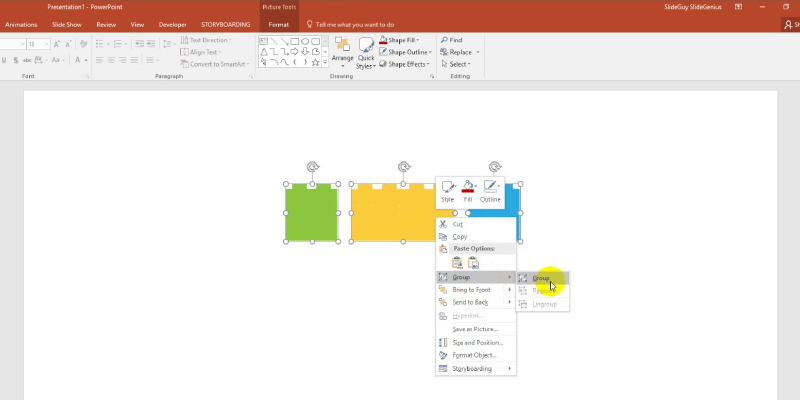
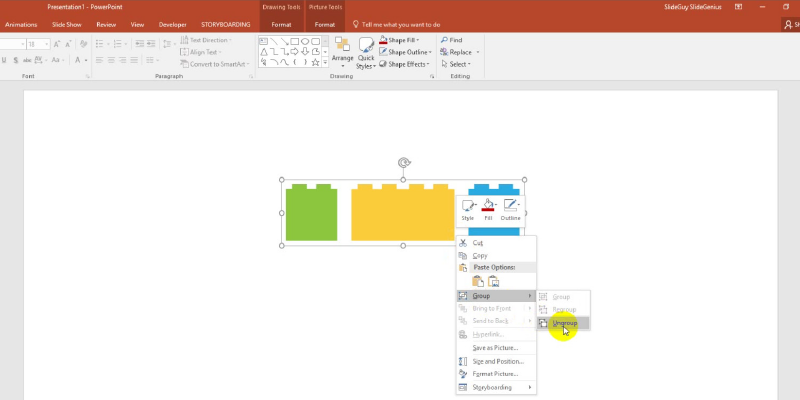
To disable the Group function, reselect the grouped object by holding the Shift key. Right click the selected object and choose Group and then Ungroup from the resulting dropdown option in the context menu.

Group, Ungroup, and Regroup in PowerPoint 2013: Ungroup

How to Regroup?

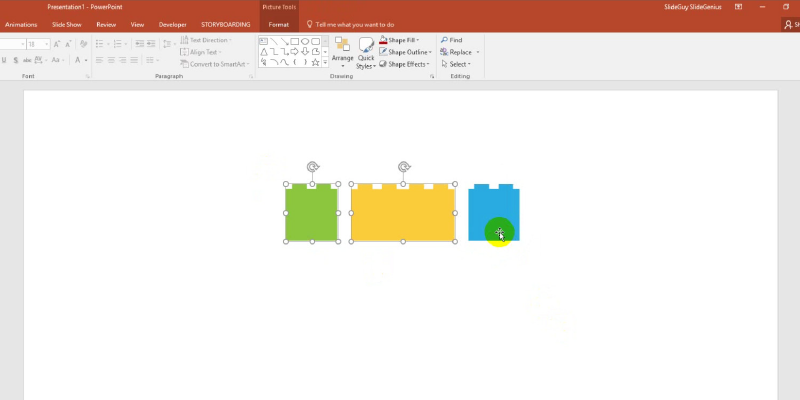
1. If you want to adjust an individual object without affecting others in the group, click on that object.

Group, Ungroup, and Regroup Objects in PowerPoint 2013: Regroup

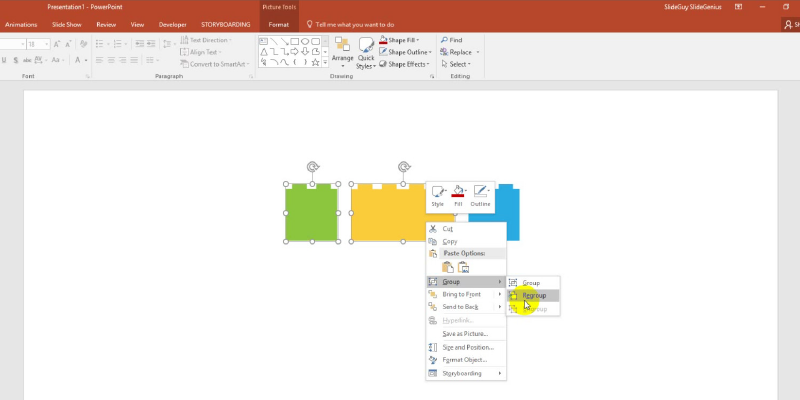
2. Once you’re done, right click any of the objects that were formerly in a group then select Group and then Regroup in the context menu.

Group, Ungroup, and Regroup Objects in PowerPoint 2013: Regroup objects

You‘ll notice that PowerPoint remembers what you had previously grouped and ungrouped.

What if it doesn’t allow you to group?

If the Group button doesn’t work, the object or the picture itself might be in a placeholder. Try to combine an image with a placeholder or textbox, and you’ll notice that it won’t be grouped together.

To solve this, remove that object outside the placeholder and move it to another position in the slide.

Add This to Your PowerPoint Arsenal

The group function doesn’t just lessen your workload; it also reduces slide clutter. Having too many things on your slide can look and feel overwhelming to tackle.

Use the Group functions by moving, resizing, and rotating objects on each slide and manage your workspace more efficiently. You can also use Ungroup to isolate a slide object in case you want to remove it. Finally, you have the option to add another object into an existing group using Regroup.

To help you craft a hassle-free PowerPoint deck, SlideGenius experts can assist you and offer you a free quote!


Resource:

“Group or Ungroup Shapes, Pictures, or Other Objects.” Office. n.d. support.office.com/en-US/article/Group-or-ungroup-shapes-pictures-or-other-objects-D8BDBF7A-FB9E-4F24-8596-6679A9C6ED15

Looking for creative presentations that can leverage your business? Enjoy free PowerPoint templates from SlideStore! Sign up today.

How to Set the Playback Options in PowerPoint 2013

As discussed in the previous post, you can embed videos from YouTube to PowerPoint in a few, easy steps. Just go to the insert tab, paste the YouTube video’s embed code in the Insert window, and presto! You have a video on your slide.

Your presentation can now be even more dynamic with the addition of a video. However, you can take this further by setting how you want your video to play.

Set the playback options in PowerPoint 2013 to make specific adjustments and gain more control over your videos throughout your pitch.

In this post, we’ll focus on how to use the Playback option under the Video Tools group for a more professional way of presenting videos with the right timing.

Play a Video Clip Automatically or When Clicked

Before you play a video automatically, open the PowerPoint file first and embed a video in your deck.

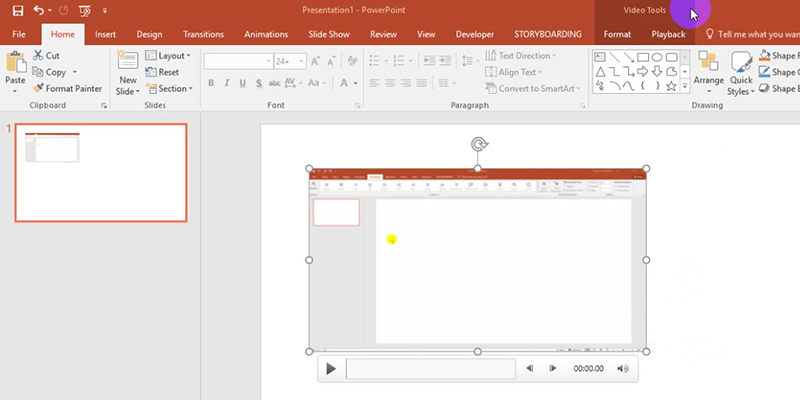
1. Check if the deck is set in the Normal view, then click on the video slide object. Once you’re done, you’ll notice that Video Tools will appear in the ribbon, which includes the Format and Playback options.

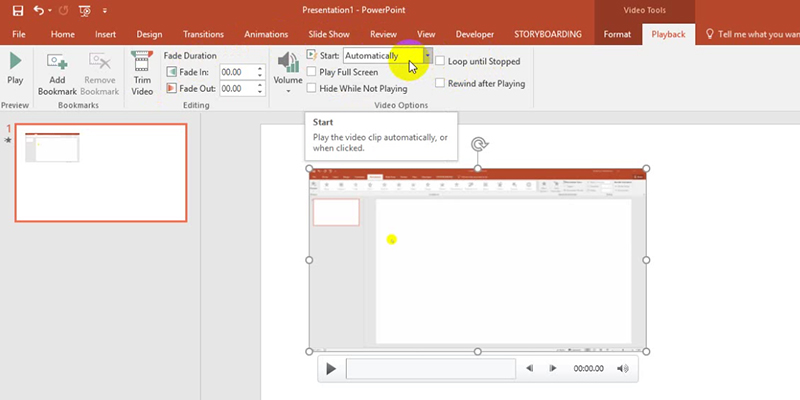
Set the Playback Options in PowerPoint 2013 Tutorials: Video Tools2. Select Playback, and then choose the Automatically option in the Start menu under the Video Options group. This will play the video automatically when you start viewing the slide containing the video itself.

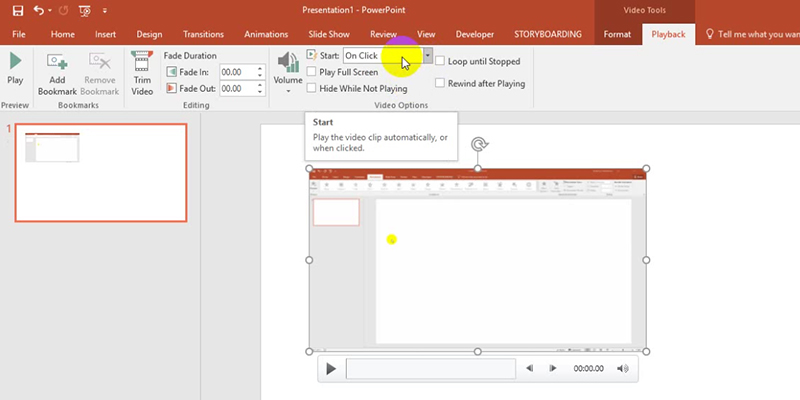
Set the Playback Options in PowerPoint 2013 Tutorials: PlaybackChoose the On Click option if you want to play the video upon clicking the mouse.

Set the Playback Options in PowerPoint 2013 Tutorials: Start on ClickNote: Before setting this option, make sure to disable any animations you’ve applied to your video to avoid any interruptions. Follow the steps above if you haven’t put any animations to it.

Hide and Loop a Video

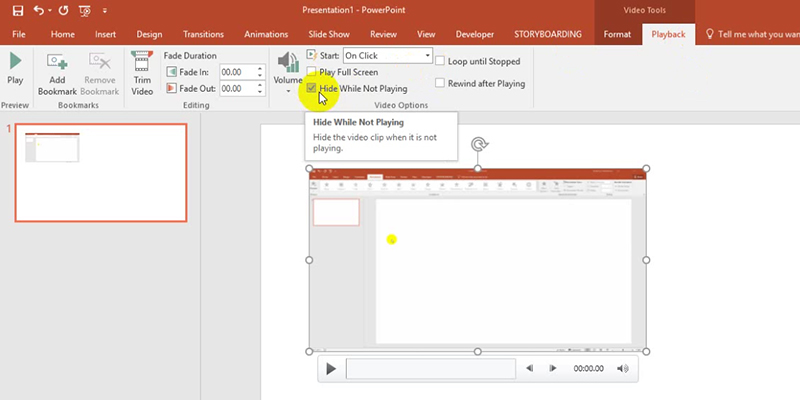
Aside from simply putting a video into your slide, you can also hide it before playing it. Here’s how:

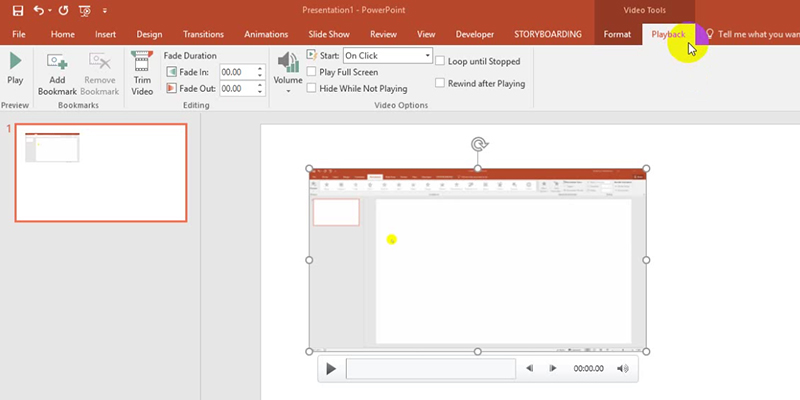
1. Click the video frame, and under the Video Tools, select Playback.

Set the Playback Options in PowerPoint 2013 Tutorials: Video tools  src=

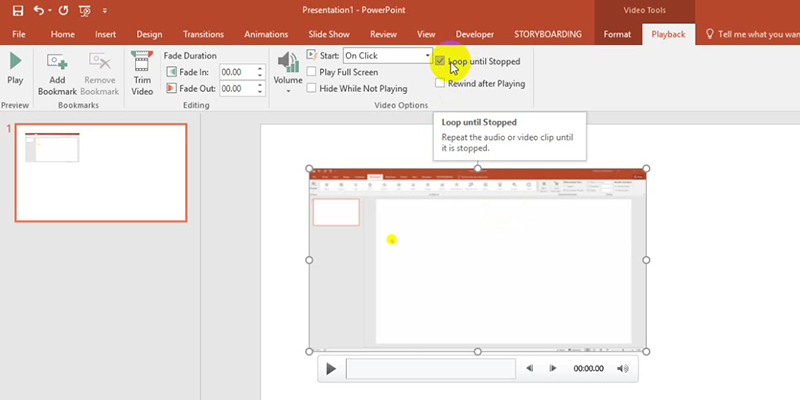
To loop a video which allows you to repeat the video you’ve included in your slide, check the Loop until Stopped box under the Video Options.

Set the Playback Options in PowerPoint 2013 Tutorials: Loop until StoppedConclusion

With PowerPoint’s functions, not only can you embed videos, but you can also control them at your own discretion.

Doing this gives your deck the engaging and persuasive power with the addition of customizing video playback timing and appearance for a seamless presentation overall.

If you’re going for a dynamic and interesting pitch, take advantage of including video playback options in your deck.

To deliver a winning PowerPoint presentation, SlideGenius experts can assist you and offer you a free quote!


Resource:

“Set the ‘Playback’ Options for a Video in Your Presentation.” Office Support. Accessed January 24, 2016. https://support.office.com/en-nz/article/Set-the-Playback-options-for-a-video-in-your-presentation-1267985a-670f-462a-a746-813beae52258

Looking for creative presentations that can leverage your business? Enjoy free PowerPoint templates from SlideStore! Sign up today.

Get More Organized with PowerPoint Presenter View

PowerPoint contains powerful features that often get buried under the comfortable confines of default settings. Unlock the potential of the Presenter view for your presentation and get more out of the program.

Our previous article talked about the different views in PowerPoint 2013 and how these views can help you customize your workflow. There, we explored the eight types of views and the additional two views.

In this post, we’ll be going in-depth on one of the additional views – the Presenter View.

This view essentially acts as the remote control to your presentation. It lets you set the precise length of your presentation and helps you look at your notes when the inevitable mind slip occurs.

You’ll amaze your audience with your ability to move from slide to slide with precise timing. The secret to ending your presentation on the dot is all in the Presenter View.

Maximize all Useful Features of Presenter View

This tutorial uses the version of PowerPoint 2013 with a computer that has two monitors to fulfill the requirement of having two screens present to activate Presenter View.

Starting your slide show automatically brings up Presenter View if you’re using PowerPoint 2013. The program also detects if you have two screens so that it can display the Presenter View and the Slide Show separately. Make sure to check if you already have a projector plugged in.

Press F5 on your keyboard to bring up the Presenter View, which simultaneously brings up the Slide Show.

PowerPoint Presenter View: The Key Areas

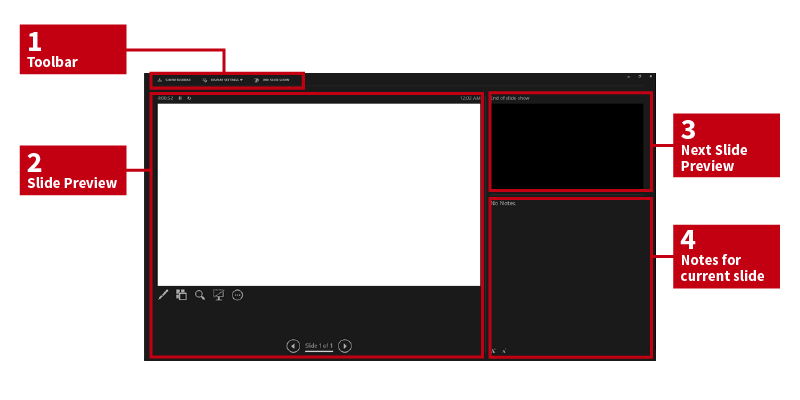
PowerPoint Presenter View: Key Areas

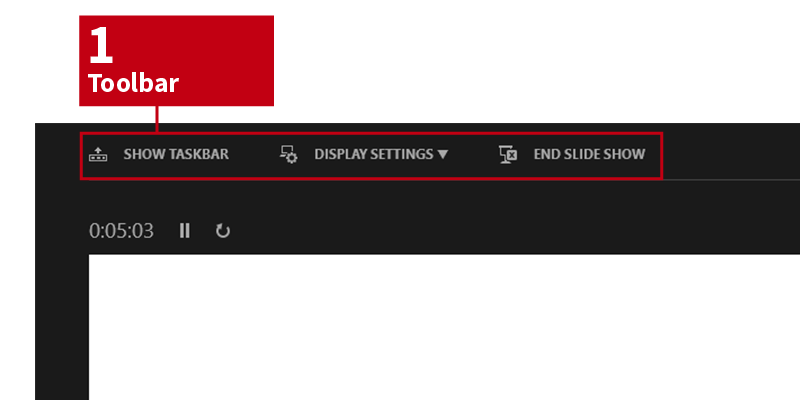
The image above labels the four main areas you’ll notice in the Presenter View. The first, Toolbar (1), has three components: Show Taskbar, Display Settings, and End Slide Show as you see below.

PowerPoint Presenter View: Toolbar

a. Show Taskbar simply shows your computer’s taskbar below the Presenter View. Collapse and expand the taskbar by clicking on this button. The taskbar is hidden by default during your presentation, and this menu item is useful if you need to bring it up.

b. Display Settings is the only item on the menu that has an inverted triangle beside it, indicating that there are other options available in the dropdown menu. Swap Presenter View switches the position of the Presenter view and Slideshow view. The Duplicate Slide Show fills both of your screens with the Slide Show View.

c. End Slide Show closes both screens displaying the Slide Show and the Presenter view.

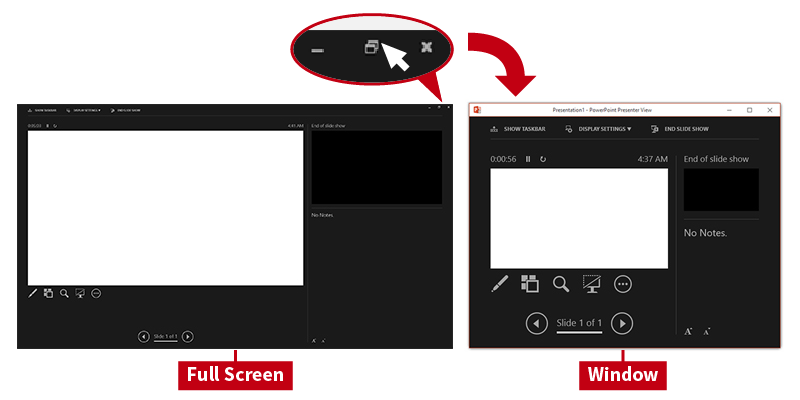
PowerPoint Presenter View: Full Screen vs window

The Minimize, Restore Down, and Close buttons on the upper right corner of the Presenter view Toolbar as highlighted above are another simple but useful set of features.

The Minimize button minimizes the Presenter view. The Restore Down button allows you to resize Presenter view. It looks much more compact than the full-screen view as the image above shows. Be careful since the Close button exits both the Slide Show and Presenter view to end your presentation.

Slide Timing, Preview, and Navigation Area

PowerPoint Presenter View: Slide timing

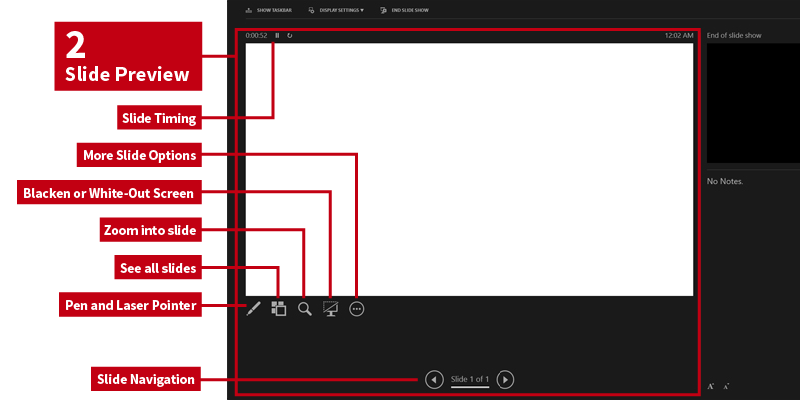
The most crucial feature in the second area is the Timer. Here, you can see how long each slide plays down to the second. The pause and play icons beside the time display allow you to control how long you want a slide to last on screen. Stay within your presentation time limit and cover all your talking points with the help of the timer.

Format your slides to only last a specific duration of time to keep you on track during your pitch. It’s even more important now to rehearse your speech so that you don’t rush your delivery.

See what your current slide looks like in the Slide Preview window between the Timer and Navigation. This understandably takes up the largest space in the Presenter view so that you can see an overview of the slide. In his tutorial on IndieZine, Geetesh Bajaj expounds on the extra controls below the Slide Preview area.

The Slide Navigation (2) at the bottom tells you which slide number you’re on and the total number of slides in your deck.

Next Slide and Notes Area

PowerPoint Presenter View: Notes area

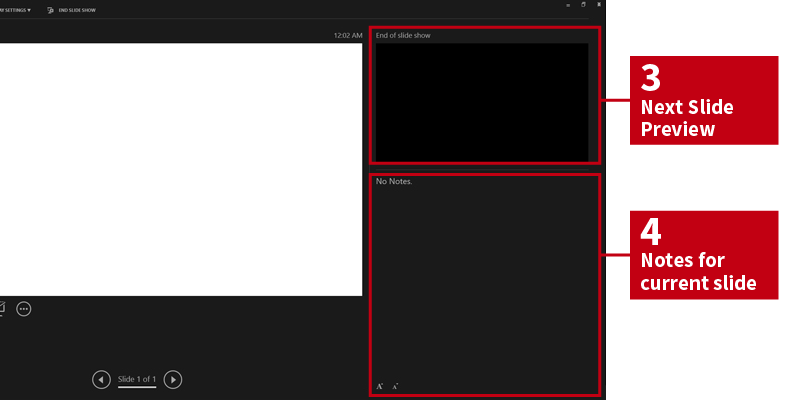
The last two areas beside the Slide Preview are Next Slide (3) and Notes (4). The former displays your upcoming slide to give you time to prepare your next thoughts.  The latter area displays your notes. The text size is adjustable on the Notes area so that you can adjust your notes to be readable from afar.

Conclusion

This thorough look at the Presenter view proves how the program is packed with features that need to be explored. It’s one of many views you can use in PowerPoint 2013 to improve your workspace and help you be in control of precise timing during your pitch.

Presenter view is useful in checking how long your slides are playing and keep you aware and alert of the time you’re spending on stage. In addition to these useful functions, you can preview your next slide and notes.

Prepare yourself with the use of these settings and make Presenter view a valuable helper for your next, big presentation.


Reference

Bajaj, Geetesh. “PowerPoint 2013 Tutorials – Enhanced Presenter View in PowerPoint 2013.” Indezine.
November 9, 2012. Accessed January 7, 2016. www.indezine.com/products/powerpoint/learn/powerpoint-2013/enhanced-presenter-view-ppt2013.html

-->